Deploying an AWS instance from Marketplace images using Terraform

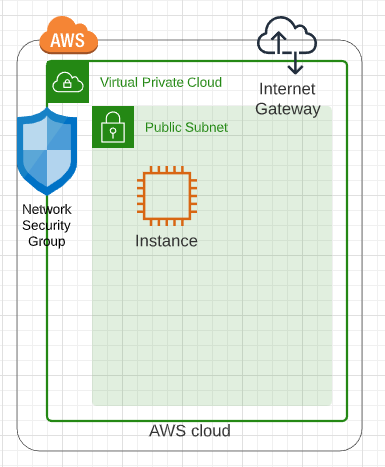
In a previous post we looked at network requirements required to deploy an instance in AWS. In this post we are going to look at what it takes to pull a Marketplace Amazon Machine Instance (AMI) from the marketplace and deploy it into a virtual private cloud with the appropriate network security group and subnet definitions.

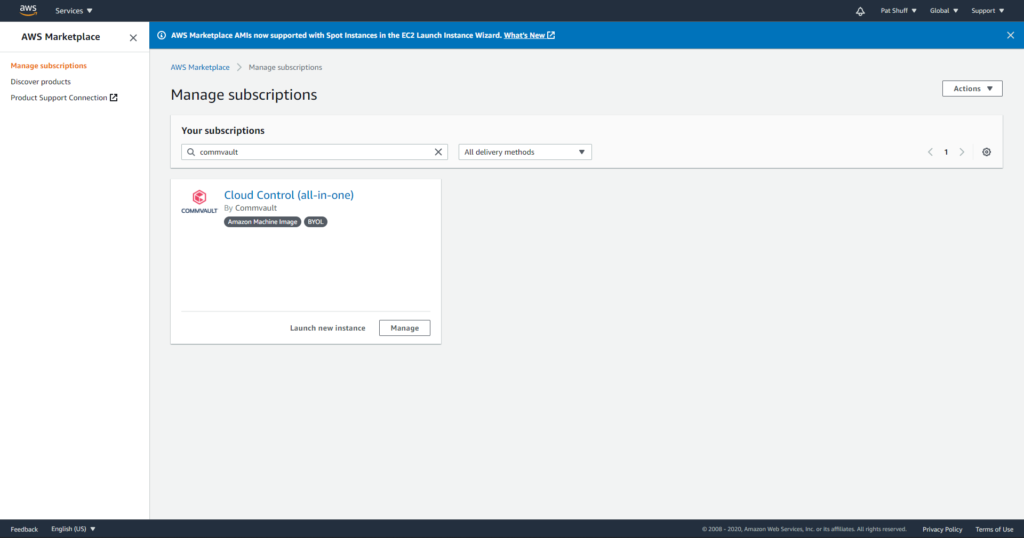
If you go into the AWS Marketplace from the AWS Console you get a list of virtual machine images. We are going to deploy a Commvault CommServe server instance because it is relatively complex with networking requirements, SQL Server, IIS Server, and customization after the image is deployed. We could just as easily have done a Windows 2016 Server or Ubuntu 18 Server instance but wanted to do something a little more complex.

The Cloud Control is a Windows CommServe server installation. The first step needed is to open a PowerShell and connect to Amazon using the aws command line interface. This might require an Install-Module aws to get the aws command line installed and configured but once it is ready to connect to aws by typing in

aws configure

We can search for Marketplace images by doing an ec2 describe-images with a filter option

aws ec2 describe-images –executable-users all –filters “Name=name,Values=*Cloud Control*”

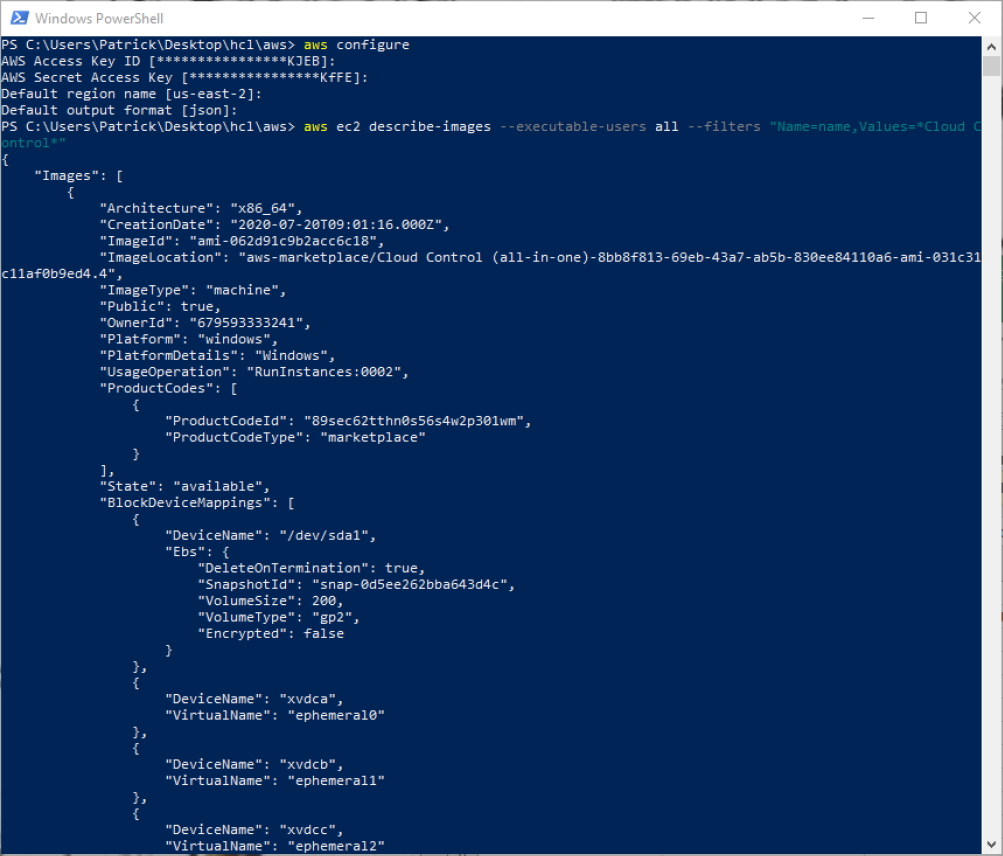
The describe-images command searches for an Amazon AMI that matches the description that we are looking for and returns an AMI ID. From this we can create a new instance pre-configured with a CommServe server. From here we can create out terraform files. It is important to note that the previous examples of main.tf and network.tf files do not need to be changed for this definition. We only need to create a virtual_machine.tf file to define our instance and have it created with the network configurations that we have previously defined.

We will need to create a new variable in our main.tf file that defines the private and public key that we are going to use to authenticate against our Windows server.

resource “aws_key_pair” “cmvlt2020” {
provider = aws.east
key_name = “cmvlt2020”
public_key = “AAAAB3NzaC1yc2EAAAADAQABAAABAQCtVZ7lZfbH8ZKC72A+ipNB6L/upQrj8pRxLwzQi7LVPrameil8/q4ROvWbC1KC9A3Ego”
}

A second element that needs to be defined is an aws_ami data declaration to reference an existing AMI. This can be done in the virtual_machines.tf file to isolate the variable and data declaration for virtual machine specific definitions. If we wanted to define an Ubuntu instance we would need to define the owner as well as the filter to use for an aws_ami search. In this example we are going to look for Ubuntu on an AMD 64-bit processor. The unusualness is the owners that needs to be used for Ubuntu since it is controlled by a third part Marketplace owner.

variable “ubuntu-version” {
type = string
default = “bionic”
# default = “xenial”
# default = “groovy”
# default = “focal”
# default = “trusty”
}

data “aws_ami” “ubuntu” {
provider = aws.east
most_recent = true
# owners = [“Canonical”]
owners = [“099720109477”]
filter {
name = “name”
values = [“ubuntu/images/hvm-ssd/ubuntu-${var.ubuntu-version}–amd64-server-“]
}
}

output “Ubuntu_image_name” {
value = “${data.aws_ami.ubuntu.name}”
}

output “Ubuntu_image_id” {
value = “${data.aws_ami.ubuntu.id}”
}

In this example we will be pulling the ubuntu-bionic-amd64-server image that has hardware virtualization running on a solid state disk. The variable ubuntu-version is mapped to the version of the Ubuntu kernel that is desired. The filter.values does the search in the Marketplace store to find the AMI ID. We restrict the search by searching in the region that we are deploying and use owner “099720109477” as the Marketplace provider.

If we compare this to a CentOS deployment the centos-version variable has a different string definition and a different owner.

variable “centos-version” {
type = string
default = “Linux 7 x86_64”
# default = “Linux 6 x86_64”
}

data “aws_ami” “centos” {
provider = aws.east
most_recent = true
owners = [“aws-marketplace”]

filter {
name = “name”
values = [“CentOS ${var.centos-version}*”]
}
}

output “CentOS_image_name” {
value = “${data.aws_ami.centos.name}”
}

output “CentOS_image_id” {
value = “${data.aws_ami.centos.id}”
}

For CentOS we can deploy 6 or version 7 by changing the centos-version.default definition. It is important to note that the owner of this AMI is not Amazon and uses the aws-marketplace definition to perform the filter. The same is true for the Commvault image that we are looking at.

data “aws_ami” “commvault” {
provider = aws.east
most_recent = true
# owners = [“Canonical”]
owners = [“aws-marketplace”]

filter {
name = “name”
values = [“*Cloud Control*”]
}
}

output “Commvault_CommServe_image_name” {
value = “${data.aws_ami.commvault.name}”
}

output “Commvault_CommServe_image_id” {
value = “${data.aws_ami.amazon.id}”
}

Note the filter uses a leading wildcard with the name “Cloud Control” followed by a wildcard to look for the instance that we are looking for. Once we have the AMI we can use the AMI.id from our search to define the aws_instance definition.

resource “aws_instance” “commserve” {
provider = aws.east
ami = data.aws_ami.commvault.id
associate_public_ip_address = true
instance_type = “m5.xlarge”
key_name = “cmvlt2020”
vpc_security_group_ids = [aws_security_group.cmvltRules.id]
subnet_id = aws_subnet.mySubnet.id
tags = {
Name = “TechEnablement test”
environment = var.environment
createdby = var.createdby
}
}

output “test_instance” {
value = aws_instance.commserve.public_ip
}

If we take the aws_instance declaration piece by piece the provider defines which AWS region that we will provision into Amazon. The vpc_security_group_ids and subnet_id defines what network that this instance will join. The new declarations are

  • ami – AWS AMI id to use as the source to clone
  • associate_public_ip_address – do we want a public or private only IP address with this instance
  • instance_type – this is the size. We need to reference the documentation or our users to figure out how large or how small this server needs to be. From the Commvault documentation the smallest recommended size is an m5.xlarge.
  • key_name – this is the public and private key names that will be used to connect to the Windows instance.

The remainder of the variables like disk, is this a Windows instance, and all the regular required parameters we saw with a vsphere_virtual_machine are provided by the AMI definition.

With these files we can execute from the following files

  • aws configure
  • terraform init
  • terraform plan
  • terraform apply

In summary, pulling an AMI ID from the marketplace works well and allows us to dynamically create virtual machines from current or previous builds. The terraform apply finishes quickly but the actual spin up of the Windows instance takes a little longer. Using Marketplace instances like the Commvault AMI provides a good foundation for a proof of concept or demo platform. The files used in this example are available in github.com.

AWS networking with Terraform

In our previous blog we talked about provisioning an AWS Provider into Terraform. It was important to note that it differed from the vSphere provider in that you can create multiple AWS providers for different regions and give an alias to each region or login credentials as desired. With vSphere you can only have one provider and no aliases.

Once we have a provider defined we need to create elements inside the provider. If our eventual goal is to create a database using software as a service or a virtual machine using infrastructure as a service then we need to create a network to communicate with these services. With AWS there are basically two layers of network that you can define and two components associated with these networks.

The first layer is the virtual private network which defines an address range and access rights into the network. The network can be completely closed and private. The network can be an extension of your existing datacenter through a virtual private network connection. The network can be an isolated network that has public access points allowing clients and consumers access to websites and services hosted in AWS.

Underneath the virtual private network is either a public or private subnet that segments the IP addresses into smaller chunks and allows for instances to be addressed on the subnet network. Multiple subnet definitions can be created inside a virtual private network to segment communications with the outside world and private communications between servers (for example a database server and applications server). The application server might need a public IP address and an private IP address while the database server typically will only have a private IP address.

Associated with the network and subnets are a network security group and internet gateway to restrict access to servers in the AWS cloud. A diagram of this configurations with a generic compute instance is shown below.

The first element that needs to be defined is the AWS Provider.

provider “aws” {
version = “> 2”
profile = “default”
region = “us-east-1”
alias = “east”
}

The second component would be the virtual private cloud or aws_vpc.

resource “aws_vpc” “myNet” {
cidr_block = “10.0.0.0/16”
provider = aws.east
tags = {
Name = “myNet”
environment = var.environment
createdby = var.createdby
}
}

Note that the only required attribute for the aws_vpc is the cidr_block. Everything else is optional. It is important to note that the aws_vpc can be defined as a resource or as a data element that does not create or destroy the network definition in AWS with terraform apply and destroy. With the data declaration the cidr_block is optional given that it has already been defined and the only only attribute needed to match the existing VPC is the name or the ID of the existing VPC.

Once the VPC has been created an aws_subnet can be defined and the two required elements for a resource definition are the cidr_block and the vpc_id. If you want to define the aws_subnet as a data element the only required resource is the vpc_id.

resource “aws_subnet” “MySubnet” {
provider = aws.east
vpc_id = aws_vpc.myNet.id
cidr_block = “10.0.1.0/24”
tags = {
Name = “MySubnet”
environment = var.environment
createdby = var.createdby
}
}

The provider declaration is not required but does help with debugging and troubleshooting at a later date. It is important to note that the VPC was defined with a /16 cidr_block and the subnet was a more restrictive /24 cidr_block. If we were going to place a database in a private network we would create another subnet definition and use a different cidr_block to isolate the network.

Another element that needs to be defined is an aws_internet_gateway to define access from one network (public or private) to another network. The only required element that is needed for the resource declaration is the internet gateway id. If you define the aws_internet_gateway as a data declaration then the name or the vpc_id is required to map to an existing gateway declaration.

resource “aws_internet_gateway” “igw” {
provider = aws.aws
vpc_id = aws_vpc.myNet.id
tags = {
Name = “igw”
environment = var.environment
createdby = var.createdby
}
}

The final element that we want to define is the network security group which defines ports that are open inbound and outbound. In the following example we define inbound rules for ports 80, 443, and 8400-8403, ssh (port 22), and rdp (port 3389) as well as outbound traffic for all ports.

resource “aws_security_group” “cmvltRules” {
provider = aws.aws
name = “cmvltRules”
description = “allow ports 80, 443, 8400-8403 inbound traffic”
vpc_id = aws_vpc.myNet.id

ingress {
description = “Allow 443 from anywhere”
from_port = 443
to_port = 443
protocol = “tcp”
cidr_blocks = [“0.0.0.0/0”]
}

ingress {
description = “Allow 80 from anywhere”
from_port = 80
to_port = 80
protocol = “tcp”
cidr_blocks = [“0.0.0.0/0”]
}

ingress {
description = “Allow 8400-8403 from anywhere”
from_port = 8400
to_port = 8403
protocol = “tcp”
cidr_blocks = [“0.0.0.0/0”]
}

ingress {
description = “Allow ssh from anywhere”
from_port = 22
to_port = 22
protocol = “tcp”
cidr_blocks = [“0.0.0.0/0”]
}

ingress {
description = “Allow rdp from anywhere”
from_port = 3389
to_port = 3389
protocol = “tcp”
cidr_blocks = [“0.0.0.0/0”]
}

egress {
description = “Allow all to anywhere”
from_port = 0
to_port = 0
protocol = “-1”
cidr_blocks = [“0.0.0.0/0”]
}

tags = {
Name = “cmvltRules”
environment = var.environment
createdby = var.createdby
}

}

For the security group the protocol and from_port are the only required definitions when defining an aws_security_group resource. If you declare an aws_security_group data declaration then the name is the only required element. For the declaration shown above the provider and vpc_id to help identify the network that the roles are associated with for debugging and troubleshooting.

This simple video looks at the AWS console to see the changes defined by terraform using the main.tf and network.tf files saved in github.com.

In summary, network definitions on AWS are radically different and more secure than a typical vSphere provider definition with undefined network configurations. Understanding network configurations in Terraform help build a more predictable and secure deployment in the cloud. If you are part of a larger organization you might need to use data declarations rather than resource declarations unless you are creating your own sandbox. You might need to join a corporate VPC or dedicated subnet assigned to your team. Once networking is defined, new and creating things like moving dev/test to the cloud or testing database as a service to reduce license costs. The only step missing from these configuration files are setting up the aws configure and authentication using the AWS CLI interface. Terraform does a good job leveraging the command line authentication so that the public and private keys don’t need to be stored in files or configuration templates.