vsphere_virtual_machine creation

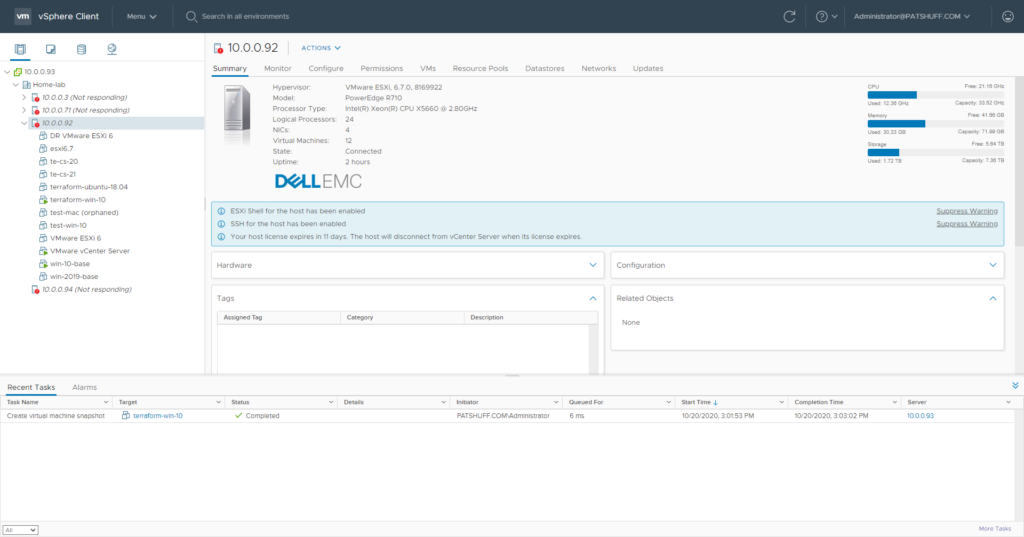
In a previous blog we looked at how to identify an existing vSphere virtual machine and add it as a data element so that it can be referenced. In this blog we will dive a little deeper and look at how to define a similar instance as a template then use that template to create a new virtual machine using the resource command.

It is important to note that we are talking about three different constructs within Terraform in the previous paragraph.

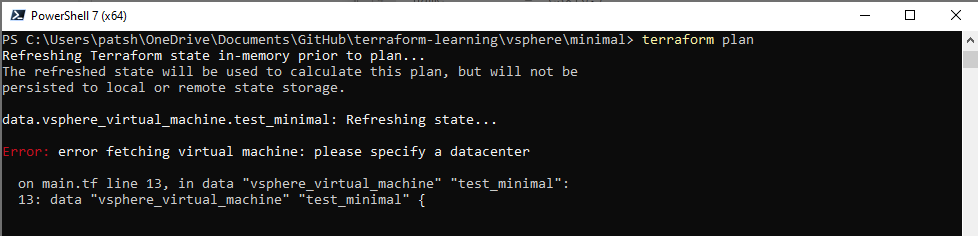
  • data declaration – defining an existing resource to reference it as an element. This element is considered to be static and can not be modified or destroyed but it does not exist, terraform will complain that the declaration failed since the element does not exist. More specifically, data vsphere_virtual_machine is the type for existing vms.
  • template declaration – this is more of a vSphere and not necessarily a Terraform definition. This defines how vSphere copies or replicates an existing instance to create a new one as a clone and not necessarily from scratch
  • resource declaration – defining a resource that you want to manage. You can create, modify, and destroy the resource as needed or desired with the proper commands. More specifically, resource vsphere_virtual_machine is the type for new or managed vms.

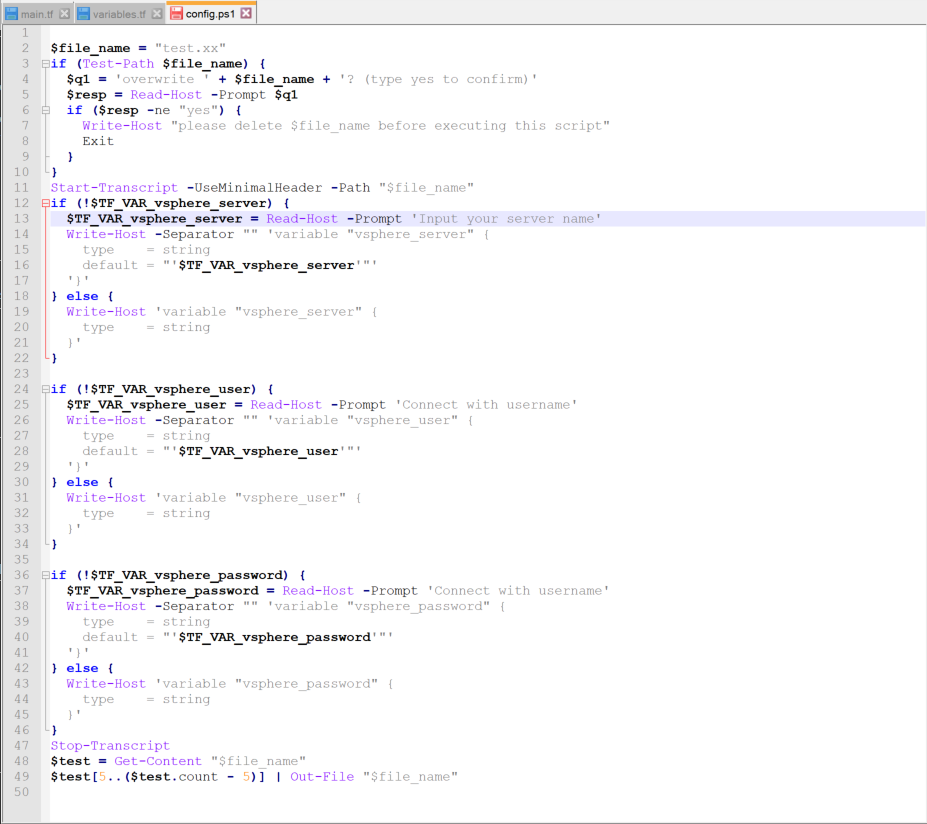
We earlier looked at how to generate the basic requirements to connect to a vSphere server and how to pull in the $TF_VAR_<variable> label to connect. With this we were able to define the vspher_server, vsphere_user, and vspher_password variable types using a script. If we use the PowerCLI module we can actually connect using this script using the format

Connect-VIServer -Server $TF_VAR_vsphere_server -User $TF_VAR_vsphere_user -Password $TF_VAR_vsphere_password

This is possible because if the values do not exist then they are assigned in the script file. From this we can fill in the following data

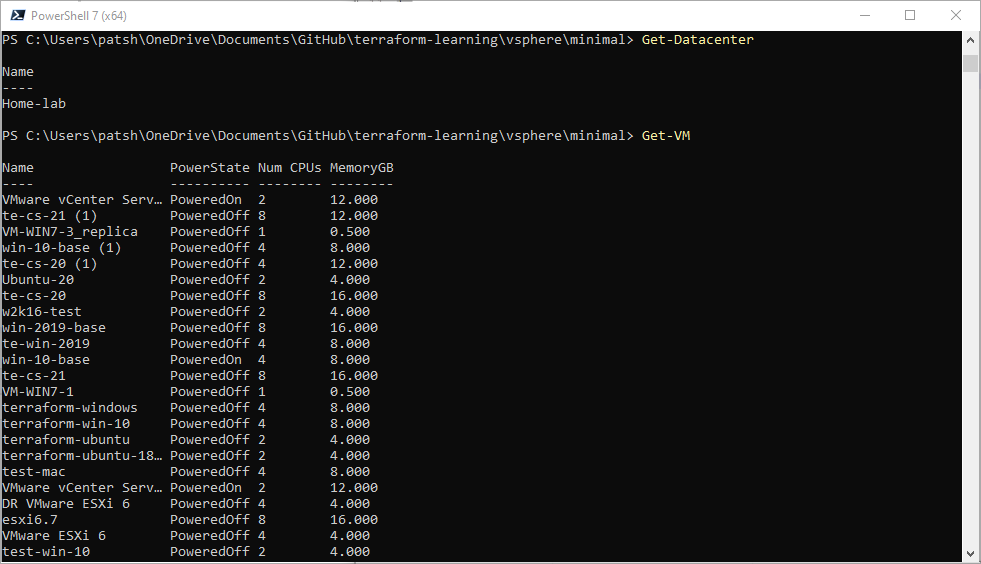
  • vsphere_datacenter from Get-Datacenter
  • vsphere_virtual_machine (templates) from Get-Template
  • vsphere_host from Get-Datacenter | Get-VMHost
  • vsphere_datastore from Get-Datastore

The vsphere_datacenter assignment is relatively simple

$connect = Connect-VIServer -Server $TF_VAR_vsphere_server -User $TF_VAR_vsphere_user -Password $TF_VAR_vsphere_password

$dc = Get-Datacenter
Write-Host ‘# vsphere_datacenter definition’
Write-Host ‘ ‘
Write-Host -Separator “” ‘data “vsphere_datacenter” “dc” {
name = “‘$dc.Name'”‘
‘}’
Write-Host ‘ ‘

This results in an output that looks like…

# vsphere_datacenter definition

data “vsphere_datacenter” “dc” {
name = “Home-lab”
}

This is the format that we want for our parameter.tf file. We can do something similar for the vm templates

Write-Host ‘# vsphere_virtual_machine (template) definition’
Write-Host ‘ ‘
$Template_Name = @()
$Template_Name = Get-Template

foreach ($item in $Template_Name) {
Write-Host -Separator “” ‘data “vsphere_virtual_machine” “‘$item'”‘ ‘ {
name = “‘$item'”‘
‘ datacenter_id = data.vsphere_datacenter.dc.id
}’
Write-Host ‘ ‘
}
Write-Host ‘ ‘

This results in the following output…

#vsphere_virtual_machine (template) definition

data “vsphere_virtual_machine” “win_10_template” {
name = “win_10_template”
datacenter_id = data.vsphere_datacenter.dc.id
}

data “vsphere_virtual_machine” “win-2019-template” {
name = “win-2019-template”
datacenter_id = data.vsphere_datacenter.dc.id
}

We can do similar actions for vsphere_host using

$Host_name = @()
$Host_name = Get-Datacenter | Get-VMHost

as well as vsphere_datastore using

$Datastore_name = @()
$Datastore_name = Get-Datastore

The resulting output is a terraform ready parameter file that represents the current state of our environment. The datacenter, host, and datastores should not change from run to run. We might define new templates so these might be added or removed but this script should be good for generating the basis of our existing infrastructure and give us the foundation to build a new vsphere_virtual_machine.

To create a vsphere_virtual_machine we need the following elements

  • name
  • resource_pool_id
  • disk
    • label
  • network_interface
    • network_id

These are the minimum requirements required by the documentation and will allows you to pass the terraform init but the apply will fail. Additional values that are needed

  • host_system_id – host to run the virtual machine on
  • guest_id – identifier for operating system type (windows, linux, etc)
  • disk.size – size of disk
  • clone.template_uuid – id of template to clone to create the instance.

The main.tf file that works to create our instance looks like

data “vsphere_virtual_machine” “test_minimal” {
name = “esxi6.7”
datacenter_id = data.vsphere_datacenter.dc.id
}

resource “vsphere_virtual_machine” “vm” {
name = “terraform-test”
resource_pool_id = data.vsphere_resource_pool.Resources-10_0_0_92.id
host_system_id = data.vsphere_host.Host-10_0_0_92.id
guest_id = “windows9_64Guest”
network_interface {
network_id = data.vsphere_network.VMNetwork.id
}
disk {
label = “Disk0”
size = 40
}
clone {
template_uuid = data.vsphere_virtual_machine.win_10_template.id
}
}

The Resources-10_0_0_92, Host-10_0_0_92, and win_10_template were all generated by our script and we pulled them from the variables.tf file after it was generated. The first vm “test_minimal” shows how to identify an existing virtual_machine. The second “vm” shows how to create a new virtual machine from a template.

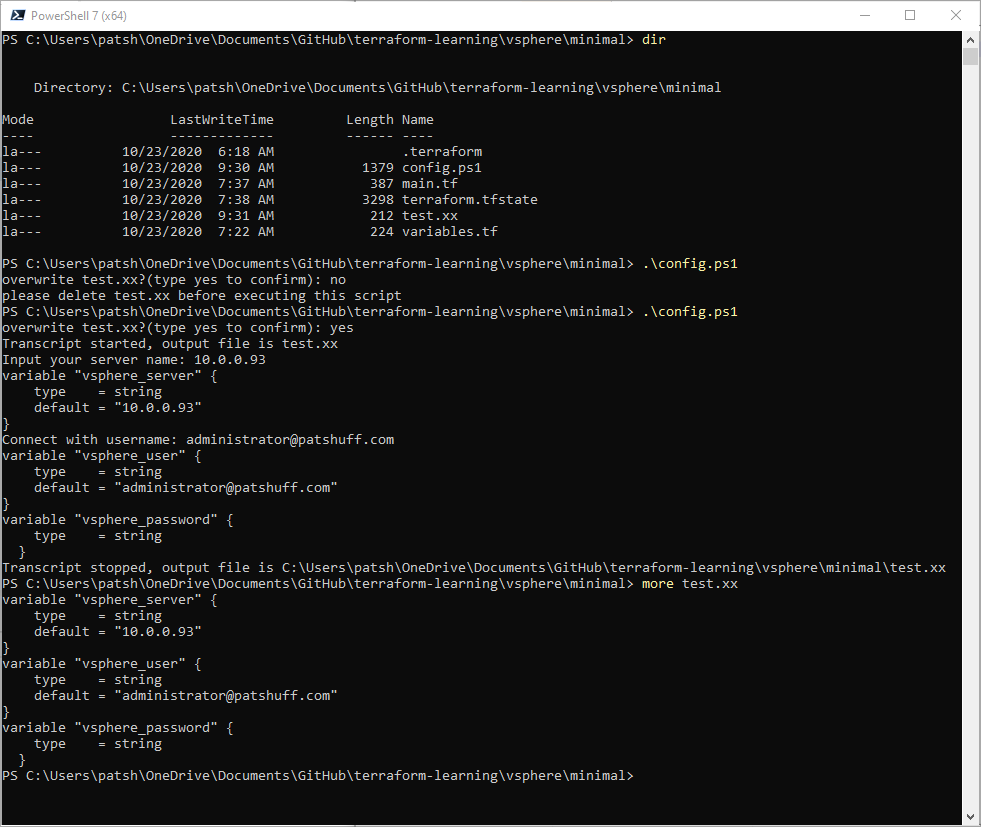
The files of interest in the git repository are

  • connect.ps1 – script to generate variables.tf file
  • main.tf – terraform file to show example of how to declare virtual_machine using data and resource (aka create new from template)
  • variables.tf – file generated from connect.ps1 script after pointing to my lab servers

All of these files are located on https://github.com/patshuff/terraform-learning. In summary, we can generate our variables.tf file by executing a connext.ps1 script. This script generates the variables.tf file (test.yy initially but you can change that) and you can pull the server, resource_pool, templates, and datastore information from this config file. It typically only needs to be run once or when you create a new template if you want it automatically created. For my simple test system it took about 10 minutes to create the virtual machine and assign it a new IP address to show terraform that the clone worked. We could release earlier but we won’t get the IP address of the new virtual instance.

Terraform vSphere vm

As a continuing series on Terraform and managing resources on-premises and in the cloud, today we are going to look at what it takes to create a virtual machine on a vSphere server using Terraform. In previous blogs we looked at

In this blog we will start with the minimal requirements to define a virtual machine for vSphere and ESXi and how to generate a parameters file using the PowerCLI commands based on your installation.

Before we dive into setting up a parameters file, we need to look at the requirements for a vsphere_virtual_machine using the vsphere provider. According to the documentation we can manage the lifecycle of a virtual machine by managing the disk, network interface, CDROM device, and create the virtual machine from scratch, cloning from a template, or migration from one host to another. It is important to note that cloning and migration are only supported with a vSphere front end and don’t work with an ESXi raw server. We can create a virtual machine but can’t use templates, migration, or clones from ESXi.

The arguments that are needed to create a virtual machine are

  • name – name of the virtual machine
  • resource_pool_id – resource pool to associate the virtual machine
  • disk – a virtual disk for the virtual machine
    • label/name – disk label or disk name to identify the disk
    • vmdk_path – path and filename of the virtual disk
    • datastore – datastore where disk is to be located
    • size – size of disk in GB
  • network_interface – virtual NIC for the virtual machine
    • network_id – network to connect this interface

Everything else is optional or implied. What is implied are

  • datastore – vsphere_datastore
    • name – name of a valid datastore
  • network – vsphere_network
    • name – name of the network
  • resource pool – vsphere_resource_pool
    • name – name of the resource pool
    • parent_resource_pool_id – root resource pool for a cluster or host or another resource pool
  • cluster or host id – vsphere_compute_cluster or vsphere_host
    • name – name of cluster or host
    • datacenter_id – datacenter object
    • username – for vsphere provider or vsphere_host (ESXi)
    • password – for vsphere provider or vsphere_host (ESXi)
    • vsphere_server or vsphere_host – fully qualified name or IP address
  • datacenter – vsphere_datacenter if using vsphere_compute_cluster
    • username/password/vsphere_server as part of vsphere provider connection

To setup everything we need a minimum of two files, a varaiable.tf and a main.tf. The variable.tf file needs to contain at least our username, password, and vsphere_server variable declarations. We can enter values into this file or define variables with the Set-Item command line in PowerShell. For this example we will do both. We will set the password with the Set-Item but set the server and username with default values in the variable.tf file.

To set and environment variable for Terraform (thanks Suneel Sunkara’s Blog) we use the command

Set-Item -Path env:TF_VAR_vsphere_password -Value “your password”

This set item command defines contents for vsphere_password and passes it into the terraform binary to understand. Using this command we don’t need to include passwords in our control files but can define it in a local script or environment variable on our desktop. We can then use our variable.tf file to pull from this variable.

variable “vsphere_user” {
type = string
default = “administrator@patshuff.com”
}

variable “vsphere_password” {
type = string
}

variable “vsphere_server” {
type = string
default = “10.0.0.93”
}

We could have just as easily defined our vsphere_user and vsphere_server as environment variables using the parameter TF_VAR_vsphere_user and TF_VAR_vsphere_server from the command line and leaving the default values blank.

Now that we have our variable.tf file working properly with environment variables we can focus on creating a virtual machine definition using the data and resource commands. For this example we do this with a main.tf file. The first section of the main.tf file is to define a vsphere provider

provider “vsphere” {
user = var.vsphere_user
password = var.vsphere_password
vsphere_server = var.vsphere_server
allow_unverified_ssl = true
}

Note that we are pulling in the username, password, and vsphere_server from the variable.tf file and ignoring the ssl certificate for our server. This definition block establishes our connection to the vSphere server. The same definition block could connect to our ESXi server given that the provider definition does not differentiate between vSphere and ESXi.

Now that we have a connection we can first look at what it takes to reference an existing virtual machine using the data declaration. This is simple and all we really need is the name of the existing virtual machine.

data “vsphere_virtual_machine” “test_minimal” {
name = “test_minimal_vm”
}

Note that we don’t need to define the datacenter, datastore, network, or disk according to the documentation. The assumption is that this virtual machine already exists and all of that has been assigned. If the virtual machine of this name does not exist, terraform will complain and state that it could not find the virtual machine of that name.

When we run the terraform plan the declaration fails stating that you need to define a datacenter for the virtual_machine which differs from the documentation. To get the datacenter name we can either use

Connect-VIServer -server $server

Get-Datacenter

or get the information from our html5 vCenter client console. We will need to update our main.tf file to include a vsphere_datacenter declaration with the appropriate name and include that as part of the vsphere_virtual_machine declaration

data “vsphere_datacenter” “dc” {
name = “Home-lab”
}

data “vsphere_virtual_machine” “test_minimal” {
name = “esxi6.7”
datacenter_id = data.vsphere_datacenter.dc.id
}

The virtual_machine name that we use needs to exist and needs to be unique. We can get this from the html5 vCenter client console or with the command

Get-VM

If we are truly trying to auto-generate this data we can run a PowerCLI command to pull a virtual machine name from the vSphere server and push the name label into the main.tf file. We can also test to see if the environment variable exist and define a variable.tf file with blank entries or prompt for values and fill in the defaults to auto-generate a variable.tf file for us initially.

To generate a variable.tf file we can create a PowerShell script to look for variables and ask if they are not defined. The output can then be written to the variable.tf. The sample script writes to a local test.xx file and can be changed to write to the variable.tf file by changing the $file_name declaration on the first line.

$file_name = “test.xx”
if (Test-Path $file_name) {
$q1 = ‘overwrite ‘ + $file_name + ‘? (type yes to confirm)’
$resp = Read-Host -Prompt $q1
if ($resp -ne “yes”) {
Write-Host “please delete $file_name before executing this script”
Exit
}
}
Start-Transcript -UseMinimalHeader -Path “$file_name”
if (!$TF_VAR_vsphere_server) {
$TF_VAR_vsphere_server = Read-Host -Prompt ‘Input your server name’
Write-Host -Separator “” ‘variable “vsphere_server” {
type = string
default = “‘$TF_VAR_vsphere_server'”‘
‘}’
} else {
Write-Host ‘variable “vsphere_server” {
type = string
}’
}

if (!$TF_VAR_vsphere_user) {
$TF_VAR_vsphere_user = Read-Host -Prompt ‘Connect with username’
Write-Host -Separator “” ‘variable “vsphere_user” {
type = string
default = “‘$TF_VAR_vsphere_user'”‘
‘}’
} else {
Write-Host ‘variable “vsphere_user” {
type = string
}’
}

if (!$TF_VAR_vsphere_password) {
$TF_VAR_vsphere_password = Read-Host -Prompt ‘Connect with username’
Write-Host -Separator “” ‘variable “vsphere_password” {
type = string
default = “‘$TF_VAR_vsphere_password'”‘
‘}’
} else {
Write-Host ‘variable “vsphere_password” {
type = string
}’
}
Stop-Transcript
$test = Get-Content “$file_name”
$test[5..($test.count – 5)] | Out-File “$file_name”

The code is relatively simple and tests to see if $file_name exists and exits if you don’t want to overwrite it. The code then looks for $TF_VAR_vsphere_server, $TF_VAR_vsphere_user, and $TF_VAR_vsphere_password and prompts you for the value if the environment variables are not found. If they are found, the default value is not stored and the terraform binary will pull in the variables at execution time.

The last few lines trim the header and footer from the PowerShell Transcript to get rid of the headers.

At this point we have a way of generating our variables.tf file and can hand edit out main.tf file to add the datacenter. If we wanted to we could create a similar PowerShell script to pull the vsphere_datacenter using the Get-Datacenter command from PowerCLI and inserting this into the main.tf file. We could also display a list of virtual machines with the Get-VM command from PowerCLI and insert the name into a vsphere_virtual_machine block.

In summary, we can define an existing virtual machine. What we will do in a later blog post is to show how to create a script to populate the resources needed to create a new virtual machine on one of our servers. Diving into this will make this blog post very long and complicated so I am going to break it into two parts.

The files can be found at https://github.com/patshuff/terraform-learning

Customizing Win 10 desktop for vSphere and Terraform

In a previous blog we talked about installing Terraform on Windows 10. In this blog we are going to dive a little deeper and get a vSphere provider configured and ready to use from our Windows 10 desktop. To get started we need a way to get into our vSphere server. The easiest way is to log into the web console and get the information from there.

The more difficult way but allows for better automation is to do everything from the command line. Unfortunately, for Windows the default PowerShell version is not supported by the Command Line Module from VMWare and to run PowerCLI we need to upgrade to PowerShell 6 or higher. At the time of this writing PowerShell 7.0.3 was the latest version available. This binary can be downloaded and installed by following the documentation on the Microsoft website and pulling the binary from the official Microsoft github.com location.

The install is relatively simple and takes a minute or two

Once PowerShell 7 is installed we need to install PowerCLI by using an Install-Module command. The format of the command is

Install-Module -Name VMware.PowerCLI

The installation is relatively simple and takes a minute or two to download the code and extract. Once extracted we can connect to the vSphere server.

When it comes to connecting to the server we can have it ask us for the username and password or set these variables as environment variables. In the following video we set the variables $user and $server as well as the $pwd (not shown) then connect to the server using environment variables. When we first connect the connection fails because the SSL certificate on our server is self-signed and not trusted. To avlid this set need to execute the two commands to get a valid connection

Set-PowerCLIConfiguration -InvalidCertificateAction Ignore -Confirm:$false

Connect-VIServer -Server $server -User $user -Password $pwd

From here we can get the DataCenter, Folder structure of the VMs and Templates, as well as the Datastores for this installation.

Getting the parameters that we will need to populate a parameters.tfvars file can be done with the following PowerCLI commands

var.datacenter Get-DataCenter

var.datastore Get-Datastore -Name <name>

var.template_folder Get-Folder -Name “Templates and vCenter”

var.terraform_folder Get-Folder -Name “Terraform”

var.templates Get-Template -Location $var.template_folder

var.terraform_vms Get-VM -Location $var.terraform_folder

From here we have the base level data that we need to populate a parameters.tfvar file and define our datacenter, host, folder structure, datastores, and templates. These are typically relatively static values that don’t change much. At some point we might want to pull in a list of our ISO files to use for initializing raw operating systems. Most companies don’t start with an ISO file but rather a partially configured server that has connections into an LDAP or Active Directory structure as well as the normal applications and security/firewall configurations needed for most applications.

To summarize what we have done is to configure our Windows 10 default terraform desktop so that we can use a browser to pull parameters from a vSphere server as well as script and automate pulling this data from a vSphere server using the PowerCLI Module that runs under PowerShell 6 or 7. We should have access to all of our key data from our vSphere and ESXi server and can populate and create a set of terraform files using variables, data declarations, and resources that we want to create and manage. With this blog we have built the foundation to manage a vSphere or ESXi instance from an HTML browser, a PowerShell command line, or from terraform. The eventual goal is to have terraform do all of the heavy lifting and not enter data like username and password into configuration files so that we can use github for version control of our configuration and management files.

Terraform variables vs data

In our last blog post we looked at data vs resources with Terraform and talked about static vs dynamic characteristics of data when compared to resources. In this blog we are going to look at using variables to declare structures rather than using data declarations. We will also cover a third option to use Local Values rather than variables and where they might be useful. It is important to note that there is no right or wrong answer with the use of local, variables, or data since they effectively perform the same functions and do not destroy structures as resources do when you execute the destroy option with terraform.

First, let’s look at Local Values. Declaring a local value allows you to insert a relatively static label into a variable stream. They are typically used for structures like tags or common_tags rather than static constructs. It is an easy way to declare something like a version or group that manages and maintains the resource in question.

locals {
  service_name = "forum"
  owner        = "Community Team"
}
locals {
  # Common tags to be assigned to all resources
  common_tags = {
    Service = local.service_name
    Owner   = local.owner
  }
}
resource "aws_instance" "example" {
  # ...

  tags = local.common_tags
}

Note that the initial declaration is a name associated with a string. The second declaration aggregates references to these tags into another tag with the local.<name> reference. This name can then be accessed with the local.common_tags reference in main code and not have to replicate the service or owner tag information. Unfortunately, defining associations in a locals declaration does not allow for values to be passed in from the command line as is done with variables.

Input Variables allow you to define a string relationship similar to locals but also allows you to pass in values from other files or the command line. Input variables serve as parameters for a module and allow for customization and differentiation between two environments. For vSphere, for example, given that you can not have two vSphere providers or datacenters in the same code defining a datacenter for development and one for production can be done with variables and reference a common code base in another directory.

variable "image_id" {
  type = string
}

variable "availability_zone_names" {
  type    = list(string)
  default = ["us-west-1a"]
}

variable "docker_ports" {
  type = list(object({
    internal = number
    external = number
    protocol = string
  }))
  default = [
    {
      internal = 8300
      external = 8300
      protocol = "tcp"
    }
  ]
}

A variable definition has an identifier associated with it and typically a type that can be a string, number, or boolean and can be combined for more complex relationships like lists, sets, objects, or touples. Variables are typically defined in a file called .tfvars rather than a .tf file or can be passed in with the -var=”label=value” command line parameter. Alternately, variables can be defined as environment variables from the command line and the terraform command line understands how to read these values. Typically user credentials like username and password or public and private keys are defined in an environment variable rather than in a file. For a vSphere provider you can define the following environment variables and hide the connection detains to a server

  • VSPHERE_USER (var.user)
  • VSPHERE_PASSWORD (var.password)
  • VSPHERE_SERVER (var.vsphere_server)
  • VSPHERE_ALLOW_UNVERIFIED_SSL (var.allow_unverified_ssl)

Defining any of these variables on the command line get passed into the terraform control files without having to define them in a .tf or .tfvars file or having to pass them in with the -var command line extension. The var.<name> extension shown above are the constructs used to reference each of the parameters in the terraform control files. The three parameters required for a connection to a vSphere server are the var.user, var.password, and var.vsphere_server with the var.allow_unverified_ssl as an optional parameter.

provider "vsphere" {
  user           = var.vsphere_user
  password       = var.vsphere_password
  vsphere_server = var.vsphere_server

  # If you have a self-signed cert
  allow_unverified_ssl = true
}

Typically this is all the code that is needed to connect to a vSphere server. You could define the user, password, and vsphere_server as locals and reference them as local.user but that implies that one of your .tf or .tfvars files contains a password definition that becomes a security issue with file management and version control. Putting the user and password in an environment variable allows for dynamic changing of roles and credentials from the VMware side of the house without having to change your .tf or .tfvars files. Having the vspher_server defined with environment variables allows management of development, production, and disaster recovery using a common foundation file and not having to define a main.tf for each environment.

We could have just as easily defined our user, password and server with a Data Source definition rather than a variable definition. A data declaration is similar to a local declaration but can be more complex than a string comparison.

data "aws_ami" "example" {
  most_recent = true

  owners = ["self"]
  tags = {
    Name   = "app-server"
    Tested = "true"
  }
}

Declaring a username and password with a data definition is not the most secure and safe way of defining this data. Using a variable declaration and environment variable pulls this information out of source code control and security concerns. Defining a datastore or a template with a data declaration makes more sense given that structures like datacenter, datastore, folder structures, and templates hopefully do not change significantly over time. Templates might change based on new operating system releases but managing this change with a new declaration can be a good thing.

Hopefully, this post helps understand the key difference between variable and data declarations. Both have a purpose. Both can be used. There are some technical reasons to use one over the other. There are some security concerns where one might be a better selection. The real answer is to look at how your organization uses the different constructs and have a meaningful conversation on why one is used and why another is used instead. This is one of the grey areas where there is not one way of solving the problem.