aws provider vs vsphere provider

In a previous post we talked about the vsphere provider and what is needed to define a connection to create a virtual machine. In this blog we will start to look at what is needed to setup a similar environment to do the same thing in AWS EC2. Think of it as a design challenge. Your client comes to you and says “I want a LAMP or WAMP stack or Tomcat Server that I can play with. I want one local as well as one in the cloud. Can you make that happen?”. You look around and find out that they do have a vSphere server and figure out how to log into it and create a Linux instance to build a LAMP stack and a Windows instance to create a WAMP stack then want to repeat this same configuration in AWS, Azure, and/or Google GCP. Simple, right?

If you remember, to create a vSphere provider declaration in Terraform you basically need a username, password, and IP address of the vSphere server.

provider “vsphere” {
user = var.vsphere_user
password = var.vsphere_password
vsphere_server = var.vsphere_server
version = “1.12.0”

allow_unverified_ssl = true
}

The allow_unverified_ssl is to get around that most vSphere installations in a lab don’t have a certified certificate but a self-signed certificate and the version is to help us keep control of syntax changes in our IaC definitions that will soon follow.

The assumptions that you are making when connecting to a vSphere server when you create a virtual machine are

  1. Networking is setup for you. You can connect to a pre-defined network interface from vSphere but you really can’t change your network configuration beyond what is defined in your vSphere instance.
  2. Firewalls, subnets, and routing is all defined by a network administrator and you really don’t have control over the configuration inside Terraform unless you manage your switches and routers from Terraform as well. The network is what it is and you can’t really change it. To change routing rules and blocked or open ports on a network typically requires reconfiguration of a switch or network device.
  3. Disks, memory, and CPUs are limited by server configurations. In my home lab, for example, I have two 24 core servers with 48 GB of RAM on one system and 72 GB of RAM on the other. One system has just under 4 TB of disk while the other has just over 600 GB of disk available.
  4. Your CPU selection is limited to what is in your lab or datacenter. You might have more than just an x86 processer here and there but the assumption is that everything is x86 based and not Sparc or PowerPC. There might be an ARM processor as an option but not many datacenters have access to this unless they are developing for single board computers or robotics projects. There might be more advanced processors like a GPU or Nvidia graphics accelerated processor but again, these are rare in most small to midsize datacenters.

Declaring a vsphere provider gives you access to all of these assumptions. If you declare an aws or azure provider these assumptions are not true anymore. You have to define your network. You can define your subnet and firewall configurations. You have access to almost unlimited CPU, memory, and disk combinations. You have access to more than just an x86 processor and you have access to multiple datacenters that span the globe rather than just a single cluster of computers that are inside your datacenter.

The key difference between declaring a vsphere provider and an aws provider is that you can declare multiple aws providers and use multiple credentials as well as different regions.

provider “aws” {
version = “> 2”
profile = “default”
region = “us-east-1”
alias = “aws”
}

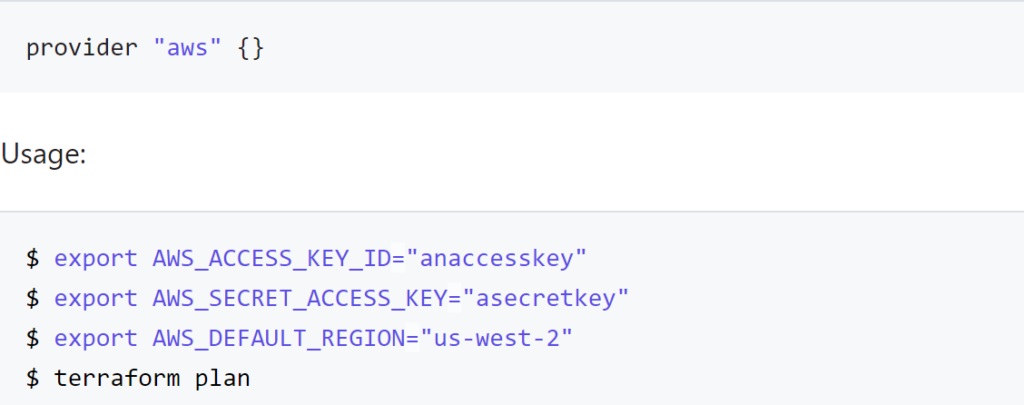
Note we don’t connect to a server. We don’t have a username or password. We do define a version and have three different parameters that we pass in. So the big question becomes how do we connect and authenticate? Where is this done if not in the provider connection? We could have gotten by with just provider “aws” {} and that would have worked as well.

To authenticate using the Hashicorp aws provider declaration you need to

  • declare the access_key and secret_key in the declaration (not advised)
  • declare the AWS_ACCESS_KEY_ID and AWS_SECRET_ACCESS_KEY_ID as environment variables
  • or point to a configuration file with the shared_credentials_file declaration or AWS_SHARED_CREDENTIALS_FILE environment variable leveraging the profile declaration or PROFILE environment variable.
  • automatic loading of the ~/.aws/credentials or ~/.aws/config files

The drawback to using the environment variables is that you can only have one login into your aws console but can connect to multiple regions with the same credentials. If you have multiple accounts you need to declare the access_key and secret_key or the more preferred method of using the shared_credentials_file declaration.

For the aws provider, all parameters are optional. The provider is flexible enough to make some assumptions and connect to AWS based on environment variables and optional parameters defined. If something is defined with a parameter it is used over the environment variable. If you define both a key and a shared_credentials_file, Terraform will throw an error. If you have environment variables define and a ~/.aws/credentials file, the environment variables will be used first.

If we dive a little deeper into our vsphere variables.tf file we note that we need to run a script or manually generate the declarations for vsphere_datacenter, vsphere_host, and vsphere_resource_pool prior to defining a virtual machine. With the aws provider we only need to define the region to define all of these elements. Unfortunately, we also need to define the networking connections, subnet definitions, and potential firewall exceptions to be able to access our new virtual machine. It would be nice if we could take our simple vsphere virtual machine definition defined in our vsphere main.tf file and translate it directly into an aws_instance declaration. Unfortunately, there is very little that we can translate from one environment to the other.

The aws provider and aws_instance declaration does not allow us to clone an existing instance. We need to go outside of Terraform and create an AMI to use as a reference for aws_instance creation. We don’t pick a datacenter and resource_pool but select a region to run our instance. We don’t need to define a datastore to host the virtual machine disks but we do need to define the disk type and if it is a high speed (higher cost) or spinning disk (lower cost) to host the operating system or data.

We can’t really take our existing code and run it through a scrubber and spit out aws ready code unfortunately. We need to know how to find a LAMP, WAMP, and Tomcat AMI and reference it. We need to know the network configurations and configure connections to another server like a database or load balancer front end. We also need to know what region to deploy this into and if we can run these services using low cost options like spot instances or can shut off the running instance during times of the day to save money given that a cloud instance charges by the minute or hour and a vsphere instance is just consuming resources that you have already paid for.

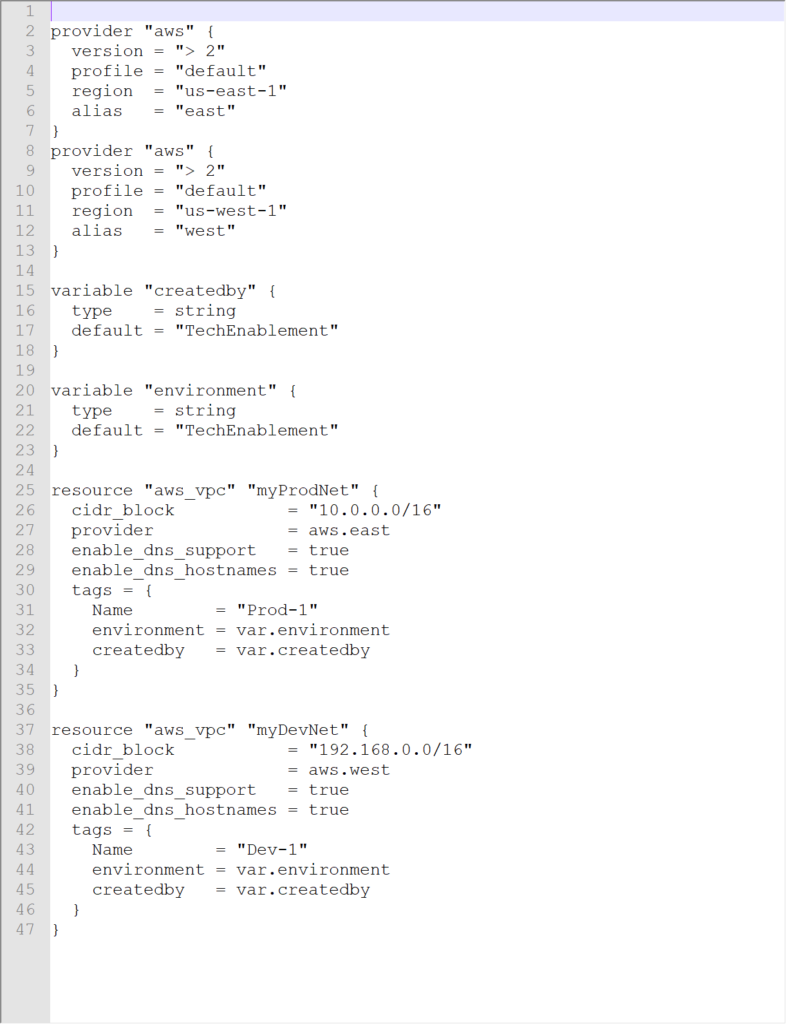
One of the nice things about an aws provider declaration is that you can define multiple providers in the same file which generated an error for a vsphere provider. You can reference different regions using an alias. In the declaration shown above we would reference the provider with

provider = aws.aws

If we wanted to declare that the east was our production site and the west was our dev site we could use the declaration

provider “aws” {
version = “> 2”
profile = “default”
region = “us-east-1”
alias = “east”
}
provider “aws” {
version = “> 2”
profile = “default”
region = “us-west-1”
alias = “west”
}

If we add a declaration of a network component (aws_vpc) we can populate our state file and see that the changes were pushed to our aws account.
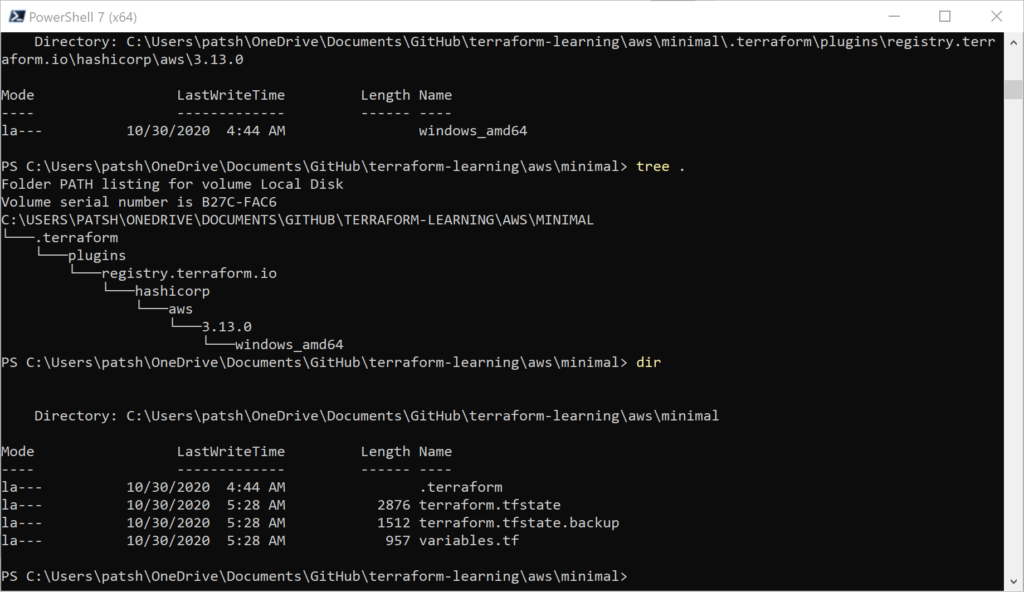
We get the .terraform tree populated for our Windows desktop environment as well as the terraform.tfstate created. Looking at our AWS VPC console we see that Prod-1 was created in US-East-1 (and we could verify that Dev-1 was created in US-West-1 if we wanted).
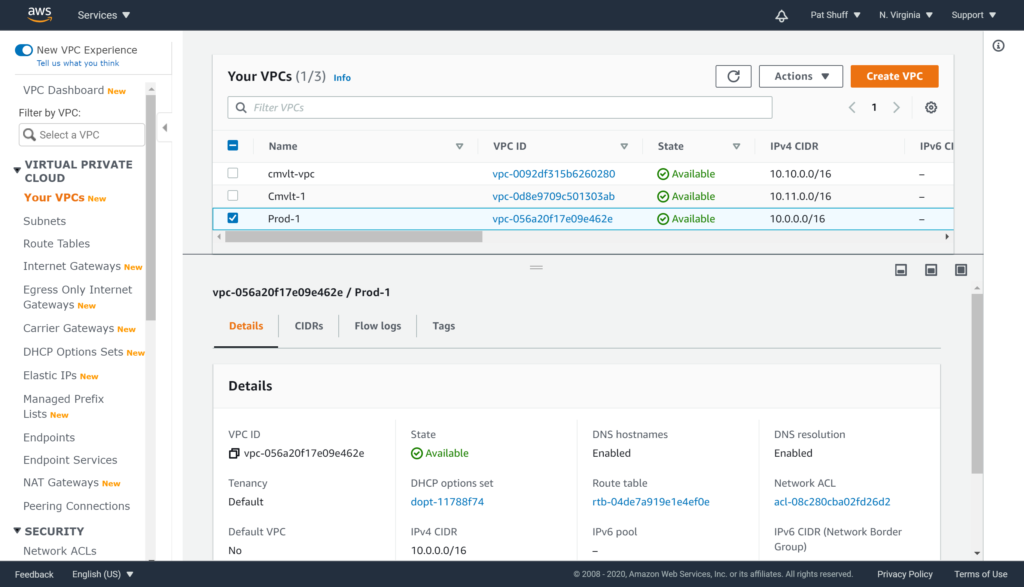
Note that the CIDR block was correctly defined as 10.0.0.0/16 as desired. If we run the terraform destroy command to clean up this vpc will be destroyed since it was created and is controlled by our terraform declaration.

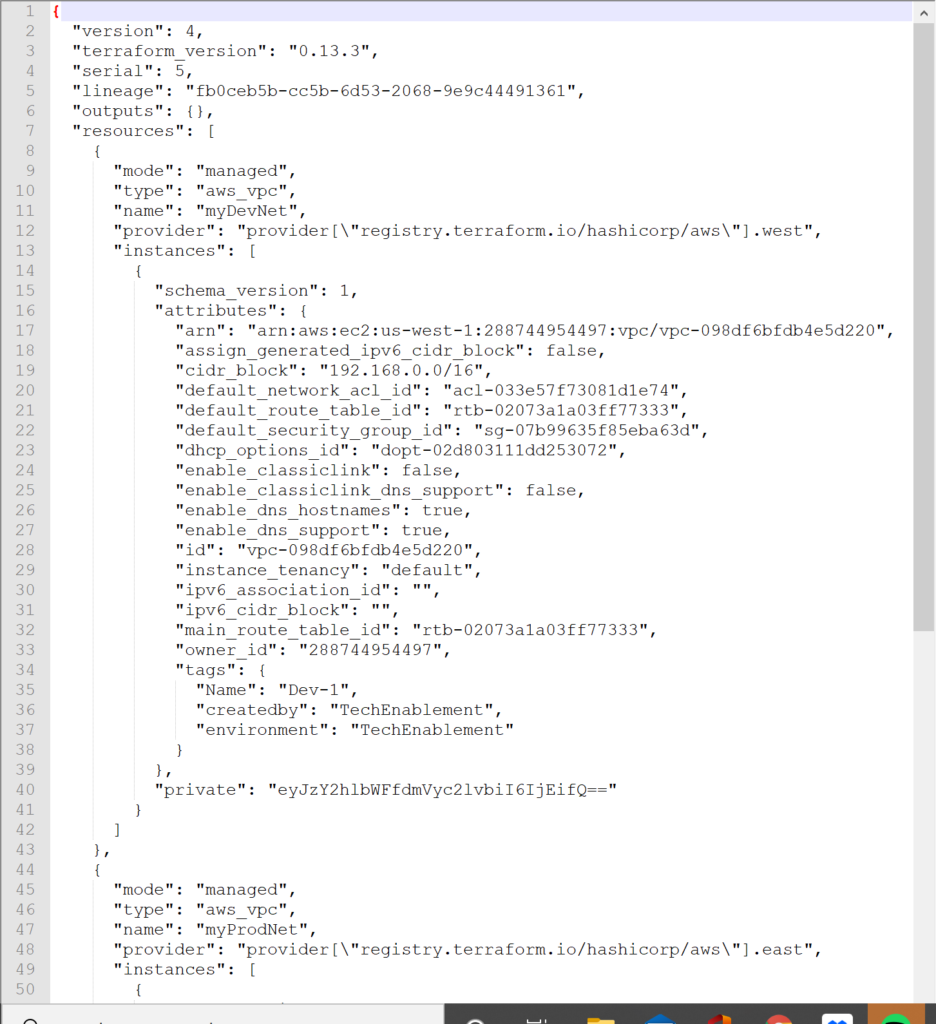
Looking at our terraform state file we can see that we did create two VPC instances in AWS and the VPC ID should correspond to what we see in the AWS console.
In summary, using Terraform to provision and manage resources in Amazon AWS is somewhat easier and somewhat harder than provisioning resources in a vSphere environment. Unfortunately, you can’t take a variables.tf or main.tf declaration from vSphere and massage it to become a AWS definition. The code needs to be rewritten and created using different questions and parameters. You don’t need to get down to the SCSI target level with AWS but you do need to define the network connection and where and how the resource will be declared with a finer resolution. You can’t clone an existing machine inside of Terraform but you can do it leveraging private AMI declarations in AWS similar to the way that templates are created in vSphere. Overall an AWS managed state with Terraform is easy to start and allows you to create a similar environment to an on-premises environment as long as you understand the differences and cost implications between the two. Note that the aws provider declaration is much simpler and cleaner than the vsphere provider. Less is needed to define the foundation but more is needed as far as networking and how to create a virtual instance with AMIs rather than cloning.
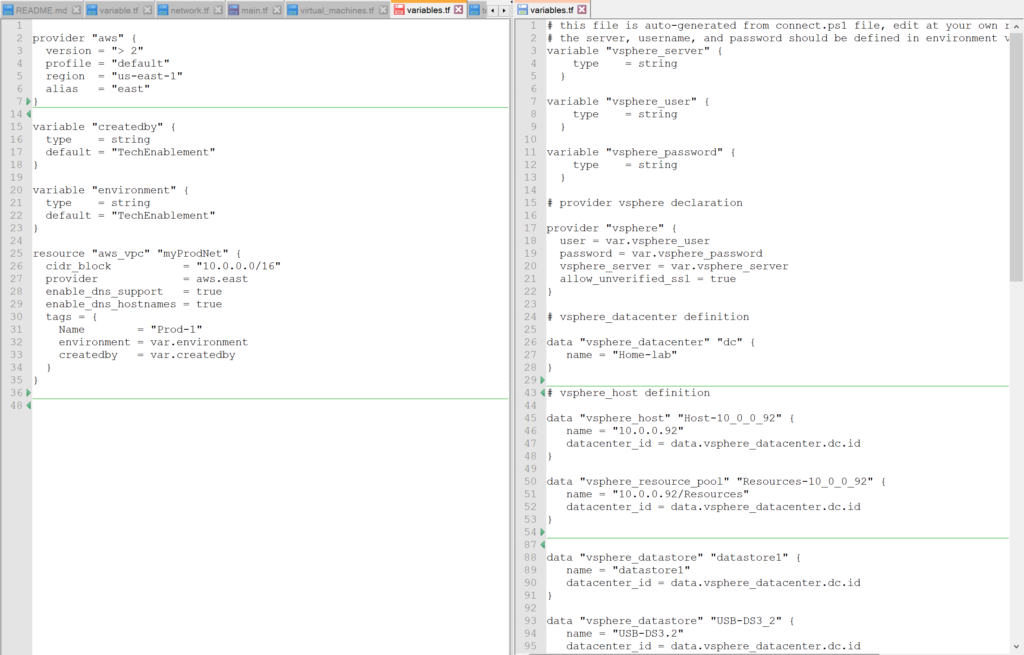
The variables.tf and terraform.state files are available on github to review.

vsphere_virtual_machine creation

In a previous blog we looked at how to identify an existing vSphere virtual machine and add it as a data element so that it can be referenced. In this blog we will dive a little deeper and look at how to define a similar instance as a template then use that template to create a new virtual machine using the resource command.
It is important to note that we are talking about three different constructs within Terraform in the previous paragraph.

  • data declaration – defining an existing resource to reference it as an element. This element is considered to be static and can not be modified or destroyed but it does not exist, terraform will complain that the declaration failed since the element does not exist. More specifically, data vsphere_virtual_machine is the type for existing vms.
  • template declaration – this is more of a vSphere and not necessarily a Terraform definition. This defines how vSphere copies or replicates an existing instance to create a new one as a clone and not necessarily from scratch
  • resource declaration – defining a resource that you want to manage. You can create, modify, and destroy the resource as needed or desired with the proper commands. More specifically, resource vsphere_virtual_machine is the type for new or managed vms.

We earlier looked at how to generate the basic requirements to connect to a vSphere server and how to pull in the $TF_VAR_<variable> label to connect. With this we were able to define the vspher_server, vsphere_user, and vspher_password variable types using a script. If we use the PowerCLI module we can actually connect using this script using the format

Connect-VIServer -Server $TF_VAR_vsphere_server -User $TF_VAR_vsphere_user -Password $TF_VAR_vsphere_password

This is possible because if the values do not exist then they are assigned in the script file. From this we can fill in the following data

  • vsphere_datacenter from Get-Datacenter
  • vsphere_virtual_machine (templates) from Get-Template
  • vsphere_host from Get-Datacenter | Get-VMHost
  • vsphere_datastore from Get-Datastore

The vsphere_datacenter assignment is relatively simple

$connect = Connect-VIServer -Server $TF_VAR_vsphere_server -User $TF_VAR_vsphere_user -Password $TF_VAR_vsphere_password

$dc = Get-Datacenter
Write-Host ‘# vsphere_datacenter definition’
Write-Host ‘ ‘
Write-Host -Separator “” ‘data “vsphere_datacenter” “dc” {
name = “‘$dc.Name'”‘
‘}’
Write-Host ‘ ‘

This results in an output that looks like…

# vsphere_datacenter definition

data “vsphere_datacenter” “dc” {
name = “Home-lab”
}

This is the format that we want for our parameter.tf file. We can do something similar for the vm templates

Write-Host ‘# vsphere_virtual_machine (template) definition’
Write-Host ‘ ‘
$Template_Name = @()
$Template_Name = Get-Template

foreach ($item in $Template_Name) {
Write-Host -Separator “” ‘data “vsphere_virtual_machine” “‘$item'”‘ ‘ {
name = “‘$item'”‘
‘ datacenter_id = data.vsphere_datacenter.dc.id
}’
Write-Host ‘ ‘
}
Write-Host ‘ ‘

This results in the following output…

#vsphere_virtual_machine (template) definition

data “vsphere_virtual_machine” “win_10_template” {
name = “win_10_template”
datacenter_id = data.vsphere_datacenter.dc.id
}

data “vsphere_virtual_machine” “win-2019-template” {
name = “win-2019-template”
datacenter_id = data.vsphere_datacenter.dc.id
}

We can do similar actions for vsphere_host using

$Host_name = @()
$Host_name = Get-Datacenter | Get-VMHost

as well as vsphere_datastore using

$Datastore_name = @()
$Datastore_name = Get-Datastore

The resulting output is a terraform ready parameter file that represents the current state of our environment. The datacenter, host, and datastores should not change from run to run. We might define new templates so these might be added or removed but this script should be good for generating the basis of our existing infrastructure and give us the foundation to build a new vsphere_virtual_machine.

To create a vsphere_virtual_machine we need the following elements

  • name
  • resource_pool_id
  • disk
    • label
  • network_interface
    • network_id

These are the minimum requirements required by the documentation and will allows you to pass the terraform init but the apply will fail. Additional values that are needed

  • host_system_id – host to run the virtual machine on
  • guest_id – identifier for operating system type (windows, linux, etc)
  • disk.size – size of disk
  • clone.template_uuid – id of template to clone to create the instance.

The main.tf file that works to create our instance looks like

data “vsphere_virtual_machine” “test_minimal” {
name = “esxi6.7”
datacenter_id = data.vsphere_datacenter.dc.id
}

resource “vsphere_virtual_machine” “vm” {
name = “terraform-test”
resource_pool_id = data.vsphere_resource_pool.Resources-10_0_0_92.id
host_system_id = data.vsphere_host.Host-10_0_0_92.id
guest_id = “windows9_64Guest”
network_interface {
network_id = data.vsphere_network.VMNetwork.id
}
disk {
label = “Disk0”
size = 40
}
clone {
template_uuid = data.vsphere_virtual_machine.win_10_template.id
}
}

The Resources-10_0_0_92, Host-10_0_0_92, and win_10_template were all generated by our script and we pulled them from the variables.tf file after it was generated. The first vm “test_minimal” shows how to identify an existing virtual_machine. The second “vm” shows how to create a new virtual machine from a template.

The files of interest in the git repository are

  • connect.ps1 – script to generate variables.tf file
  • main.tf – terraform file to show example of how to declare virtual_machine using data and resource (aka create new from template)
  • variables.tf – file generated from connect.ps1 script after pointing to my lab servers

All of these files are located on https://github.com/patshuff/terraform-learning. In summary, we can generate our variables.tf file by executing a connext.ps1 script. This script generates the variables.tf file (test.yy initially but you can change that) and you can pull the server, resource_pool, templates, and datastore information from this config file. It typically only needs to be run once or when you create a new template if you want it automatically created. For my simple test system it took about 10 minutes to create the virtual machine and assign it a new IP address to show terraform that the clone worked. We could release earlier but we won’t get the IP address of the new virtual instance.

Terraform vSphere vm

As a continuing series on Terraform and managing resources on-premises and in the cloud, today we are going to look at what it takes to create a virtual machine on a vSphere server using Terraform. In previous blogs we looked at

In this blog we will start with the minimal requirements to define a virtual machine for vSphere and ESXi and how to generate a parameters file using the PowerCLI commands based on your installation.

Before we dive into setting up a parameters file, we need to look at the requirements for a vsphere_virtual_machine using the vsphere provider. According to the documentation we can manage the lifecycle of a virtual machine by managing the disk, network interface, CDROM device, and create the virtual machine from scratch, cloning from a template, or migration from one host to another. It is important to note that cloning and migration are only supported with a vSphere front end and don’t work with an ESXi raw server. We can create a virtual machine but can’t use templates, migration, or clones from ESXi.

The arguments that are needed to create a virtual machine are

  • name – name of the virtual machine
  • resource_pool_id – resource pool to associate the virtual machine
  • disk – a virtual disk for the virtual machine
    • label/name – disk label or disk name to identify the disk
    • vmdk_path – path and filename of the virtual disk
    • datastore – datastore where disk is to be located
    • size – size of disk in GB
  • network_interface – virtual NIC for the virtual machine
    • network_id – network to connect this interface

Everything else is optional or implied. What is implied are

  • datastore – vsphere_datastore
    • name – name of a valid datastore
  • network – vsphere_network
    • name – name of the network
  • resource pool – vsphere_resource_pool
    • name – name of the resource pool
    • parent_resource_pool_id – root resource pool for a cluster or host or another resource pool
  • cluster or host id – vsphere_compute_cluster or vsphere_host
    • name – name of cluster or host
    • datacenter_id – datacenter object
    • username – for vsphere provider or vsphere_host (ESXi)
    • password – for vsphere provider or vsphere_host (ESXi)
    • vsphere_server or vsphere_host – fully qualified name or IP address
  • datacenter – vsphere_datacenter if using vsphere_compute_cluster
    • username/password/vsphere_server as part of vsphere provider connection

To setup everything we need a minimum of two files, a varaiable.tf and a main.tf. The variable.tf file needs to contain at least our username, password, and vsphere_server variable declarations. We can enter values into this file or define variables with the Set-Item command line in PowerShell. For this example we will do both. We will set the password with the Set-Item but set the server and username with default values in the variable.tf file.

To set and environment variable for Terraform (thanks Suneel Sunkara’s Blog) we use the command

Set-Item -Path env:TF_VAR_vsphere_password -Value “your password”

This set item command defines contents for vsphere_password and passes it into the terraform binary to understand. Using this command we don’t need to include passwords in our control files but can define it in a local script or environment variable on our desktop. We can then use our variable.tf file to pull from this variable.

variable “vsphere_user” {
type = string
default = “administrator@patshuff.com”
}

variable “vsphere_password” {
type = string
}

variable “vsphere_server” {
type = string
default = “10.0.0.93”
}

We could have just as easily defined our vsphere_user and vsphere_server as environment variables using the parameter TF_VAR_vsphere_user and TF_VAR_vsphere_server from the command line and leaving the default values blank.

Now that we have our variable.tf file working properly with environment variables we can focus on creating a virtual machine definition using the data and resource commands. For this example we do this with a main.tf file. The first section of the main.tf file is to define a vsphere provider

provider “vsphere” {
user = var.vsphere_user
password = var.vsphere_password
vsphere_server = var.vsphere_server
allow_unverified_ssl = true
}

Note that we are pulling in the username, password, and vsphere_server from the variable.tf file and ignoring the ssl certificate for our server. This definition block establishes our connection to the vSphere server. The same definition block could connect to our ESXi server given that the provider definition does not differentiate between vSphere and ESXi.

Now that we have a connection we can first look at what it takes to reference an existing virtual machine using the data declaration. This is simple and all we really need is the name of the existing virtual machine.

data “vsphere_virtual_machine” “test_minimal” {
name = “test_minimal_vm”
}

Note that we don’t need to define the datacenter, datastore, network, or disk according to the documentation. The assumption is that this virtual machine already exists and all of that has been assigned. If the virtual machine of this name does not exist, terraform will complain and state that it could not find the virtual machine of that name.

When we run the terraform plan the declaration fails stating that you need to define a datacenter for the virtual_machine which differs from the documentation. To get the datacenter name we can either use

Connect-VIServer -server $server

Get-Datacenter

or get the information from our html5 vCenter client console. We will need to update our main.tf file to include a vsphere_datacenter declaration with the appropriate name and include that as part of the vsphere_virtual_machine declaration

data “vsphere_datacenter” “dc” {
name = “Home-lab”
}

data “vsphere_virtual_machine” “test_minimal” {
name = “esxi6.7”
datacenter_id = data.vsphere_datacenter.dc.id
}

The virtual_machine name that we use needs to exist and needs to be unique. We can get this from the html5 vCenter client console or with the command

Get-VM

If we are truly trying to auto-generate this data we can run a PowerCLI command to pull a virtual machine name from the vSphere server and push the name label into the main.tf file. We can also test to see if the environment variable exist and define a variable.tf file with blank entries or prompt for values and fill in the defaults to auto-generate a variable.tf file for us initially.

To generate a variable.tf file we can create a PowerShell script to look for variables and ask if they are not defined. The output can then be written to the variable.tf. The sample script writes to a local test.xx file and can be changed to write to the variable.tf file by changing the $file_name declaration on the first line.

$file_name = “test.xx”
if (Test-Path $file_name) {
$q1 = ‘overwrite ‘ + $file_name + ‘? (type yes to confirm)’
$resp = Read-Host -Prompt $q1
if ($resp -ne “yes”) {
Write-Host “please delete $file_name before executing this script”
Exit
}
}
Start-Transcript -UseMinimalHeader -Path “$file_name”
if (!$TF_VAR_vsphere_server) {
$TF_VAR_vsphere_server = Read-Host -Prompt ‘Input your server name’
Write-Host -Separator “” ‘variable “vsphere_server” {
type = string
default = “‘$TF_VAR_vsphere_server'”‘
‘}’
} else {
Write-Host ‘variable “vsphere_server” {
type = string
}’
}

if (!$TF_VAR_vsphere_user) {
$TF_VAR_vsphere_user = Read-Host -Prompt ‘Connect with username’
Write-Host -Separator “” ‘variable “vsphere_user” {
type = string
default = “‘$TF_VAR_vsphere_user'”‘
‘}’
} else {
Write-Host ‘variable “vsphere_user” {
type = string
}’
}

if (!$TF_VAR_vsphere_password) {
$TF_VAR_vsphere_password = Read-Host -Prompt ‘Connect with username’
Write-Host -Separator “” ‘variable “vsphere_password” {
type = string
default = “‘$TF_VAR_vsphere_password'”‘
‘}’
} else {
Write-Host ‘variable “vsphere_password” {
type = string
}’
}
Stop-Transcript
$test = Get-Content “$file_name”
$test[5..($test.count – 5)] | Out-File “$file_name”

The code is relatively simple and tests to see if $file_name exists and exits if you don’t want to overwrite it. The code then looks for $TF_VAR_vsphere_server, $TF_VAR_vsphere_user, and $TF_VAR_vsphere_password and prompts you for the value if the environment variables are not found. If they are found, the default value is not stored and the terraform binary will pull in the variables at execution time.

The last few lines trim the header and footer from the PowerShell Transcript to get rid of the headers.

At this point we have a way of generating our variables.tf file and can hand edit out main.tf file to add the datacenter. If we wanted to we could create a similar PowerShell script to pull the vsphere_datacenter using the Get-Datacenter command from PowerCLI and inserting this into the main.tf file. We could also display a list of virtual machines with the Get-VM command from PowerCLI and insert the name into a vsphere_virtual_machine block.

In summary, we can define an existing virtual machine. What we will do in a later blog post is to show how to create a script to populate the resources needed to create a new virtual machine on one of our servers. Diving into this will make this blog post very long and complicated so I am going to break it into two parts.

The files can be found at https://github.com/patshuff/terraform-learning

Customizing Win 10 desktop for vSphere and Terraform

In a previous blog we talked about installing Terraform on Windows 10. In this blog we are going to dive a little deeper and get a vSphere provider configured and ready to use from our Windows 10 desktop. To get started we need a way to get into our vSphere server. The easiest way is to log into the web console and get the information from there.

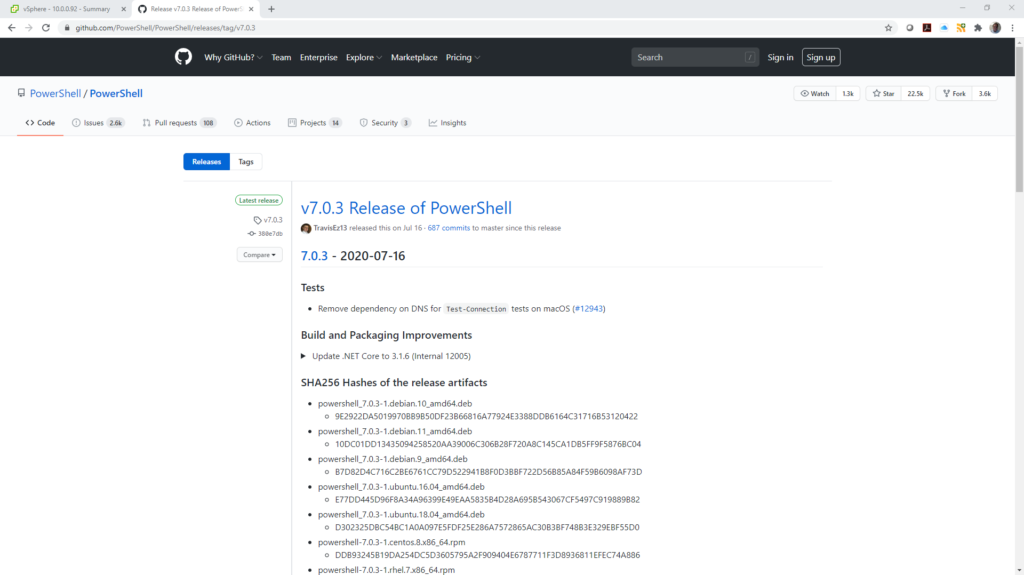
The more difficult way but allows for better automation is to do everything from the command line. Unfortunately, for Windows the default PowerShell version is not supported by the Command Line Module from VMWare and to run PowerCLI we need to upgrade to PowerShell 6 or higher. At the time of this writing PowerShell 7.0.3 was the latest version available. This binary can be downloaded and installed by following the documentation on the Microsoft website and pulling the binary from the official Microsoft github.com location.

The install is relatively simple and takes a minute or two

Once PowerShell 7 is installed we need to install PowerCLI by using an Install-Module command. The format of the command is

Install-Module -Name VMware.PowerCLI

The installation is relatively simple and takes a minute or two to download the code and extract. Once extracted we can connect to the vSphere server.

When it comes to connecting to the server we can have it ask us for the username and password or set these variables as environment variables. In the following video we set the variables $user and $server as well as the $pwd (not shown) then connect to the server using environment variables. When we first connect the connection fails because the SSL certificate on our server is self-signed and not trusted. To avlid this set need to execute the two commands to get a valid connection

Set-PowerCLIConfiguration -InvalidCertificateAction Ignore -Confirm:$false

Connect-VIServer -Server $server -User $user -Password $pwd

From here we can get the DataCenter, Folder structure of the VMs and Templates, as well as the Datastores for this installation.

Getting the parameters that we will need to populate a parameters.tfvars file can be done with the following PowerCLI commands

var.datacenter Get-DataCenter

var.datastore Get-Datastore -Name <name>

var.template_folder Get-Folder -Name “Templates and vCenter”

var.terraform_folder Get-Folder -Name “Terraform”

var.templates Get-Template -Location $var.template_folder

var.terraform_vms Get-VM -Location $var.terraform_folder

From here we have the base level data that we need to populate a parameters.tfvar file and define our datacenter, host, folder structure, datastores, and templates. These are typically relatively static values that don’t change much. At some point we might want to pull in a list of our ISO files to use for initializing raw operating systems. Most companies don’t start with an ISO file but rather a partially configured server that has connections into an LDAP or Active Directory structure as well as the normal applications and security/firewall configurations needed for most applications.

To summarize what we have done is to configure our Windows 10 default terraform desktop so that we can use a browser to pull parameters from a vSphere server as well as script and automate pulling this data from a vSphere server using the PowerCLI Module that runs under PowerShell 6 or 7. We should have access to all of our key data from our vSphere and ESXi server and can populate and create a set of terraform files using variables, data declarations, and resources that we want to create and manage. With this blog we have built the foundation to manage a vSphere or ESXi instance from an HTML browser, a PowerShell command line, or from terraform. The eventual goal is to have terraform do all of the heavy lifting and not enter data like username and password into configuration files so that we can use github for version control of our configuration and management files.

Terraform variables vs data

In our last blog post we looked at data vs resources with Terraform and talked about static vs dynamic characteristics of data when compared to resources. In this blog we are going to look at using variables to declare structures rather than using data declarations. We will also cover a third option to use Local Values rather than variables and where they might be useful. It is important to note that there is no right or wrong answer with the use of local, variables, or data since they effectively perform the same functions and do not destroy structures as resources do when you execute the destroy option with terraform.

First, let’s look at Local Values. Declaring a local value allows you to insert a relatively static label into a variable stream. They are typically used for structures like tags or common_tags rather than static constructs. It is an easy way to declare something like a version or group that manages and maintains the resource in question.

locals {
  service_name = "forum"
  owner        = "Community Team"
}
locals {
  # Common tags to be assigned to all resources
  common_tags = {
    Service = local.service_name
    Owner   = local.owner
  }
}
resource "aws_instance" "example" {
  # ...

  tags = local.common_tags
}

Note that the initial declaration is a name associated with a string. The second declaration aggregates references to these tags into another tag with the local.<name> reference. This name can then be accessed with the local.common_tags reference in main code and not have to replicate the service or owner tag information. Unfortunately, defining associations in a locals declaration does not allow for values to be passed in from the command line as is done with variables.

Input Variables allow you to define a string relationship similar to locals but also allows you to pass in values from other files or the command line. Input variables serve as parameters for a module and allow for customization and differentiation between two environments. For vSphere, for example, given that you can not have two vSphere providers or datacenters in the same code defining a datacenter for development and one for production can be done with variables and reference a common code base in another directory.

variable "image_id" {
  type = string
}

variable "availability_zone_names" {
  type    = list(string)
  default = ["us-west-1a"]
}

variable "docker_ports" {
  type = list(object({
    internal = number
    external = number
    protocol = string
  }))
  default = [
    {
      internal = 8300
      external = 8300
      protocol = "tcp"
    }
  ]
}

A variable definition has an identifier associated with it and typically a type that can be a string, number, or boolean and can be combined for more complex relationships like lists, sets, objects, or touples. Variables are typically defined in a file called .tfvars rather than a .tf file or can be passed in with the -var=”label=value” command line parameter. Alternately, variables can be defined as environment variables from the command line and the terraform command line understands how to read these values. Typically user credentials like username and password or public and private keys are defined in an environment variable rather than in a file. For a vSphere provider you can define the following environment variables and hide the connection detains to a server

  • VSPHERE_USER (var.user)
  • VSPHERE_PASSWORD (var.password)
  • VSPHERE_SERVER (var.vsphere_server)
  • VSPHERE_ALLOW_UNVERIFIED_SSL (var.allow_unverified_ssl)

Defining any of these variables on the command line get passed into the terraform control files without having to define them in a .tf or .tfvars file or having to pass them in with the -var command line extension. The var.<name> extension shown above are the constructs used to reference each of the parameters in the terraform control files. The three parameters required for a connection to a vSphere server are the var.user, var.password, and var.vsphere_server with the var.allow_unverified_ssl as an optional parameter.

provider "vsphere" {
  user           = var.vsphere_user
  password       = var.vsphere_password
  vsphere_server = var.vsphere_server

  # If you have a self-signed cert
  allow_unverified_ssl = true
}

Typically this is all the code that is needed to connect to a vSphere server. You could define the user, password, and vsphere_server as locals and reference them as local.user but that implies that one of your .tf or .tfvars files contains a password definition that becomes a security issue with file management and version control. Putting the user and password in an environment variable allows for dynamic changing of roles and credentials from the VMware side of the house without having to change your .tf or .tfvars files. Having the vspher_server defined with environment variables allows management of development, production, and disaster recovery using a common foundation file and not having to define a main.tf for each environment.

We could have just as easily defined our user, password and server with a Data Source definition rather than a variable definition. A data declaration is similar to a local declaration but can be more complex than a string comparison.

data "aws_ami" "example" {
  most_recent = true

  owners = ["self"]
  tags = {
    Name   = "app-server"
    Tested = "true"
  }
}

Declaring a username and password with a data definition is not the most secure and safe way of defining this data. Using a variable declaration and environment variable pulls this information out of source code control and security concerns. Defining a datastore or a template with a data declaration makes more sense given that structures like datacenter, datastore, folder structures, and templates hopefully do not change significantly over time. Templates might change based on new operating system releases but managing this change with a new declaration can be a good thing.

Hopefully, this post helps understand the key difference between variable and data declarations. Both have a purpose. Both can be used. There are some technical reasons to use one over the other. There are some security concerns where one might be a better selection. The real answer is to look at how your organization uses the different constructs and have a meaningful conversation on why one is used and why another is used instead. This is one of the grey areas where there is not one way of solving the problem.

Terraform data vs resources

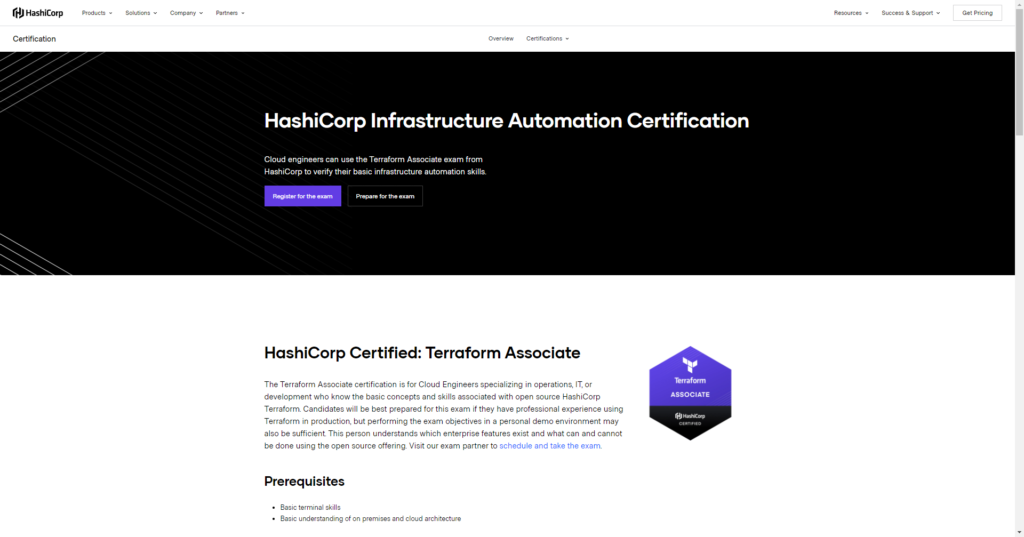
In previous blog posts we have talked about Installing Terraform on Windows, Installing Terraform on Ubuntu, Providers part 1 and Providers part 2. In this blog we will look at differentiating between data sources and resources. Note that we are looking at terraform constructs differently from what is presented in the HashiCorp Terraform Associate Certification and not following the suggested study guide format but diving into what is required to build something from scratch.

The assumptions that we are going to make in this blog are that first we have a terraform binary installed on Windows or Ubuntu and second that our target system is going to be vSphere initially either for development or in house production systems.

Given that we talked about the vSphere provider in an earlier blog posting we won’t go into a discussion on adding and configuring providers other than to say that vSphere is a tricky configuration when it comes to managing multiple servers. If we were managing multiple Amazon or Azure regions or zones we would define one provider for one zone and another provider with a different alias for the second zone. The vSphere provider does not support multiple datacenters or aliases for providers so managing multiple hosts with terraform must be done with one vSphere server controlling multiple hosts or multiple folders and directories managing different vSphere servers. Both of these strategies work well. For this example we will look at multiple servers under one vSphere and a single terraform configuration to manage all of these hosts.

Before we get started on data vs resource definitions it is important to note that the Terraform Associate certification focuses on Cloud Engineering and not necessarily on-premises servers. The concepts are generic enough but for this blog we will cover vSphere as our example target.

Scrolling down to the outline of the exam note that “Create and differentate resource and data configuration” is one of the topics in the Read, generate, and modify configuration section.

If we look at the documentation for the Terraform CLI for Data Sources it notes that data sources allow data to be fetched or computed for use elsewhere in Terraform configuration. Each provider may offer data sources alongside its set of resource types. What this means is that we can declare things that we know exist and should not change. For vSphere we know that there is a datacenter as well as datastore. The datacenter is the root of the vSphere environment. Under the datacenter is a host and a datastore. If we correlate this back to our vSphere console we can pull this data from the user interface.

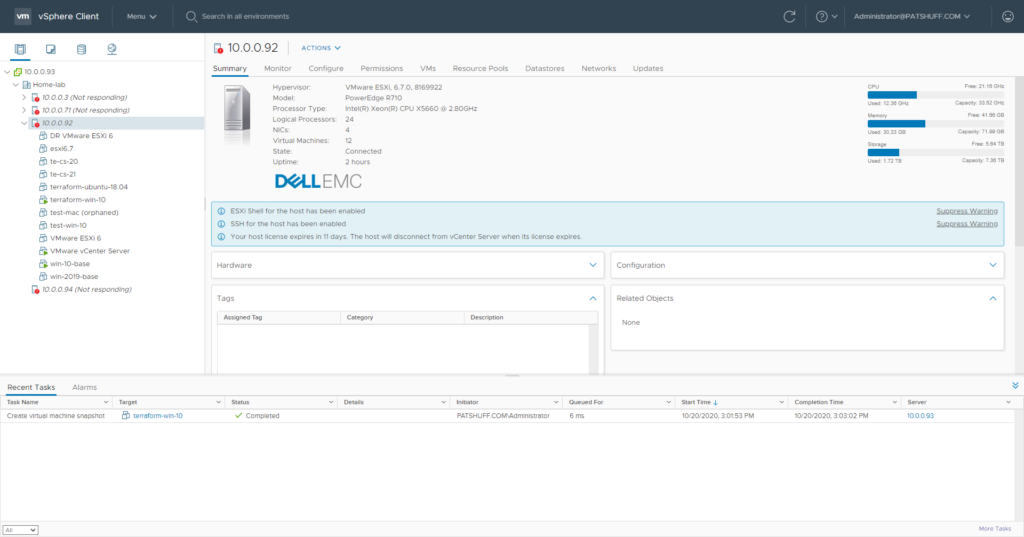
From our lab environment we log into the vSphere Client and go to the Summary screen of the root vSphere instance.

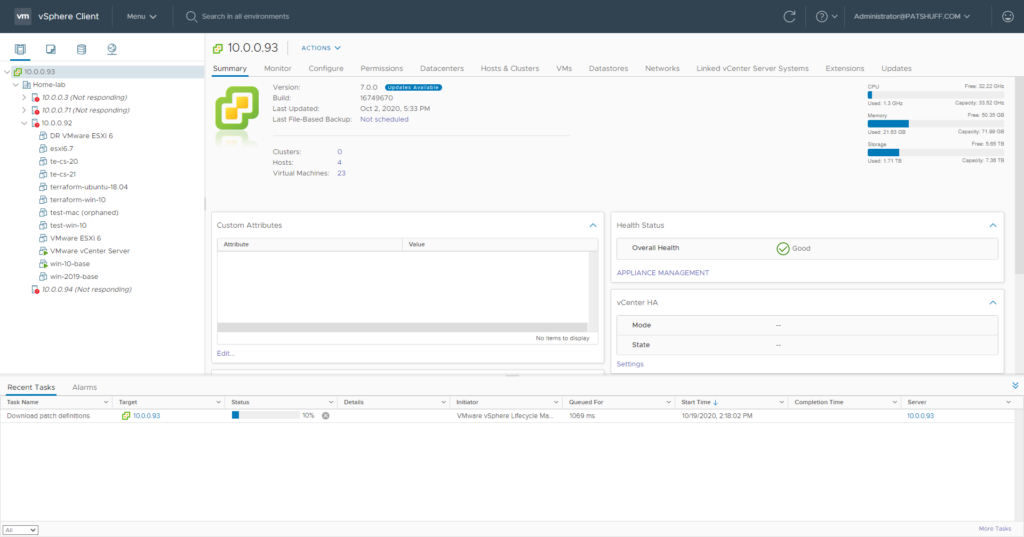
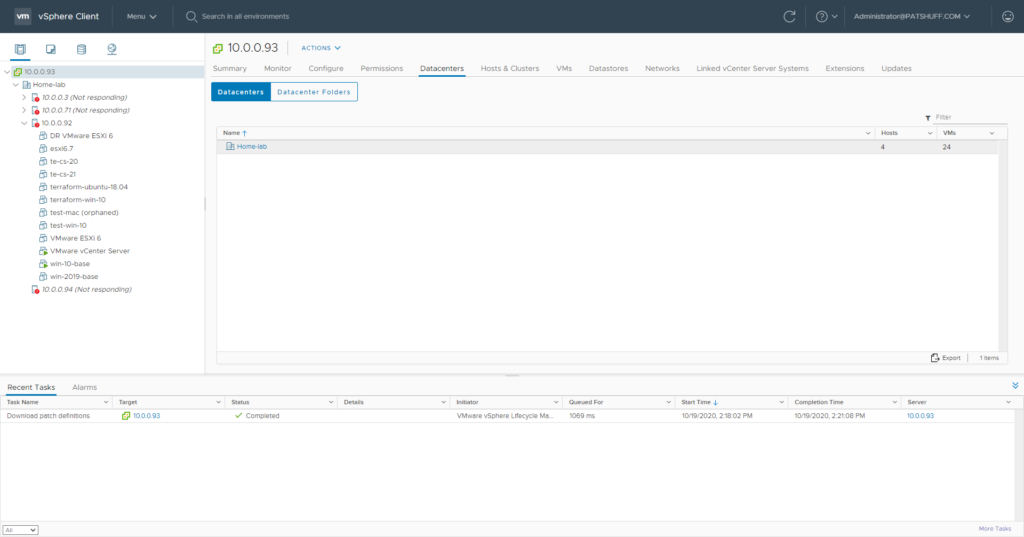
Note that we have 4 hosts displayed on the left side, 4 hosts listed in the center as well as 23 virtual machines. We do have a number of templates and virtual machines listed under our server 10.0.0.92 with two of the virtual machines currently running.

For our Terraform vSphere provider we need to first get the name of the Datacenter associated with this installation. We can do this by clicking on the Datacenters tab on the right side of the screen.

For this example we see that “Home-lab” is the Datacenter defined for our instance. In Terraform we would define this with a data element rather than a resource.

data "vsphere_datacenter" "datacenter" {
  name = "Home-lab"
}

The key reason that we use data rather than resource is that the terraform command will try to create this datacenter when an apply is run and destroy the datacenter when a destroy is run. We don’t want to destroy our datacenter but want to retain the definition to use as needed to access hosts and virtual machines.

From the Resources definition in the Terraform CLI, a resource describes one or more infrastructure object and running the apply command creates, updates, or destroys the object to force them to match the configuration in the configuration files. If your configuration gets changed then the terraform configuration tries to delete and reconfigure your datacenter. This is not the behavior that we want. What we want is to define everything that is static and should not change with the data declaration and things that are dynamic with the resource declaration. The elements that typically don’t change for vSphere are:

  • Datacenter
  • Host
  • Network
  • Datastore

Things that typically change but are good to use data declarations for are

  • Folders
  • Templates
  • Tags

Things that typically change are need a resource definition are

  • Virtual Machines
  • VMFS Disks
  • Roles
  • Users

To reference a data element you start with the data.<value> and use the type definition followed by the alias name. In the following example we define a host that is associated with a compute cluster that is inside a datacenter. We refer to the datacenter as data.vsphere_datacenter.dc and the cluster as data.vsphere_compute_cluster.c1 where “dc” and “c1” are aliases to identify the data definitions. We use the id parameter in the data construct to uniquely identify the resource.

data "vsphere_datacenter" "dc" {
  name = "TfDatacenter"
}

data "vsphere_compute_cluster" "c1" {
  name          = "DC0_C0"
  datacenter_id = data.vsphere_datacenter.dc.id
}

resource "vsphere_host" "h1" {
  hostname = "10.10.10.1"
  username = "root"
  password = "password"
  license  = "00000-00000-00000-00000i-00000"
  cluster  = data.vsphere_compute_cluster.c1.id
}

In the above example we are talking about the host “10.10.10.1” located in the compute cluster “DC0_C0” that lives in the TfDatacenter. In our Home-lab datacenter we can define our host 10.0.0.92 as a member of the Home-lab datacenter and provision virtual machines onto this host.

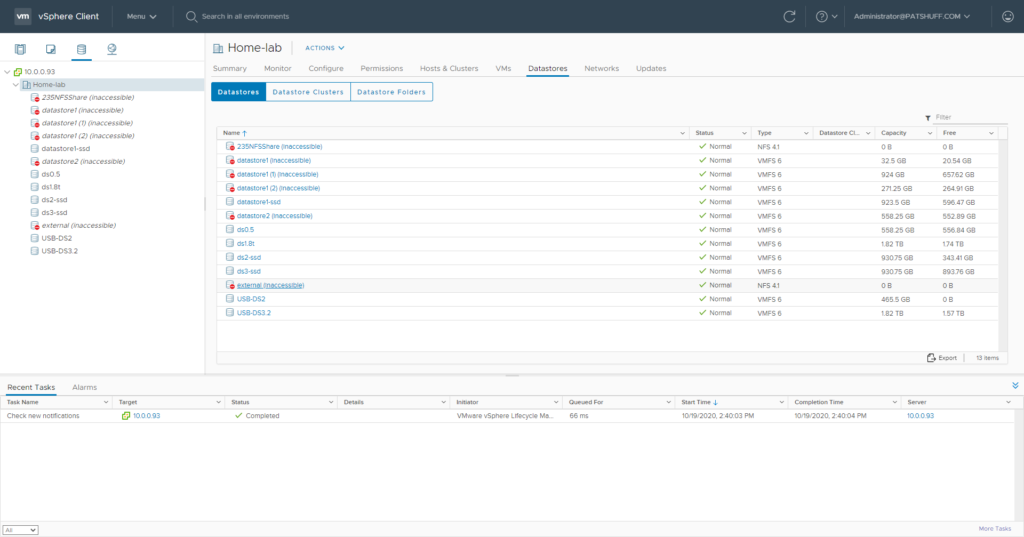
We would also define our vsphere_datastore defined by “name” that lives in the data.vsphere_datacenter.dc. To view the datastores from the vSphere Client, click on the Datastores tab or the disk icon to get a list of potential datastores.

Note that some of the datastores are listed as inacessible. These servers are currently turned off and the accessible ones are connected to our primary host and vSphere server which is the only one powered on for demonstration purposes.

In summary, data declarations should be used for static and permanent structures. Resource declarations should be used for things that can be created or considered transient or malleable. For a production datacenter that I managed we defined folders, virtual machine templates, and datastores with the data declaration.

data “vsphere_datacenter” “dc” {
name = “QM Lab”
}

data “vsphere_resource_pool” “pool” {
name = “TintonFalls/Resources”
datacenter_id = data.vsphere_datacenter.dc.id
}

data “vsphere_host” “host” {
name = “172.19.21.54”
datacenter_id = data.vsphere_datacenter.dc.id
}

data “vsphere_datastore” “DS6” {
name = “DS6”
datacenter_id = data.vsphere_datacenter.dc.id
}

data “vsphere_datastore” “EQL1-Raid5” {
name = “EQL1-Raid5”
datacenter_id = data.vsphere_datacenter.dc.id
}

data “vsphere_datastore” “EQL2-Raid6” {
name = “EQL2-Raid6”
datacenter_id = data.vsphere_datacenter.dc.id
}

data “vsphere_datastore” “ADV-ESX4-maglib1” {
name = “ADV-ESX4 maglib1(7.2K)”
datacenter_id = data.vsphere_datacenter.dc.id
}

data “vsphere_datastore” “ADV-ESX4-maglib2” {
name = “ADV-ESX4 maglib2(7.2K)”
datacenter_id = data.vsphere_datacenter.dc.id
}

data “vsphere_datastore” “ADV-ESX4storage1” {
name = “ADV-ESX4 storage1(15K)”
datacenter_id = data.vsphere_datacenter.dc.id
}

data “vsphere_datastore” “ADV-ESX4storage2” {
name = “ADV-ESX4 storage2(15K)”
datacenter_id = data.vsphere_datacenter.dc.id
}

data “vsphere_datastore” “ADV-ESX4storage3” {
name = “ADV-ESX4 storage3(15K)”
datacenter_id = data.vsphere_datacenter.dc.id
}

data “vsphere_datastore” “ADV-ESX4storage4” {
name = “ADV-ESX4 storage4(15K)”
datacenter_id = data.vsphere_datacenter.dc.id
}

data “vsphere_datastore” “ADV-ESX4storage5” {
name = “ADV-ESX4 storage5(15K)”
datacenter_id = data.vsphere_datacenter.dc.id
}

data “vsphere_datastore” “corenfsshare” {
name = “corenfsshare”
datacenter_id = data.vsphere_datacenter.dc.id
}

data “vsphere_network” “network” {
name = “VM Network”
datacenter_id = data.vsphere_datacenter.dc.id
}

data “vsphere_virtual_machine” “W2k8-sp18-template” {
name = “W2k8-sp18-template”
datacenter_id = data.vsphere_datacenter.dc.id
}

data “vsphere_virtual_machine” “Windows2016-template” {
name = “2016_template”
datacenter_id = data.vsphere_datacenter.dc.id
}

data “vsphere_virtual_machine” “W2k16-Aug-2020-template” {
name = “W2k16-Aug-2020-template”
datacenter_id = data.vsphere_datacenter.dc.id
}

data “vsphere_virtual_machine” “centos-base” {
name = “centos-base”
datacenter_id = data.vsphere_datacenter.dc.id
}

data “vsphere_virtual_machine” “rhel-base” {
name = “rhel-base”
datacenter_id = data.vsphere_datacenter.dc.id
}

data “vsphere_virtual_machine” “suse-sap-base” {
name = “suse-sap-base”
datacenter_id = data.vsphere_datacenter.dc.id
}

data “vsphere_virtual_machine” “te-kubernetes-base” {
name = “te-kubernetes-base”
datacenter_id = data.vsphere_datacenter.dc.id
}

data “vsphere_virtual_machine” “ubuntu-base” {
name = “ubuntu-base”
datacenter_id = data.vsphere_datacenter.dc.id
}

data “vsphere_virtual_machine” “ubuntu-docker-desktop” {
name = “ubuntu-docker-desktop”
datacenter_id = data.vsphere_datacenter.dc.id
}

data “vsphere_virtual_machine” “Windows-10-template” {
name = “Windows-10-template”
datacenter_id = data.vsphere_datacenter.dc.id
}

data “vsphere_folder” “parent” {

path = “${data.vsphere_datacenter.dc.name}/vm/Technical Enablement”
}

data “vsphere_folder” “Apps” {
path = “${data.vsphere_folder.parent.path}/Apps”
}

data “vsphere_folder” “testing” {
path = “${data.vsphere_folder.Apps.path}/testing”
}

data “vsphere_folder” “sp22” {
path = “${data.vsphere_folder.Apps.path}/sp22”
}

data “vsphere_folder” “sp21” {
path = “${data.vsphere_folder.Apps.path}/sp21”
}

data “vsphere_folder” “sp20” {
path = “${data.vsphere_folder.Apps.path}/sp20”
}

Terraform Providers

One of the foundational components of automation is being able to speak in the language of your target. With AWS, for example, CloudFormation is a good tool to define what a deployment in AWS should look like and ensures conformity to the design definition. The main problem is that CloudFormation only works on AWS and does not work on other deployment platforms. Terraform, on the other hand, performs the same automation from a configuration definition and creates the desired components onto a variety of platforms. The mechanism used to perform this function is the inclusion of a provider definition. If you think in terms of Java or C programming a provider is a set of library functions that can be called and including a provider definition is similar to a include statement to pull in a library header.

Some good blogs that compare and contrast Terraform vs CloudFormation include:

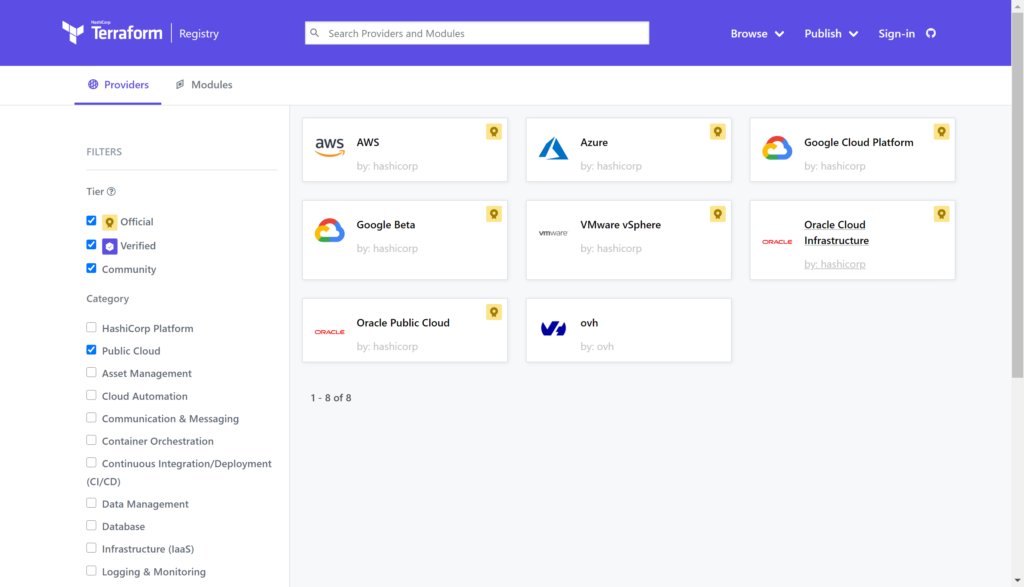
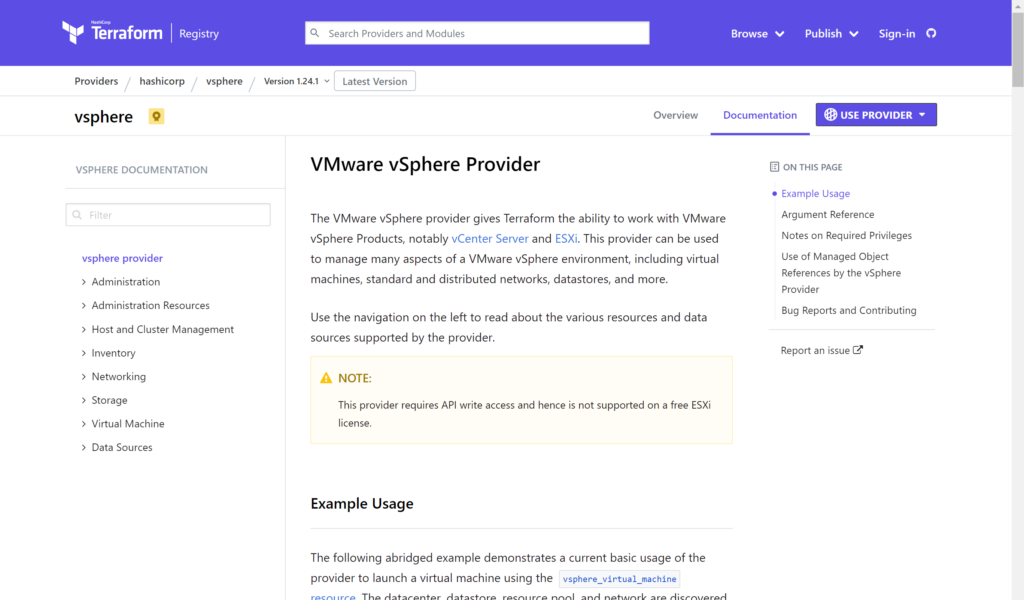
If you look at the definition of a provider from HashiCorp on their Providers page it defines a provider as a way to expose the API interface of the backend system as well as tasks that might be needed like random number generation utilities to generate names. The Terraform Registry includes a list of providers and systems that Terraform can interface with. Checking the public cloud box provides us with a list of various cloud hosting targets that we will focus on in later blogs.

For the purpose of this blog we will dive into the VMware vSphere provider to get an understanding of how to call it, what happens when you call it, and what constructs are needed when you call it. In a previous blog we compared the vSphere provider to the AWS provider on a very high level to talk about the format differences between providers. In this blog we will dive deeper into the vSphere provider to help understand how to deploy it in a development, production, and disaster recovery scenario.

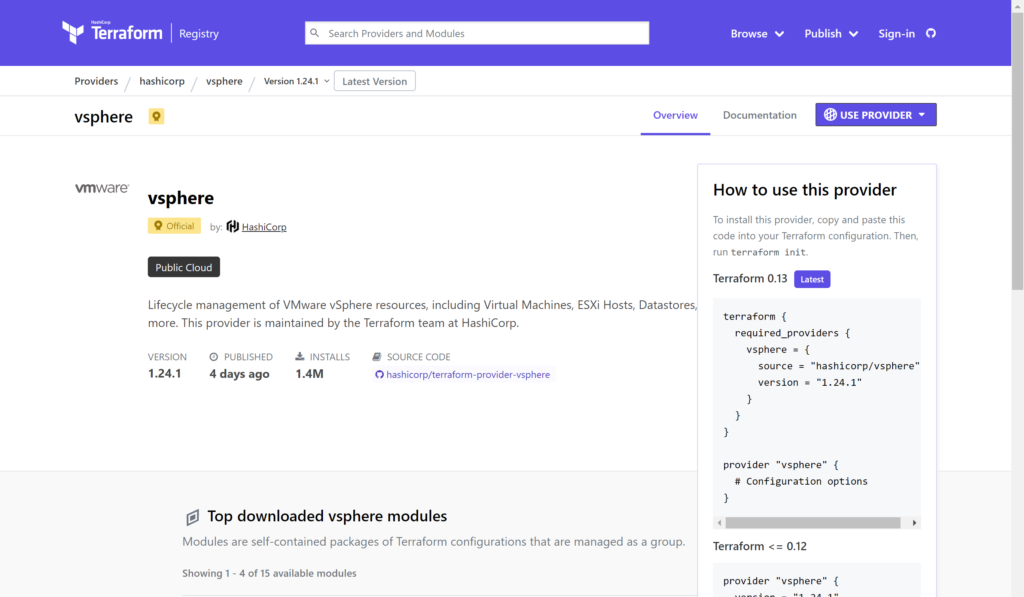
Selecting the vsphere provider and clicking on the USE PROVIDER button at the top right it shows that you can call the provider with either the required_providers or provider command structures. We will use the simplest example by calling only

provider “vsphere” { }

Looking at the documentation there are a variety of optional and required parameters that are needed inside the curly brackets.

The parameter options that we need for the provider definition include (taken straight from the hashicorp page):

  • user – (Required) This is the username for vSphere API operations. Can also be specified with the VSPHERE_USER environment variable.
  • password – (Required) This is the password for vSphere API operations. Can also be specified with the VSPHERE_PASSWORD environment variable.
  • vsphere_server – (Required) This is the vCenter server name for vSphere API operations. Can also be specified with the VSPHERE_SERVER environment variable.
  • allow_unverified_ssl – (Optional) Boolean that can be set to true to disable SSL certificate verification. This should be used with care as it could allow an attacker to intercept your auth token. If omitted, default value is false. Can also be specified with the VSPHERE_ALLOW_UNVERIFIED_SSL environment variable.
  • vim_keep_alive – (Optional) Keep alive interval in minutes for the VIM session. Standard session timeout in vSphere is 30 minutes. This defaults to 10 minutes to ensure that operations that take a longer than 30 minutes without API interaction do not result in a session timeout. Can also be specified with the VSPHERE_VIM_KEEP_ALIVE environment variable.

For security sake it is recommended to hide user and password information in a different file from the definition or have it as environment variables in the shell to pass into terraform. In this example we will create two files, variables.tf and main.tf to simple call the provider definition and look at the constructs that are created by terraform.

The main.tf file looks like

provider “vsphere” {
user = var.vsphere_user
password = var.vsphere_password
vsphere_server = var.vsphere_server
version = “1.12.0”

allow_unverified_ssl = true
}

Note the use of var.<something> to pull in the definition of an externally defined variable. This could be done with a second file or with environment variables. For a variables.tf file we could enter

variable “vsphere_user” {
type = string
default = “administrator@vsphere.local”
}

variable “vsphere_password” {
type = string
default = “NotTheRIghtPassword”
}

variable “vsphere_server” {
type = string
default = “10.0.0.72”
}

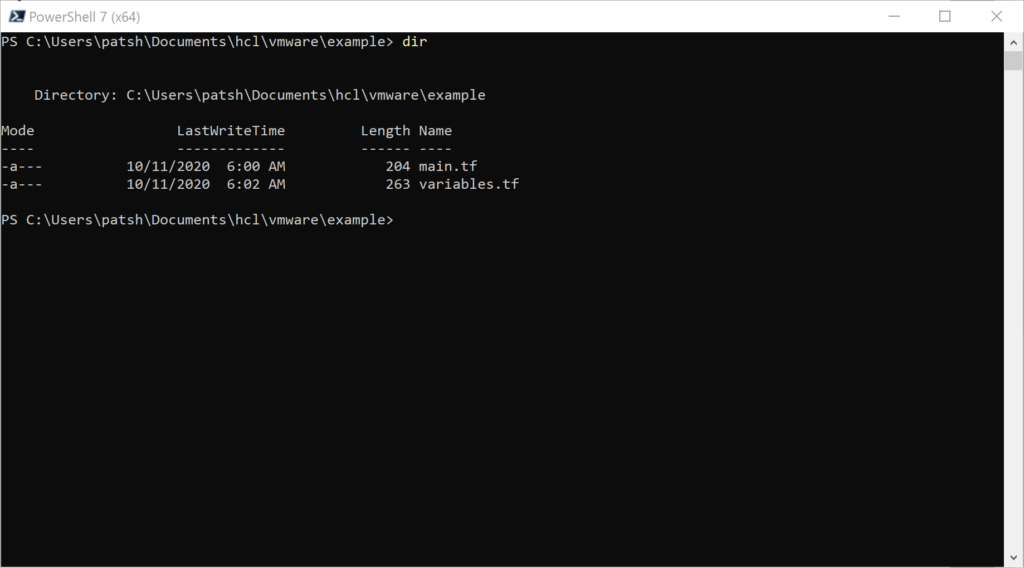
In the variables.tf file we define three string values and include a default value to pre-define what the variable should be defined as. If we open up a PowerShell windows (or Terminal on Linux) we can see that there are only the variables.tf and main.tf files in the directory.

Note that we are using PowerShell 7 as the command line interface so that we can test out the connection to our vSphere server using PowerCLI commands to verify variable definitions.

If we type

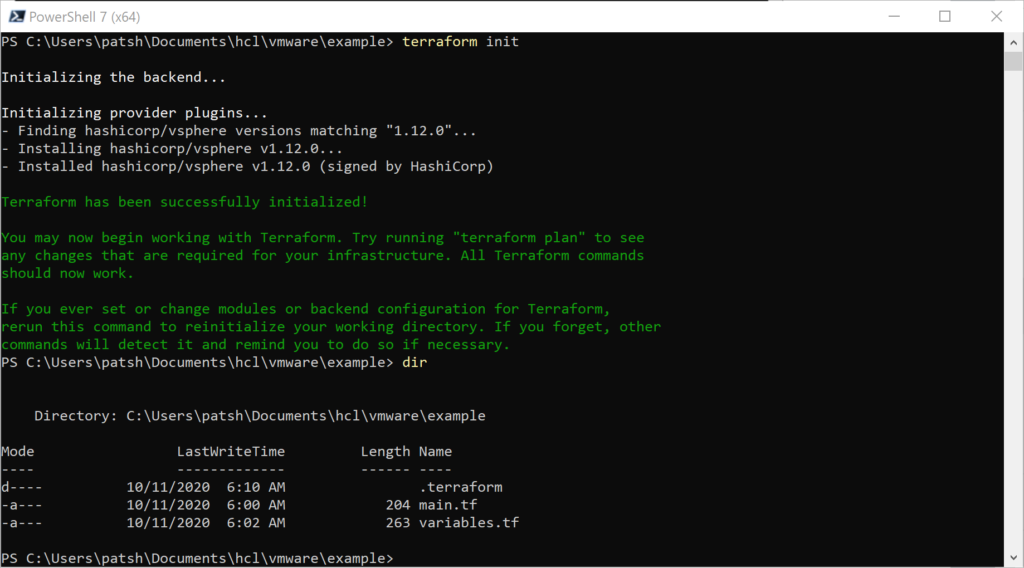
terraform init

The hashicorp/vsphere provider data is pulled from the web and placed in the .terraform subdirectory.

Looking at the .terraform directory it contains a grouping of libraries that we can call from our main.tf definition file.

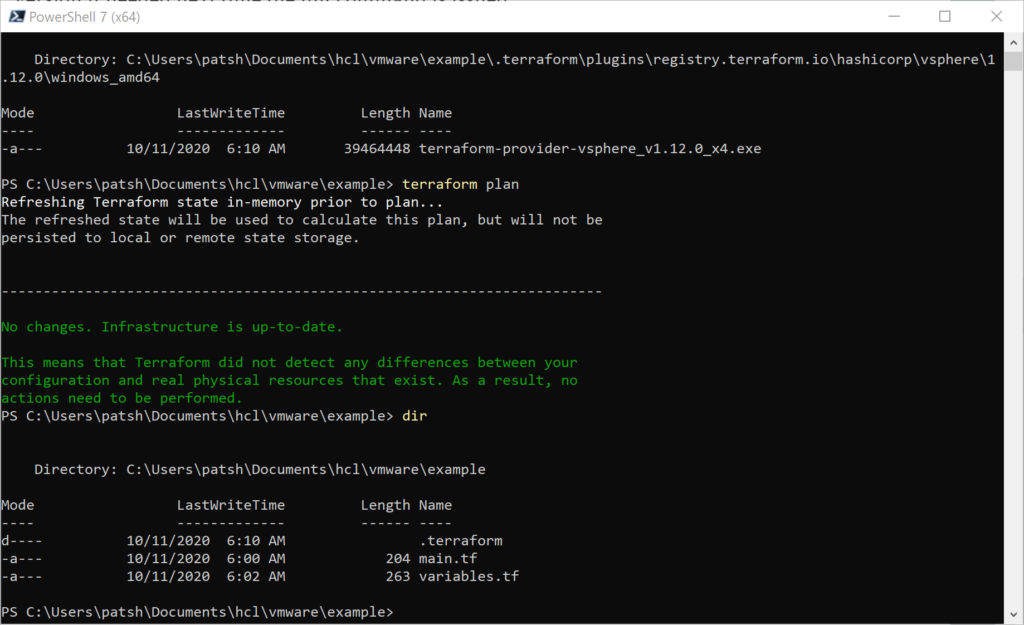
If we use the tree command we can see the nested structure and note that there is a selections.json file at the plugins and a terraform-provider-vsphere_v1.12.0_x4.exe at the windows_amd64 subdirectory

What the init command did was find out what platform we are running on and pulled down the appropriate binary to translate terraform modules and resource calls into API calls into vSphere. For our example we will make API calls into our vSphere server located at 10.0.0.72 as administrator@vsphere.local with the given password. The selections.json file contains a hash value that is used to test the binary integrity of the terraform-provider-vsphere_v1.12.0_x4.exe and download a new version if needed next time the init command is issued.

At this point we can call the

terraform plan

command to test our main.tf and variables.tf configurations. Everything should work because the syntax is simple so far.

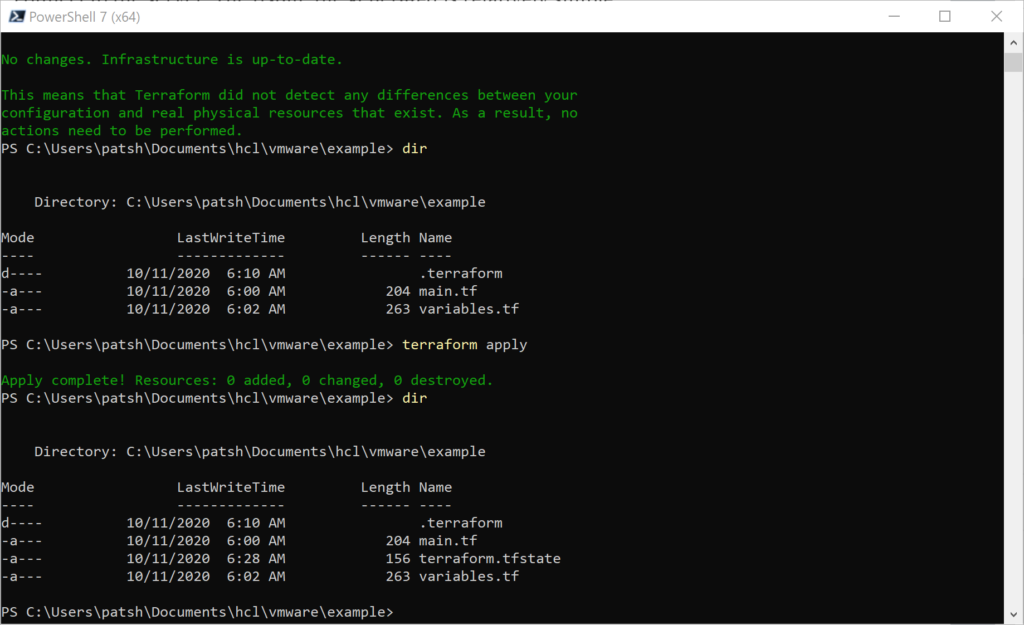
Note that we don’t have a state file defined yet. This should happen when we type

terraform apply

Once we execute this command we get a terraform.tfstate file locally that contains the state information of the current server. Given that we have not made any resource definitions, data declarations, or module calls we don’t have any need to connect to the server. The tfstate file generated is relatively simple.

{
“version”: 4,
“terraform_version”: “0.13.3”,
“serial”: 1,
“lineage”: “f35a4048-4cee-63e0-86b2-e699165efbe5”,
“outputs”: {},
“resources”: []
}

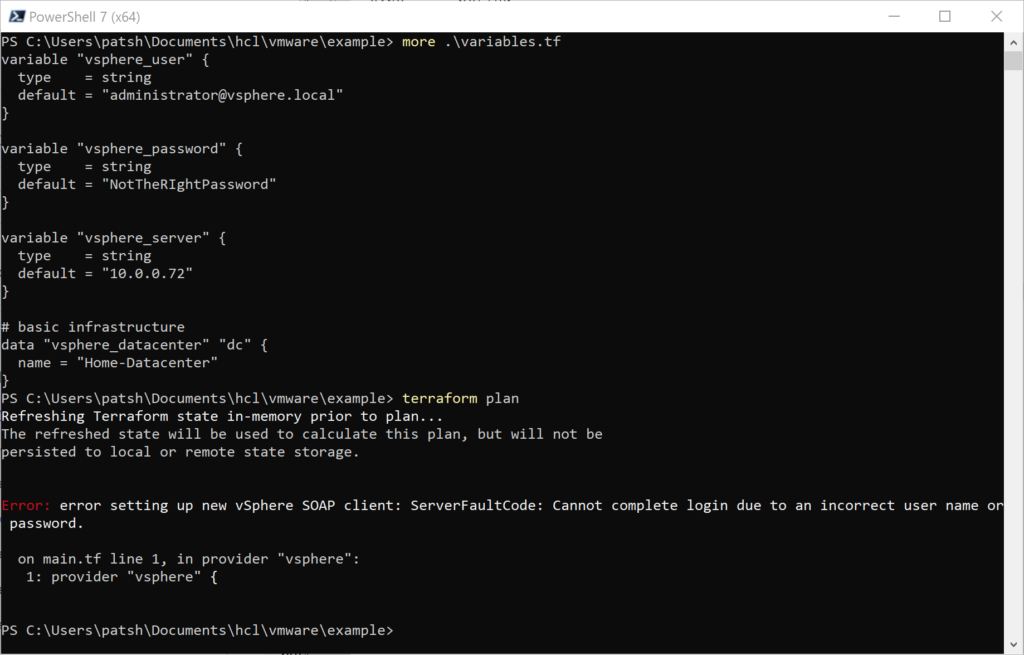
If we included something simple like a datacenter definition the connection will fail with the wrong password.

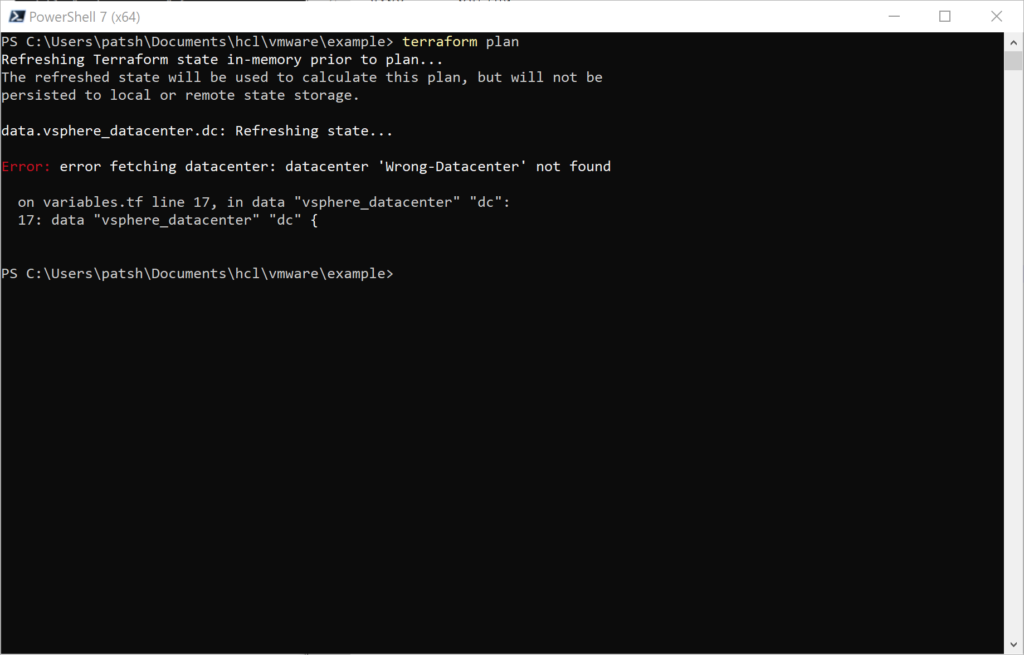
Putting in the right password but the wrong datacenter will return a different value

To get the right datacenter we can go to the vSphere html5 user interface or use the Connect-VIserver command to look for the datacenter name.

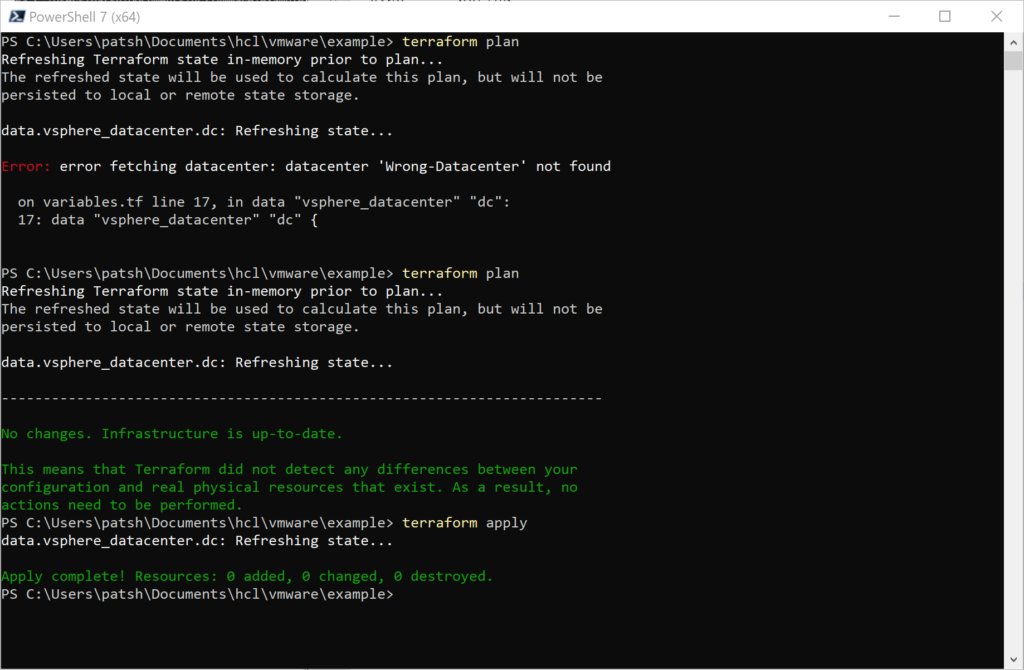
In this example we should use the Home-Datacenter as the Datacenter name.

It is important to note that the tfstate file changes with the successful apply and the resources section now contains valid data about our server.

{
“version”: 4,
“terraform_version”: “0.13.3”,
“serial”: 2,
“lineage”: “f35a4048-4cee-63e0-86b2-e699165efbe5”,
“outputs”: {},
“resources”: [
{
“mode”: “data”,
“type”: “vsphere_datacenter”,
“name”: “dc”,
“provider”: “provider[\”registry.terraform.io/hashicorp/vsphere\”]”,
“instances”: [
{
“schema_version”: 0,
“attributes”: {
“id”: “datacenter-3”,
“name”: “Home-Datacenter”
}
}
]
}
]
}

In summary, we have looked at how to find various providers to use with terraform, how to call a sample provider and what constructs are created when the init, plan, and apply functions are used with the local terraform binary. Fortunately, none of this changes if you are using Windows, Linux, or any other operating system. The provider directory under the .terraform tree contains the binary to translate from local API calls to API calls on the target system. This is a simple example but gives a good overview of what a good and bad connection into a vSphere server looks like and how to troubleshoot the connection. This construct should also work for a direct connection into an ESXi server without having to spin up a vSphere management instance.

HashiConf – October 2020 Conference

HashiCorp is holding their annual users conference online this year and I will be attending virtually to learn what is new and being announced around Terraform. The conference is a two day conference starting Oct 14th and runs through Oct 15th as well as two days of workshops on the 12th and 13th. This blog will cover part of the full schedule since not all of the presentations are Terraform centric.

HashiConf Digital Opening Keynote

The introduction keynote was interesting with conference shots from the presenter’s homes. The number of attendees (12K) and new number of employees (1K) were interesting numbers. The rest was mostly marketing information about HashiCorp. Some interesting facts: 1K enterprise customers, 6K new users/month, growing with cloud partners and technology partners. Certification program – http://hashicorp.com/certification. Learning program – http://learn.hashicorp.com

Unlocking the Cloud Operating Model: Provisioning

Vault as a Security Platform & Future Direction

Vault is the security layer on top of Terraform and allows storage of security and secrets for Kubernetes and other platforms in a secure manner. The bulk of downloads last year was a combination of Vault in conjunction with Kubernetes. The discussion continued from a banking customer that used Vault to store API keys, Certificates, as well as username/passwords. Vault also allows for automation or key rotation and X.509 certificates to be dynamically assigned and consumed.

Options for running Vault – traditional way of download and run as well as SaaS in the HashiCorp Cloud Platform. New announcement of Vault on AWS as a service.

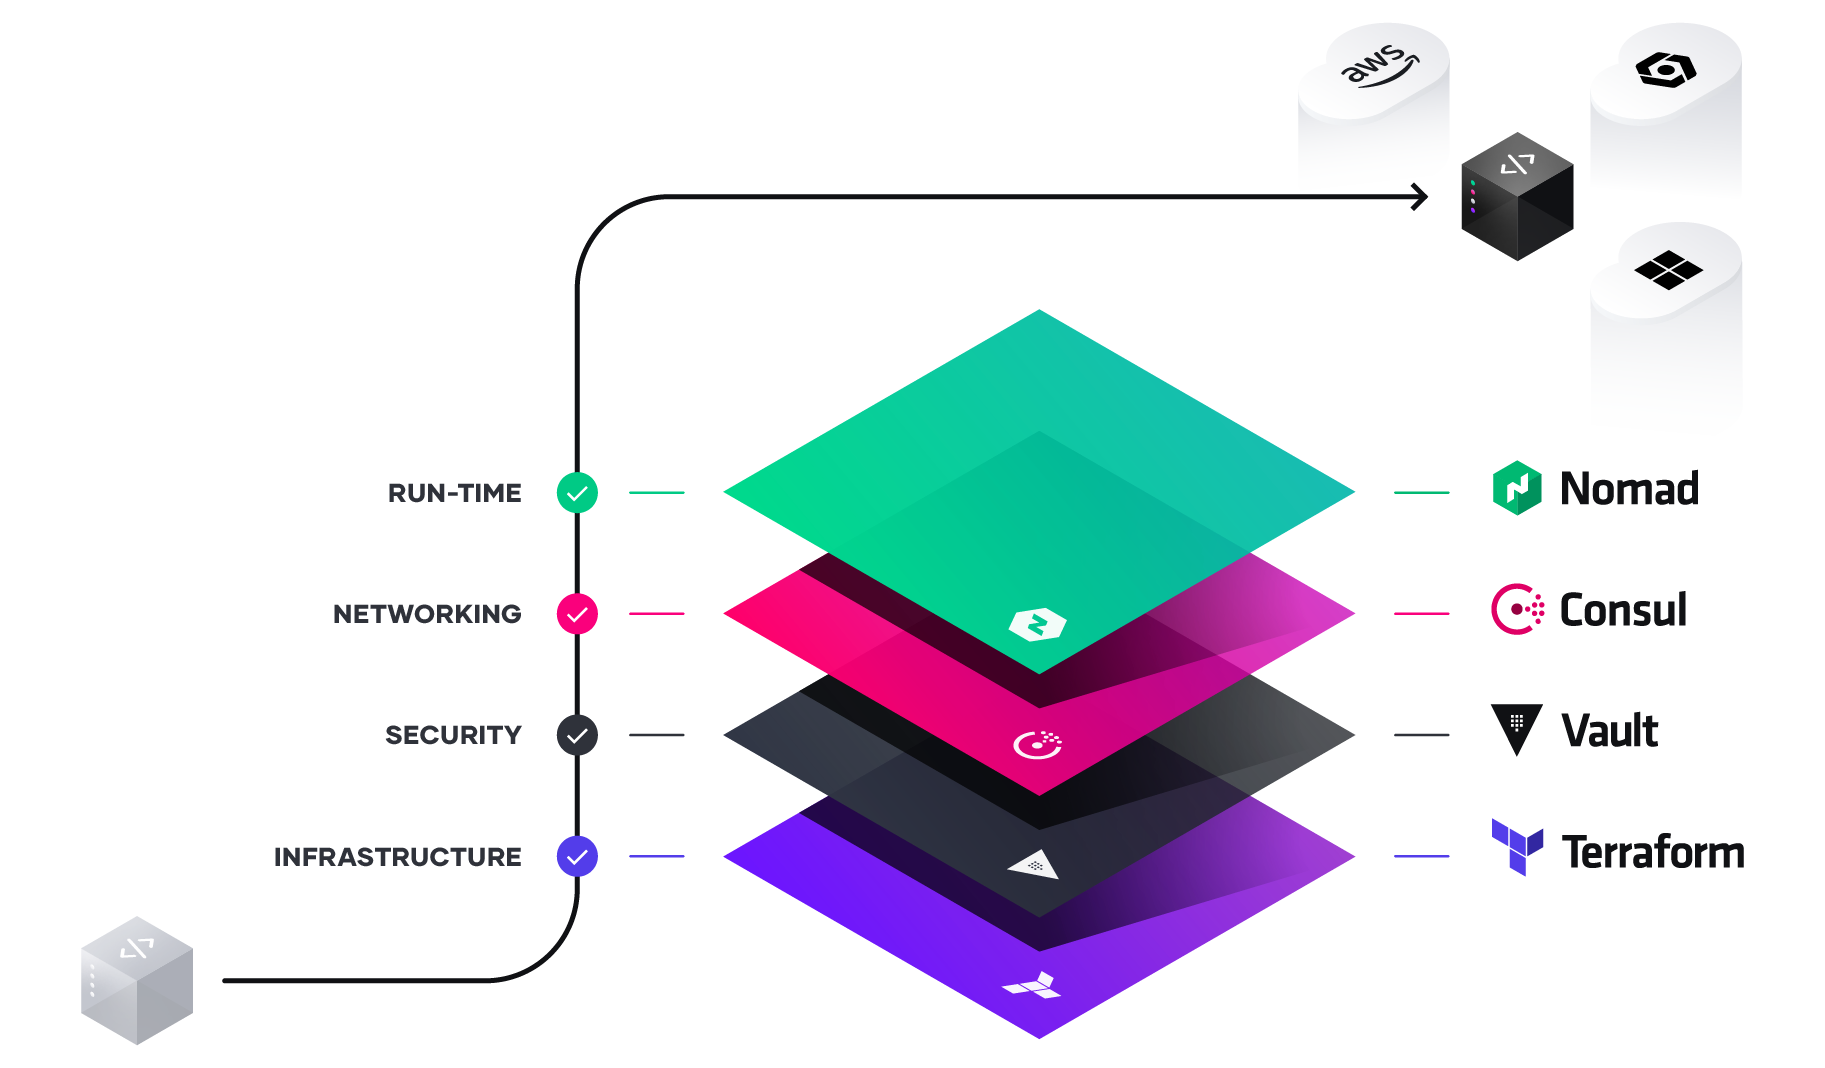
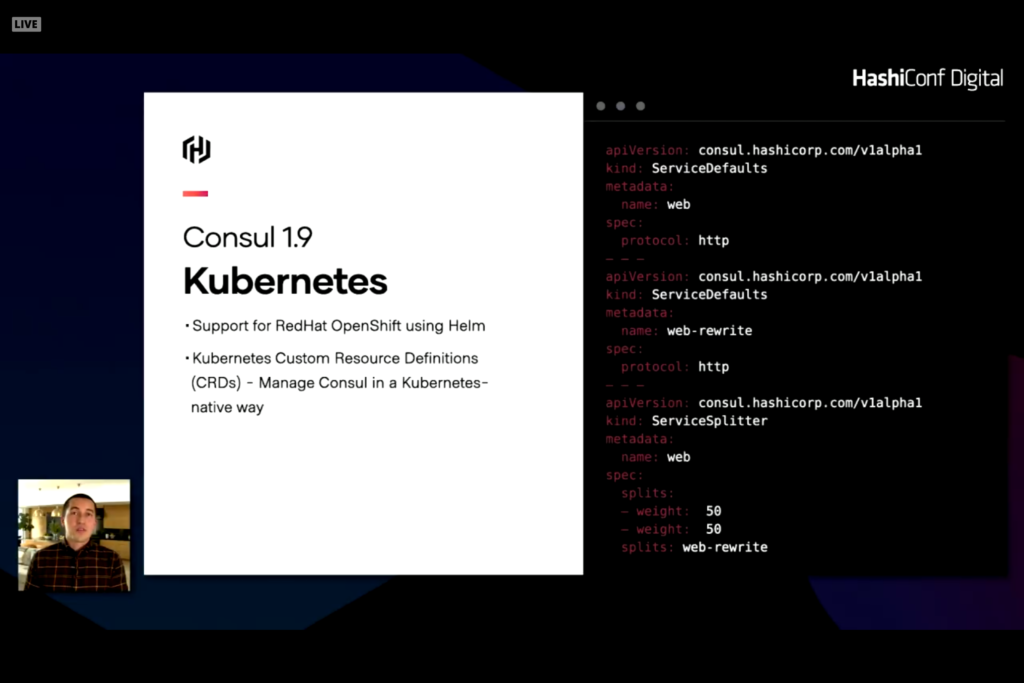
Consul is an extension of Vault allowing for network infrastructure automation that includes service discovery as well as access rights, authorization, and connection health. Consul can reconfigure and change on-premises server like Cisco and cloud network configurations like load balancers, network security rules, and firewalls. New announcement of Consul on AWS as a service as well as Consul 1.9 with significant enhancements for Kubernetes

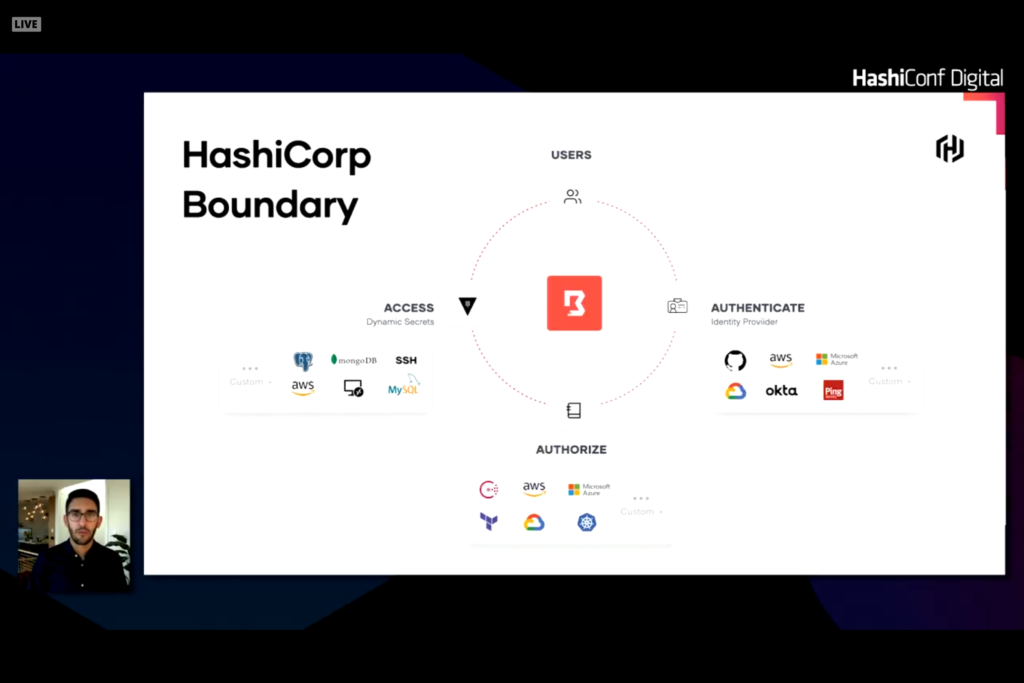
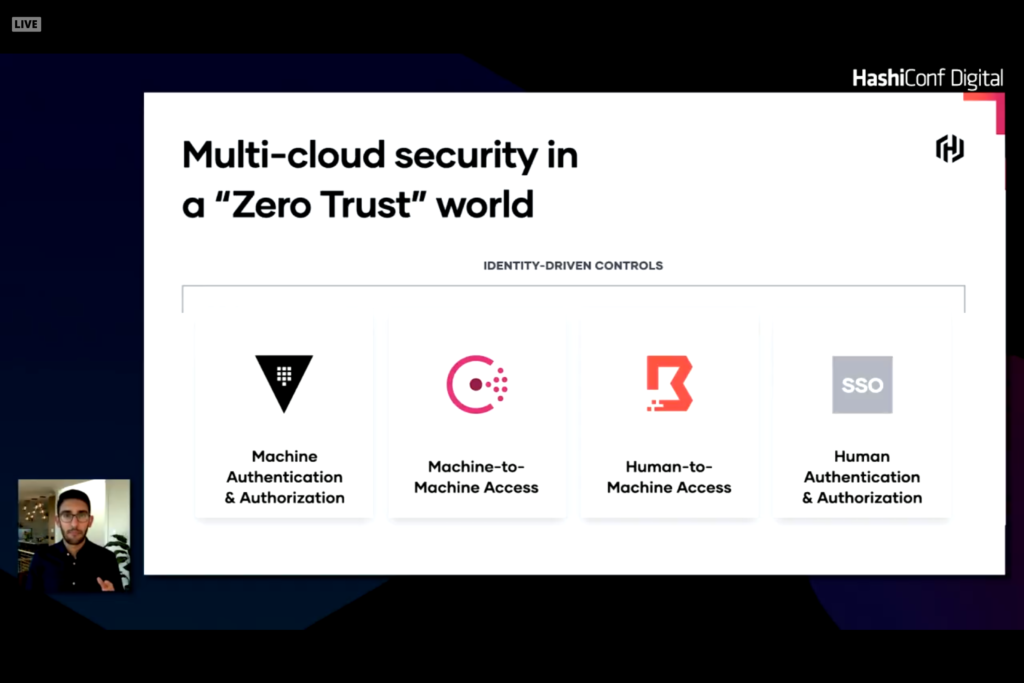
Human Authentication and Authorization is another layer that can cause problems or issues with system configuration and automation. Traditional products like Active Directory or LDAP for on-premises or Okta or AzureAD for cloud credentials can be leveraged to provide auth and authz resources. The trick is how to leverage these trusted sources into servers and services. Traditionally this was done with SSH keys or VPN credentials with secure network and known IP addresses or hostnames. With dynamic services and hosts this connection becomes difficult. Leveraging services like Okta or AzureAD and role based access for users or services is a better way of solving this problem. Credentials can be dynamically assigned to role and rotated as needed. The back end servers and services can verify these credentials with the auth service to verify authorization for the user or role for access. HashiCorp Boundary provides the linkages to make this work.

Boundary establishes a plugable identity provider into authentication source to verify user identities. A second set of plugables connect to an authorization source and integrates with HashiCorp Vault to access services with stored secrets allowing secrets to be rotated and dynamic.

Vault as a Security Platform and Future Direction

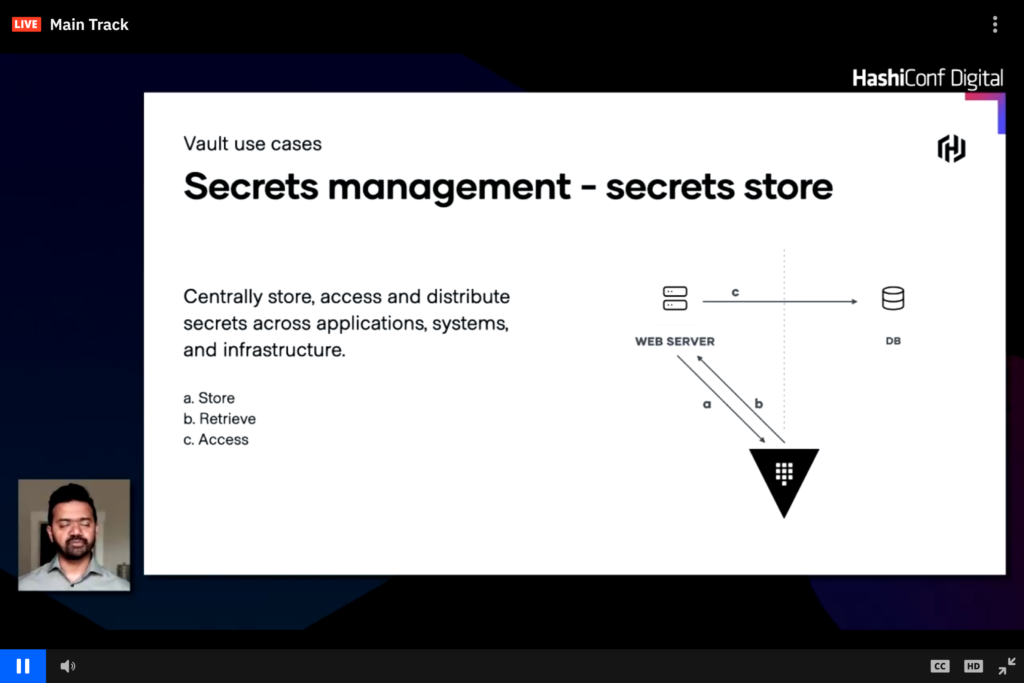
Vault centrally stores secrets for infrastructure

Vault can centrally store username and passwords, public and private keys, as well as other dynamic or secure credentials. In the image above a web server pulls the database credentials from Vault rather than storing it in code or config files and the webserver can use these dynamic credentials to connect to a database. This workflow can easily change and have the webserver request credentials from Vault and Vault connects to the database to generate a short lived auth token which is then passed back to Vault and then to the web server.

Building a Self-service vending machine to streamline multi-AWS account strategy

The presentation was from Eventbrite describing how they use Terraform and the HashiStack to manage AWS and a multi-account AWS solution. Multiple AWS accounts are needed to isolate different domains and solutions. Security can be controlled across all accounts through automation. The AWS Terraform Landing Zone (TLZ) quickly became a solution. This product was introduced a year ago as a joint project between HashiCorp and Amazon.

The majority of the conversation was business justification for a multi-AWS account management requirement and how AWS Control Tower would not work. From the discussion and chat it appears that TLZ is still in beta and could potentially make things easier.

Terraform in Regulated Financial Services

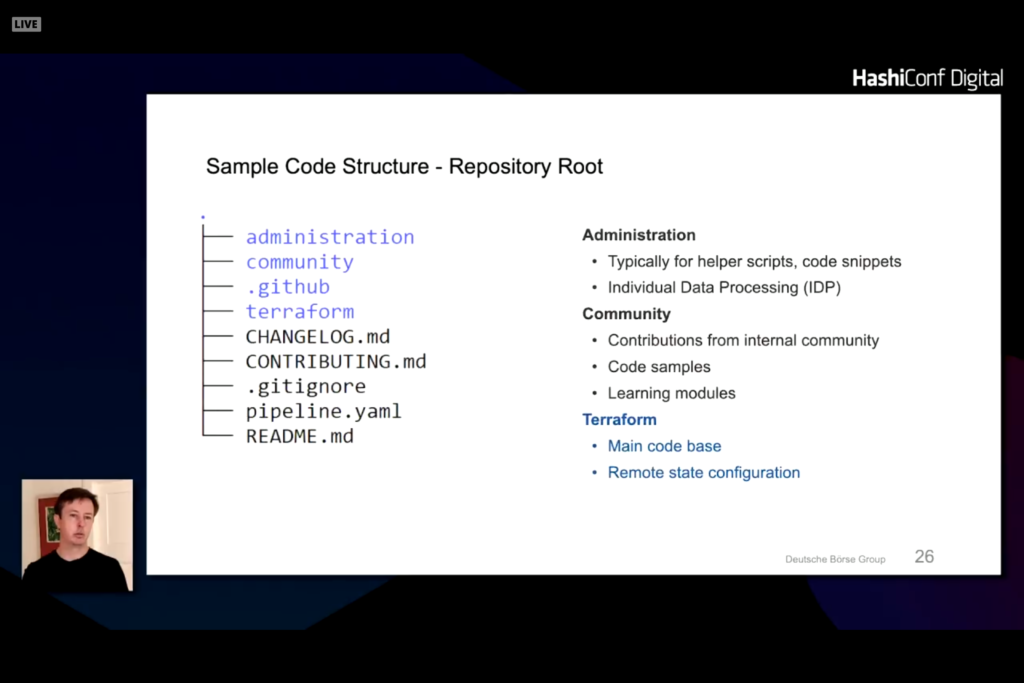
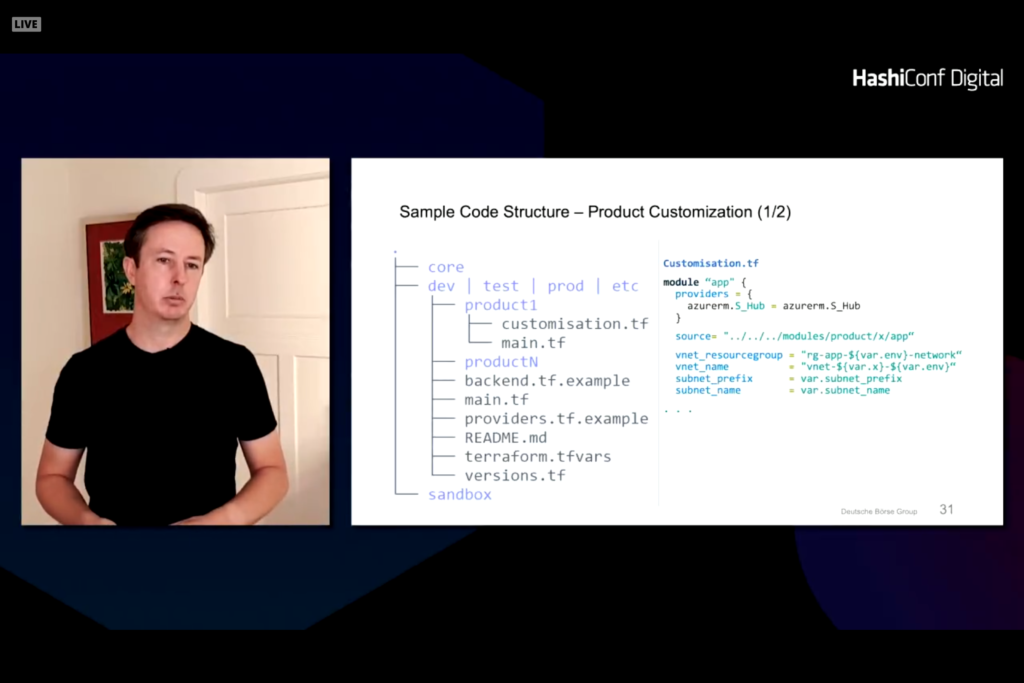
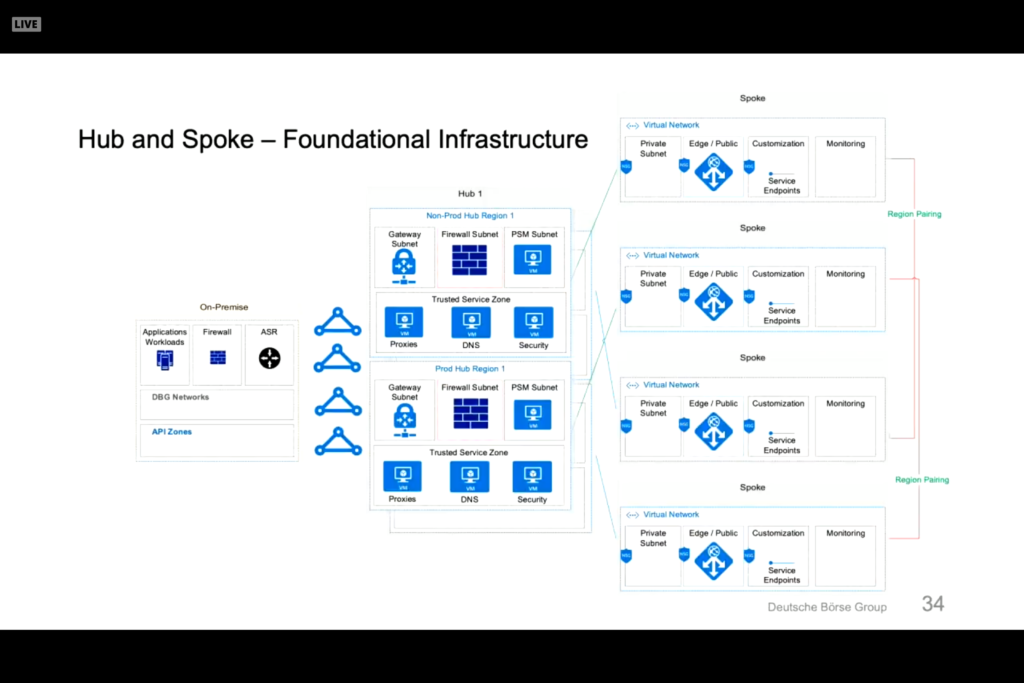
Customer presentation from Deutsche Boerse Group discussing Terraform deployment into AWS, Azure, and GCP. Fully automated electronic training application. Terraform and Packer foundation to building and managing systems. Infrastructure as Code (IaC) helps with regulation reporting and guidelines in the financial industry. The Terraform helps define uniform policies and procedures. Code is designed and split into product zones that represents different applications or functions.

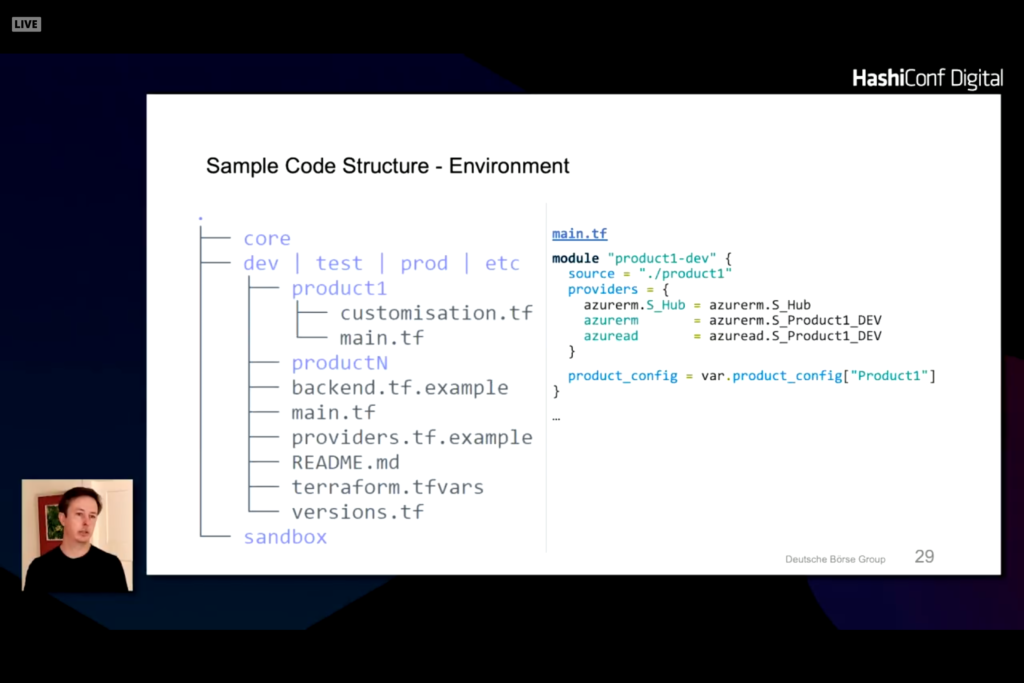
Under the terraform directory is a split of dev, test, prod, and etc directories with product lists under each one.

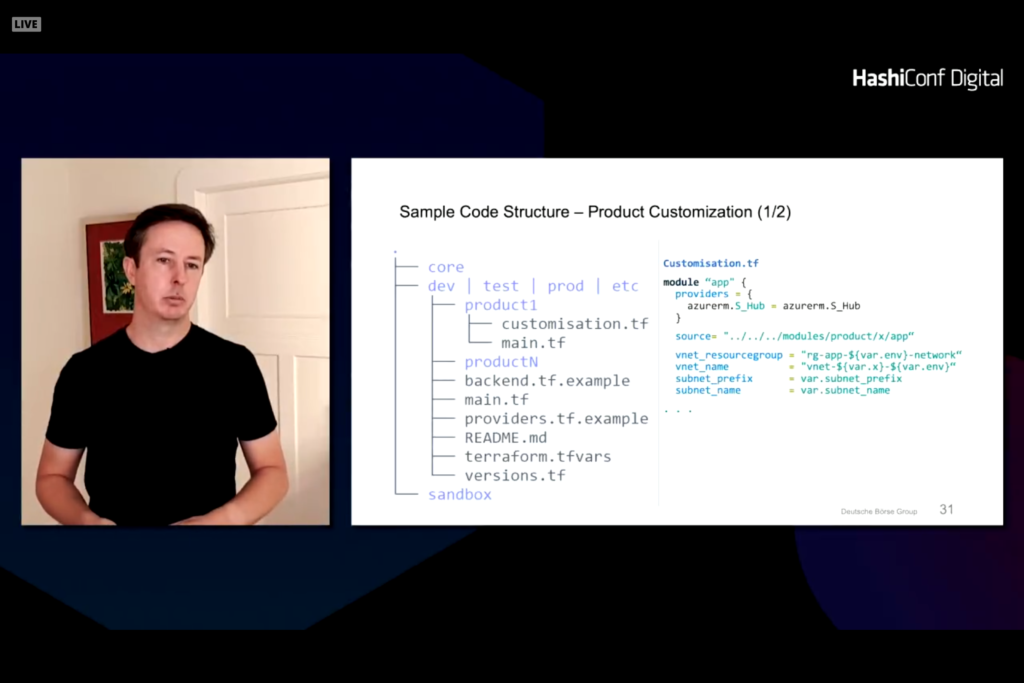
Note that there are a few structures that are common across all modules and there are specific product and class of service. Network controls are controlled through a central network definition. Customizations can be made to note changes that vary from the company policies and procedures.

A standard module for a hub can be defined for services like monitoring and network.

This results in a core module that is secure and compliant with environments.

Packer in layered on top of this to harden the operating system and provision customizations into each virtual machine. Ansible configures the machine and can deploy straight to a cloud provider through a private marketplace or personal template.

Terraform Consistent Development and Deployment

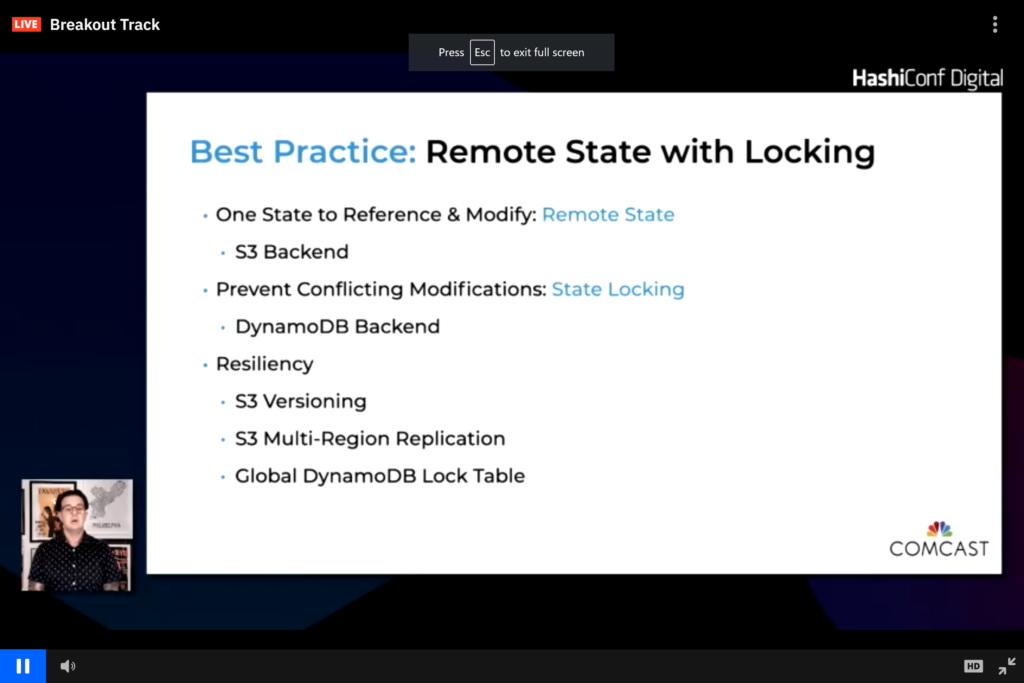
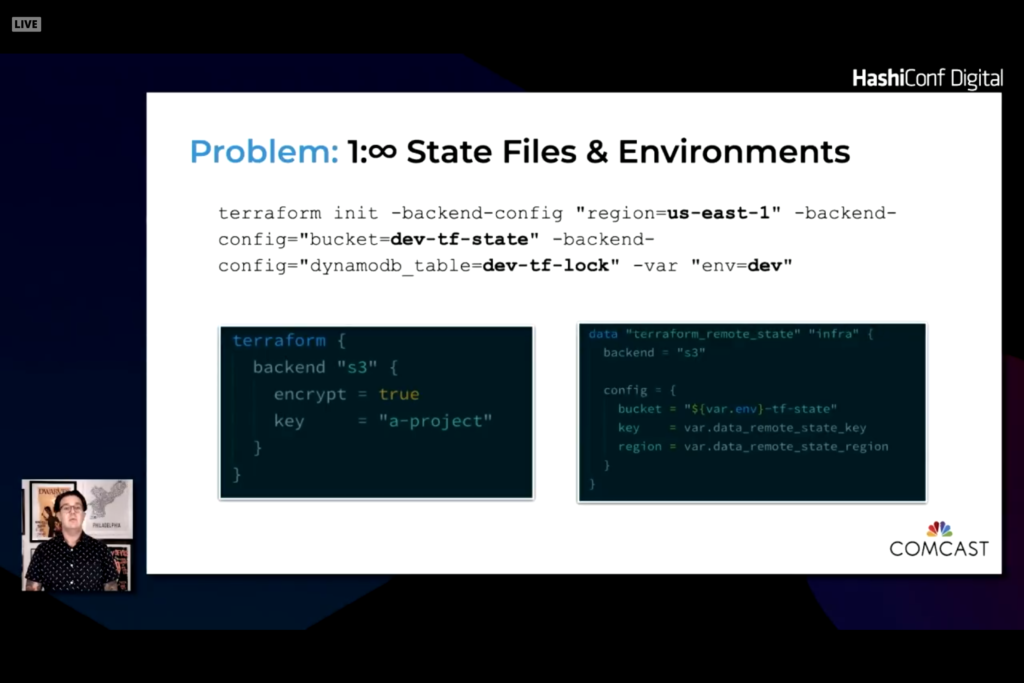
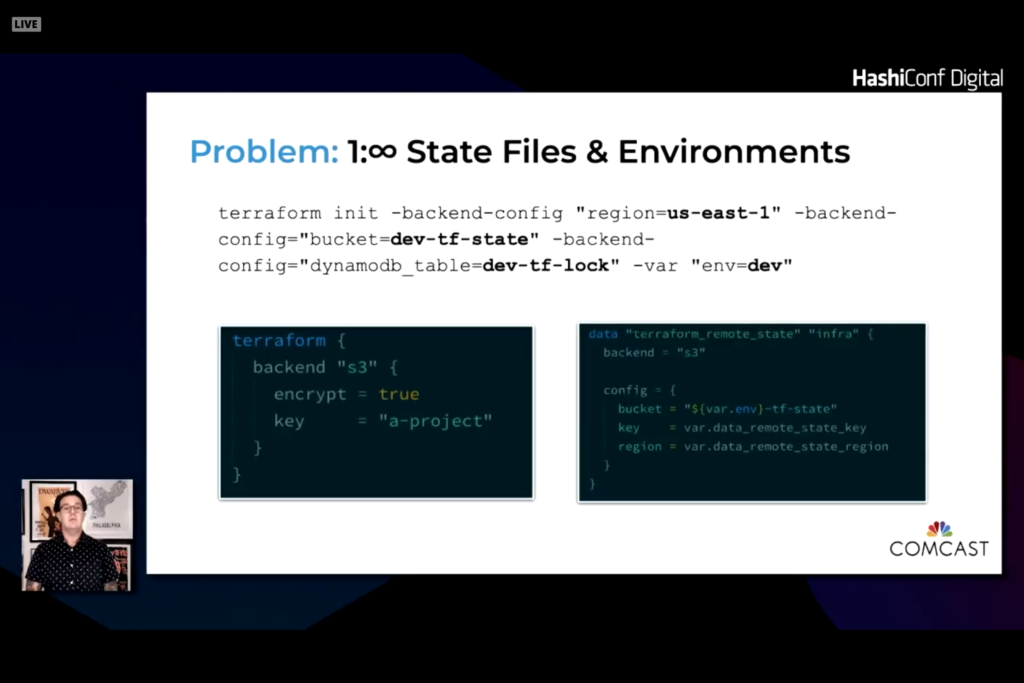
This presentation reviewed what Comcast has done with Terraform. The primary goals are consistency and accuracy. Having everyone run the same configuration and secrets helps reduce complexity. Secondary goal is to have dev, test, and prod configurations the same in different regions and locations.

Bootstrap is done from a Git repository then managed with cloud storage backend

State is stored and referenced from a common backend.

Use a makefile with targets to run the proper terraform command with the proper environment variables. This allows you to integrate state, Vault, and secrets on all desktops and in the CI/CD tool.

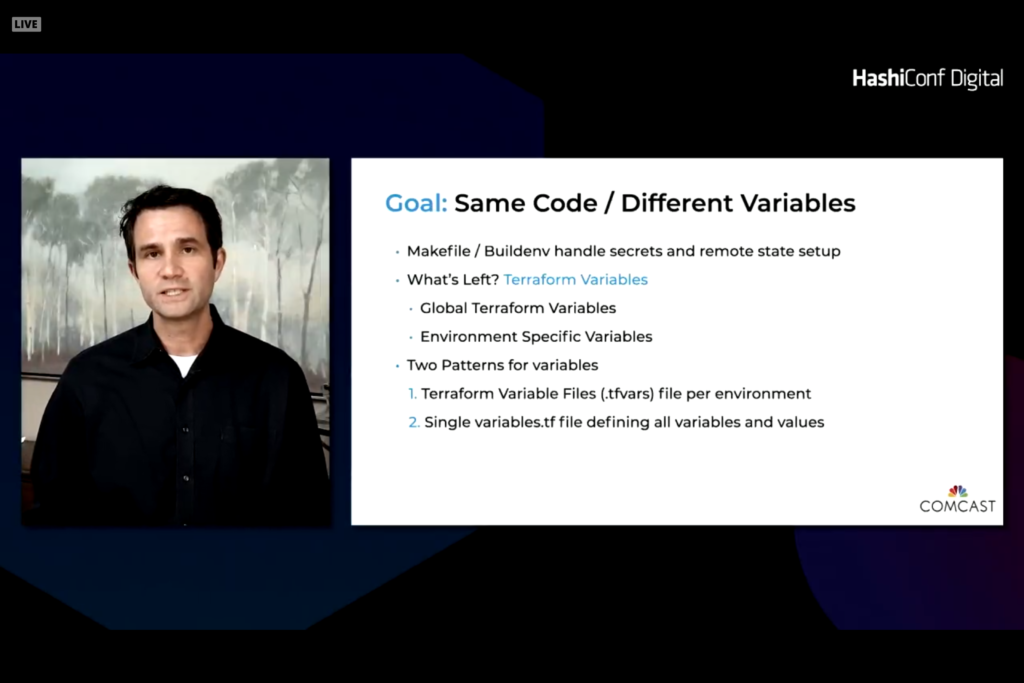
Two levels of variables. One that are specific to a platform. The second is global variables. It is easy to set defaults and override when needed. The difficulty is to compare two environments to see changes and differences.

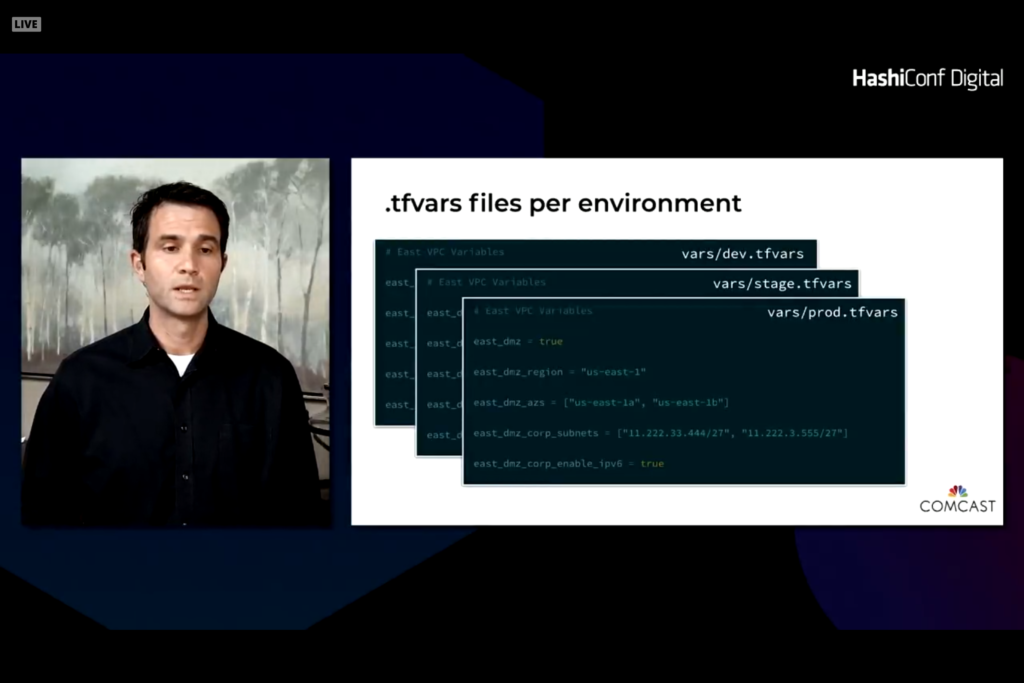
With this module you end up with a vars folder and tfvars file unique to different environments. The Makefile pulls in the right value and ingests the desired tfvars file.

Remainder of presentations

The remainder of the presentations were Vault or Consul presentations. I primarily wanted to focus on Terraform deployments and presentations in this blog. More tomorrow given that day 2 is more Terraform focused.

Supporting multiple providers

One of the key uses of Terraform is to deploy development and production systems. Terraform can be used to manage what is deployed, manage resources, and restrict resources available to an instance. In our last blog entry we looked at the vSphere provider and looked at some of they key parameters that are needed to deploy solutions into this virtual environment.

In a perfect world we should be able to develop definitions to deploy development systems to a small or older system, deploy production to a more expensive and powerful vSphere cluster, and a disaster recovery copy to make sure that we can failover to an alternate datacenter in times of emergency. We should then be able to take the data for this provider and move it to Amazon AWS or Microsoft Azure or Google GCP by just changing the provider. Unfortunately, this is not a perfect world and there are a ton of reasons that this won’t work.

If we look at the documentation for the AWS provider we note that we don’t need a username and password or IP address but rather need a public and private key to connect to an AWS serviced and these parameters can be provided by command line environment variables. We can also define multiple providers and give an alias for the multiple providers and deploy services into different accounts, regions, and zones based on the terraform provider definition.

A typical aws provider main.tf file looks like…

provider “aws” {
version = “> 2”
profile = “default”
region = var.dev_location
alias = “dev”
}

provider “aws” {
version = “> 2”
profile = “default”
region = “us-west-1”
alias = “prod”
}

allowing you to deploy resources into “aws.dev” or “aws.prod” with a variable.tf file containing nothing or

variable “createdby” {
type = string
default = “TechEnablement”
}

variable “environment” {
type = string
default = “TechEnablement”
}

variable “dev_location” {
type = string
default = “us-east-1”
}

With this variable.tf definition you need to define environment variables to define the AWS_ACCESS_KEY_ID and AWS_SECRET_ACCESS_KEY or define shared_credentials_file in a terraform configuration file to point to the location of a key file. On Windows this is typically “%USERPROFILE%\.aws\credentials”. The format of the credentials file looks like

[default]

aws_access_key_id=AWSSAMPLE7EXAMPLE

aws_secret_access_key=long/keywith/numbers4&letters

Unfortunately the vSphere provider does not allow for an alias tag and use of different account credentials and vsphere host address. Rather than defining multiple providers you need to define different directories and different variable.tf and main.tf files for each of the environments. In our earlier example we would have a dev, prod, and dr folder under our main folder. Each folder would have terraform configuration files to define what each environment would look like and resources available.

A typical multi-environment tree would look different from out initial single tree deployment with a dev, prod, and dr folder each containing the same main.tf files but different variable.tf definitions. Each folder would have their own terraform.tfstate file as well given that there are different environment variables and states on different servers.

If you try to define multiple vsphere providers in one file you get the error

Given the differences between the two provider types it begs the question of changing the aws provider to the same file format as the vsphere provider and have three different folders that deploy different environments to different servers. This would work but having everything in one file reduces complexity and potential errors by having multiple copies in multiple folders. Editing one does not guarantee changes to the other directories and there might be subtle differences between the different environments, like datastore names or locations as well as network definitions, that are unique to each environment.

In summary, there are multiple ways of solving the same problem. The ultimate solution is to write a generic provider that can deploy services into vSphere, Hyper-V, Nutanix, other on-premises virtual machine hosts, AWS, Azure, Google GCP, and other cloud virtual machine hosts. Given that there is no generic provider that works across all or even multiple environments you have to decide how to deploy multiple terraform configuration files to multiple target locations without doubling or tripling your work and code that needs support and maintenance. My recommendation is to go with different folders for different environments and have different variable.tf and main.tf files in each folder.

Installing Terraform on Ubuntu

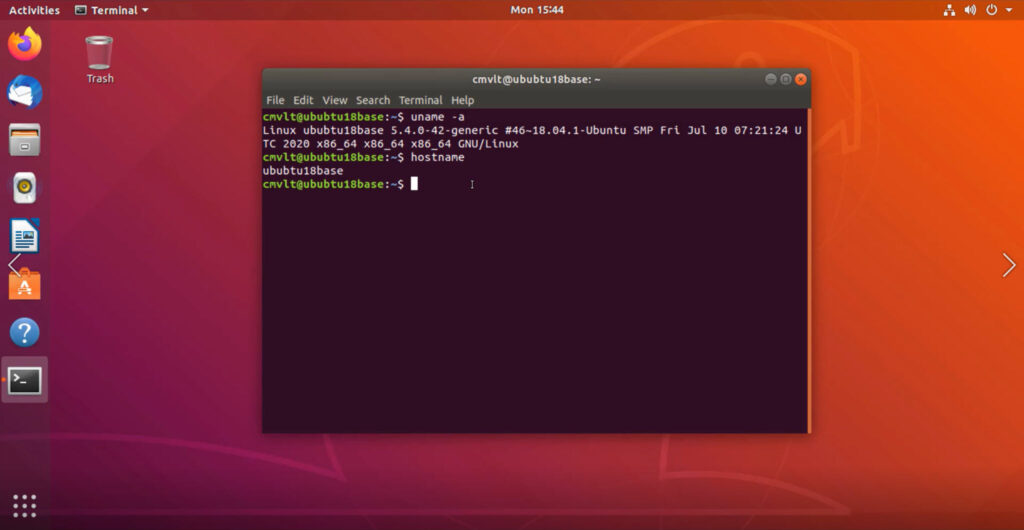
Welcome to an ongoing series of Terraform tips, tricks, and tutorials. On this journey we are going to look at what it takes to use Terraform to manage resources running in VMware, Azure, AWS, and Google cloud. We will look at the differences between running Terraform on Linux and Windows and show examples of both. The assumption is that you know what Terraform is and just need to know how to do things with it. In a previous blog, we discussed how to install Terraform on Windows. In this blog we will look at installing Terraform on an Ubuntu 18 server.

For these examples we will use a VMware generic deployed instance so that we can go back to the same system and build upon the previous posting of how to do something. For this example we install a generic Ubuntu 18.04.5 desktop instance. We could just as easily have done this from a server instance and done everything from the command line using wget to get the Terraform binary.

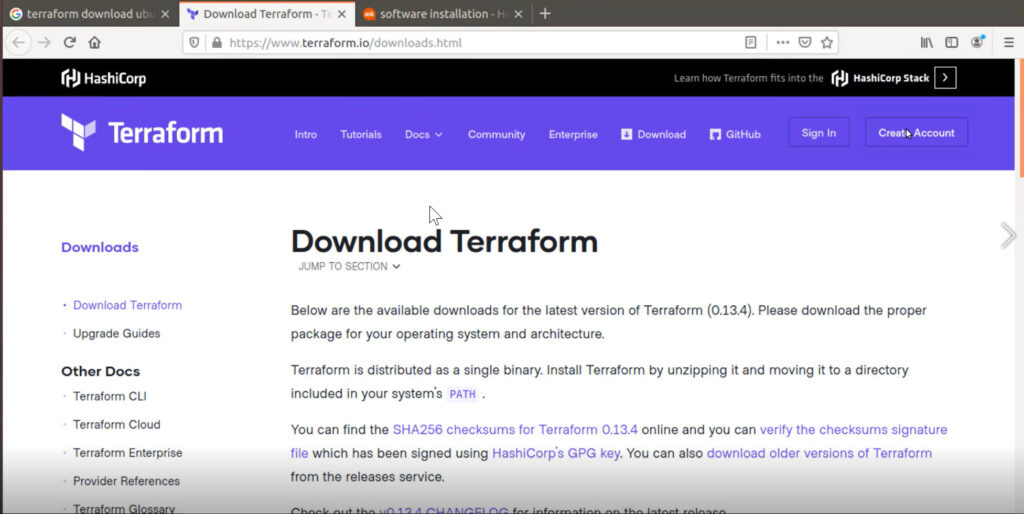
Rather than using the wget command and having to figure out which version of Terraform to download we use the Firefox browser and go to http://terraform.io to download the binary.

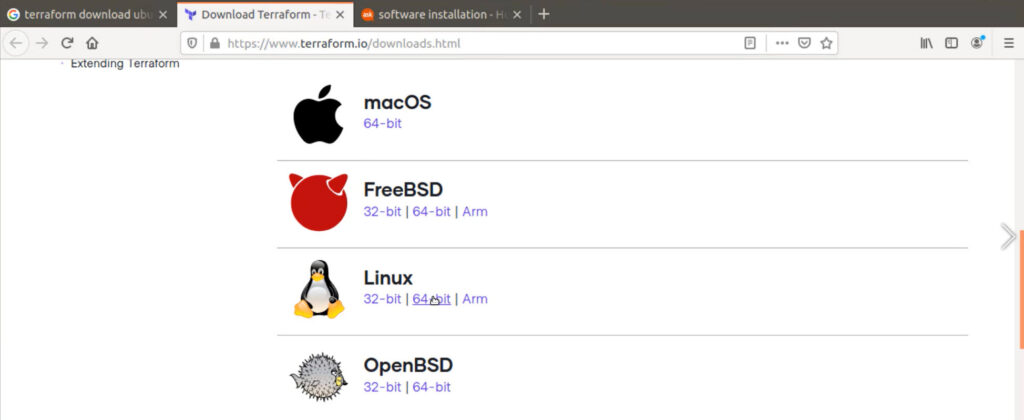
If you forget the Terraform website you can easily do a search for the term terraform download ubuntu which returns a variety of tutorials and the HashiCorp Terraform site. Scrolling down on the site we see a variety of operating systems that are supported for the Terraform platform. Select the Linux 64-bit from the list to download.

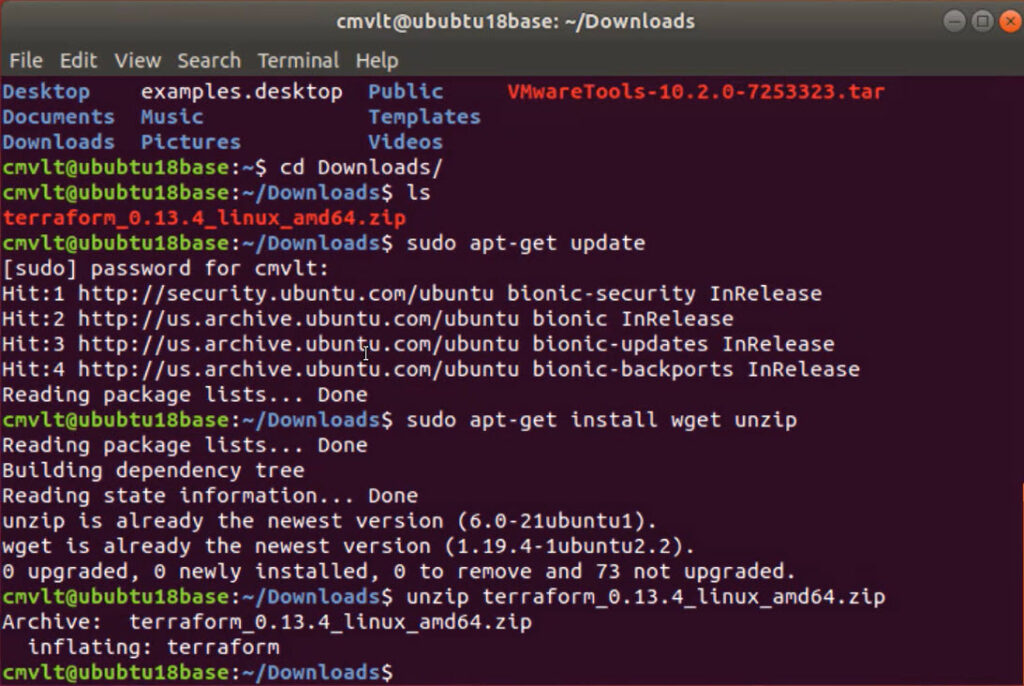
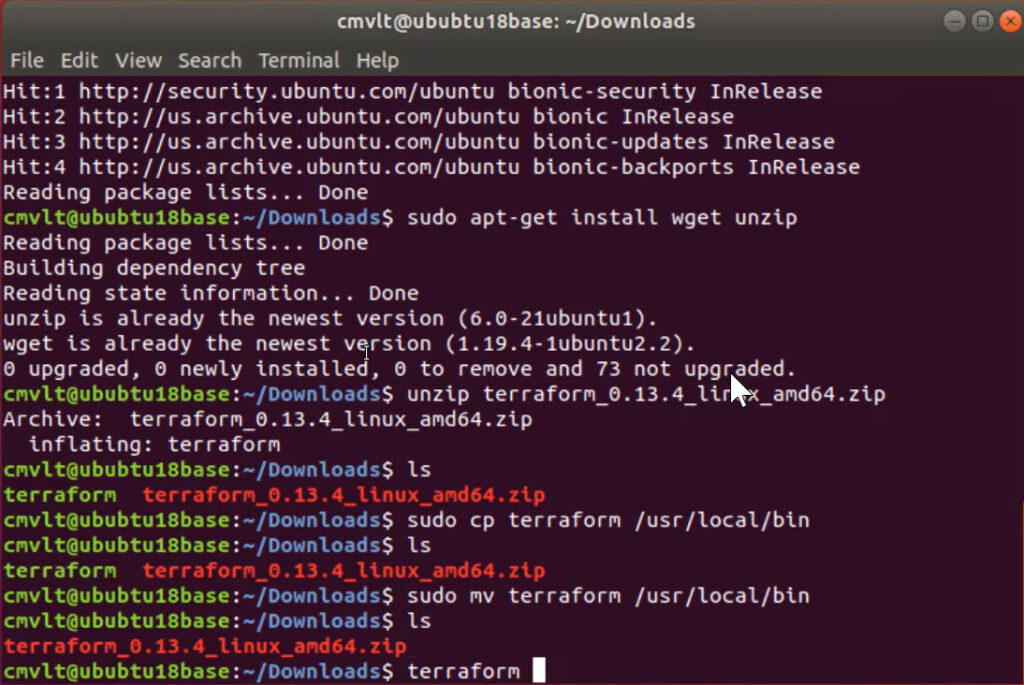
Once the download is finished we need to unzip the binary from the zip file. Prior to unzipping the file we need to install the unzip package. This is done on Ubuntu with the apt-get command

sudo apt-get update

sudo apt-get install wget unzip

The update command makes sure that all patches and updates are installed. The install command makes sure that the wget (which is not necessary for this example) and unzip are installed. Once the unzip command is installed execute the unzip command to extract the terraform binary.

unzip terraform_0.13.4_linux_amd64.zip.

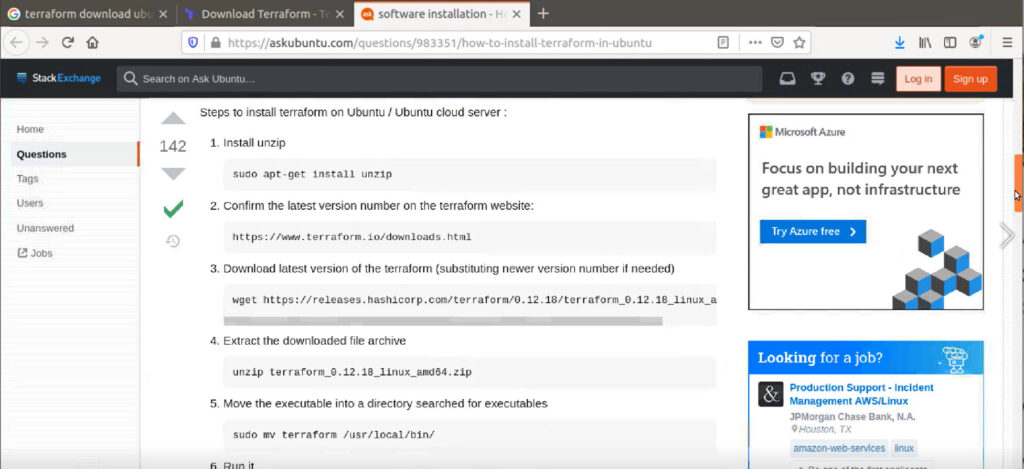
The askubuntu website has a good cookbook on how to perform this installation and testing of the binaries.

The last step to getting Terraform installed on Ubuntu is to place the terraform binary in the path of the current user. Rather than placing this in a user specific bin directory it is best practice to put binaries like this in /usr/local/bin to be used by automation scripts and other users on this system. We can either copy or move the binary to this location using the sudo command to write to a root protected directory.

sudo mv terraform /usr/local/bin

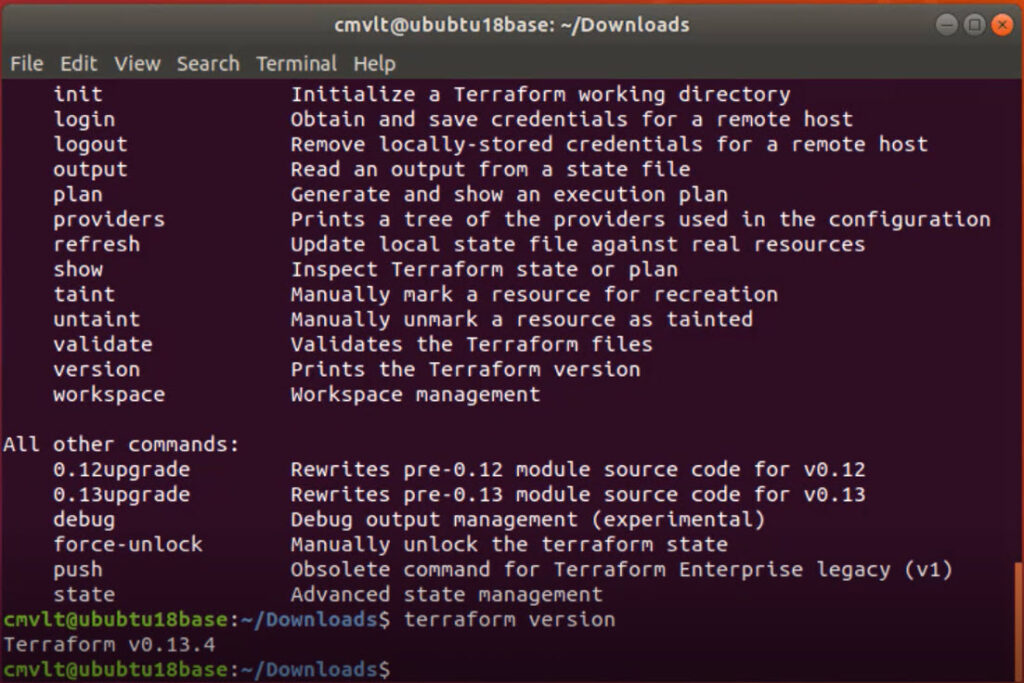
Once the binary is relocated we can test the terraform binary by typing

terraform version

terraform

These commands not only test the binary but test that the binary is in the proper path to be executed.

At this point we have a terraform development platform that can be used to provision systems and services on a wide variety of cloud and virtualization platforms. To see this process in action, watch a video capture of this procedure.

In summary, installation of Terraform on Ubuntu is relatively simple. The three minute video shows everything required from start to finish to get a Terraform platform configured to be used from a terminal.

some additional blogs for a different perspective