Microsoft AZ-104 – Azure Admin Certification/Resources, Networks, and Terraform

In my last two blog posts covering Groups and Roles, the recommendation was to not use Terraform to initialize either of these features of Azure. If we step back and look at what Terraform is good at and what Azure is good at we recognize that the two don’t overlap. Terraform is good at creating infrastructure from a definition. If you have a project that you need to build, Terraform is very good at wrapping everything into a neat package and provides the constructs to create, update, and destroy everything. They key work here is everything. If you have something that builds foundation above the project level and provides the foundation for multiple projects destruction of these constructs has reach beyond just a single project. Azure is also very good at creating a boundary around projects as we will see with Resource Groups but also has tools to build resources above the project layer that cross multiple projects. Roles and Groups are two examples of this higher layer. You might create a database administrator group or a secure network connection back to your on-premises datacenter that helps with reliability and security of all projects. Unfortunately, defining these terms in a Terraform project could potentially ruin other projects that rely upon a user or group or role existing. Rather than defining a resource to create users, groups, or roles it was suggested that a local-exec script be called to first test if the necessary definitions exist then create them if needed. The script would then avoid deletion during the destroy phase and not re-create the resource or error out if the resource did not exist. An exec script would allow for conditional testing and creating of these elements on the first execution and only on the first execution. Consider the case where you have a development workspace and a production workspace. There is no need to create a new role or a new group in Azure specific to that workspace. There is a need to create a new resource group and network definition but not a new set of users, groups and roles.

Diagram that shows the relationship of management hierarchy levels

Using the diagram from the Microsoft documentation, creation of a tenant (Management group) or subscription does not make sense. Creating of a Resource group and Resources in Terraform is where the two fit perfectly. Consider the example of a three tiered architecture with virtual machines and web apps running in one resource group and a database running in another resource group. An alternate way of creating this is to create multiple subnets or virtual private networks and put everything in one resource group.

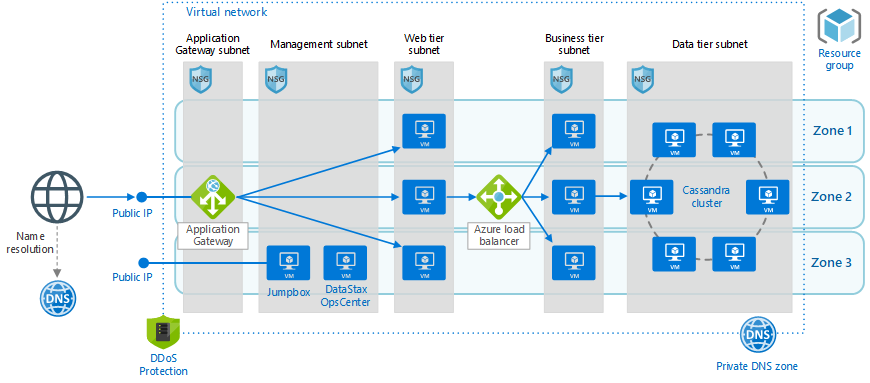
Note that we have one resource group, one virtual private network, a web tier on one subnet and a business and data tier on their own subnets. These deployments can cross multiple zones and all get wrapped with firewalls, network security rules, and DDoS protection. A simpler network configuration using SQL Server might look like the following diagram.

We create one resource group, one virtual network, five subnets in the same vnet, five network security groups, and three public IP addresses. Each subnet will contain an availability set that can scale with multiple virtual machines and have a load balancer where appropriate to communicate outside the subnet to other subnets or the public internet.

An Azure Resource Group can easily be reference using the azurerm_resource_group data declaration or the azurerm_resource_group resource declaration. For the data declaration the only required field is the resource group name. For the resource declaration we also have to define the location or Azure region where the resource group will be located. You can define multiple resource groups in different regions as well as define multiple azurerm providers to associate billing with different cost centers. In the simple example above we might want to associate the Active Directory and Bastion (or Jump box) servers with the IT department and the rest of the infrastructure with the marketing or engineering departments. If this project were a new marketing initiative the management subnet and AD DS subnet might be data declarations because they are used across other projects. All other infrastructure components will be defined in a Terraform directory and created and destroyed as needed.

To declare a virtual network we can use the azurerm_virtual_network data declaration or azurerm_virtual_network resource declaration. The data declaration requires a name and resource group while the resource declaration needs an address space and region definition as well. Under the virtual network we can declare a subnet with the azurerm_subnet data declaration or azurerm_subnet resource declaration. The data declaration requires a name, resource group, and virtual network while the resource declaration also needs either an address prefix or prefixes to define the subnet. Once we have a subnet defined we can define an azurerm_network_security_group resource or data declaration and associate it with a subnet using the azurerm_subnet_network_group_association resource to map the security to our subnet. All of these declarations are relatively simple and help define and build a security layer around our application.

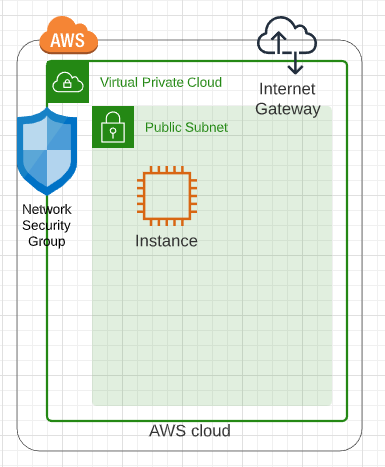
In a previous blog post we talked about how to perform networking with AWS. The constructs for Azure are similar but have a resource group layered on top of the networking component. For AWS we defined a aws provider then an aws_vpc to define our virtual network. Under this network we created an aws_subnet to define subnets. For AWS we defined an aws_security_group and associated it with our virtual network or vpc_id.

Azure works a little differently in that the azurerm_network_security_group is associated with an azurerm_subnet and not the azurerm_virtual_network.

provider "azurerm" {
    features {}
}

resource "azurerm_resource_group" "example" {
  name     = "Simple_Example_Resource_Group"
  location = "westus"
}

resource "azurerm_virtual_network" "example" {
  name                = "virtualNetwork1"
  location            = azurerm_resource_group.example.location
  resource_group_name = azurerm_resource_group.example.name
  address_space       = ["10.0.0.0/16"]
}


resource "azurerm_subnet" "example" {
  name                 = "testsubnet"
  resource_group_name  = azurerm_resource_group.example.name
  virtual_network_name = azurerm_virtual_network.example.name
  address_prefixes     = ["10.0.1.0/24"]
}

resource "azurerm_network_security_group" "example" {
  name                = "acceptanceTestSecurityGroup1"
  location            = azurerm_resource_group.example.location
  resource_group_name = azurerm_resource_group.example.name

  security_rule {
    name                       = "test123"
    priority                   = 100
    direction                  = "Inbound"
    access                     = "Allow"
    protocol                   = "Tcp"
    source_port_range          = "*"
    destination_port_range     = "*"
    source_address_prefix      = "*"
    destination_address_prefix = "*"
  }
}

resource "azurerm_subnet_network_security_group_association" "example" {
  subnet_id                 = azurerm_subnet.example.id
  network_security_group_id = azurerm_network_security_group.example.id
}

Overall, this is a relatively simple example. We could declare four more subnets, four more network security groups, and four more network security group associations. Each network security group would have different definitions and allow traffic from restricted subnets rather than a wildcard allowing all access from all servers and ports. Terraform is very clean when it comes to creating a nice and neat resource group package and cleaning up with the destroy command all of the resources and network definitions defined under the resource group. This sample main.tf file is shared on github and only requires that you run the following commands to execute

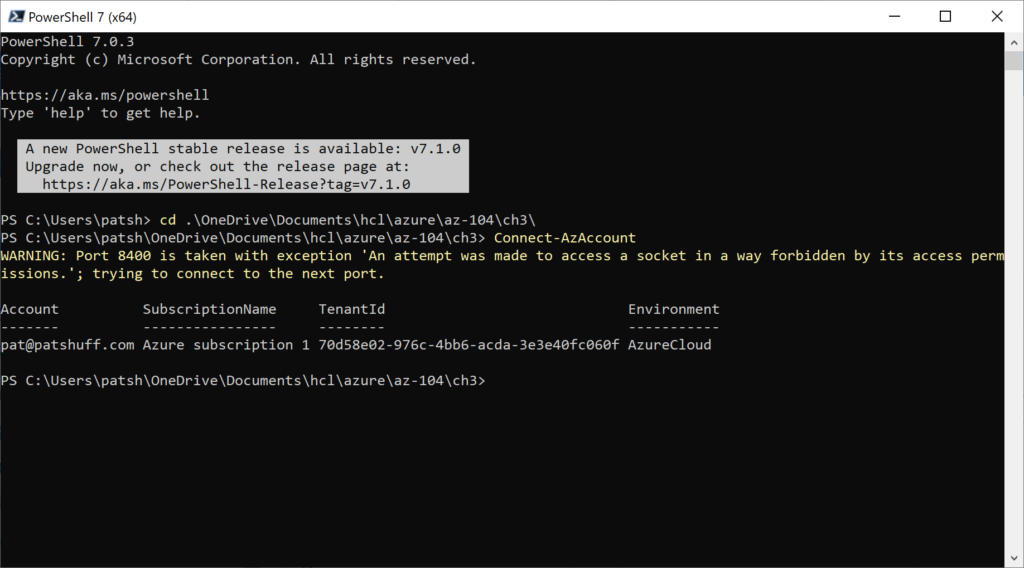
  • open a PowerShell with the az cli enabled
  • download the main.tf file from github
  • az login
  • terraform init
  • terraform plan
  • terraform apply
  • terraform destroy

The plan and destroy are optional parameters. All of this can be done from cloud shell because Microsoft has preconfigure Terraform in the default cloud shell environment. All you need to do is upload the main.tf file to your cloud shell environment our mount a shared cloud storage and execute the init and apply commands.

Microsoft AZ-104 – Azure Admin Certification/Roles and Terraform

In a previous blog we talked about Azure AD and Tenant, Subscription, and User administration as well as Azure AD Group management and Terraform and how to map these functions to Terraform. In this blog we will continue this discussion but move onto Roles and RBAC in Azure.

Roles and administrators in Azure Active Directory help define actions that can be performed by users, groups, and services. Some roles, for example, are account specific allowing users or members of groups to create other users and groups or manage billing. Other roles allow not only users and groups to manage virtual machines but also allows services and other virtual machines to manage virtual machines. Backup software, for example, needs to be able to update or create virtual machines. The backup software can be associated with a service and that service needs to have permission to be able to read, update, and create new virtual machines.

If we select one of the pre-defined roles we can look at the Role permissions. Selecting the Cloud application administrator shows a list of Role permissions associated with this Role definition.

Looking at the Microsoft documentation on Azure Roles, there are four general build-in roles

  • contributor – full access to resource but can not pass role to other users, groups, or services
  • owner – full access to resources
  • reader – view only role but can not make changes to anything
  • user access administrator – can change user access to resource but can’t do anything with the resource like read, update, delete, or create.

Associated with these base roles are pre-defined roles to allow you to perform specific functions. These roles have actions associated with the role and the actions can either allow or prohibit an action. An example of this would be the pre-defined role of “Reader and Data Access”. This role allows for three actions, Microsoft.Storage/storageAccounts/listKeys/action, Microsoft.Storage/storageAccounts/ListAccountSas/action, and Microsoft.Storage/storageAccounts/read. Note none of these permissions allow for create, delete, or write access. This user can read and only read data associated with a Storage Account.

If we look at role related functions in the azuread provider in Terraform, the only role related call is the azureread_application_app_role resource declaration. This resource declaration applies to application_objects and not users. This is not the roles that we are talking about in the previous section.

If we look at the role related functions in the azurerm provider in Terraform, we get the ability to define a role with the azurerm_role_definition data source as well as the azurerm_role_definition and azurerm_role_assignement resource definition. The role assignment allows us to assign roles to a user or a group. The role definition allows us to create custom roles which allows us to associate a role name to actions and disabled actions through a permission block. The scope of the role definition can be associated with a subscription, a resource group, or a specific resource like a virtual machine. The permissions block allows for the definition of actions, data actions, not_actions, and not_data_actions. A permission must include a wildcard [*] or a specific Azure RM resource provider operation as defined by Microsoft. These operations map directly to actions that can be performed in Azure and are very unique to Azure and Microsoft operations in Azure. This list can also be generated from the Get-AzProviderOperations or az provider operations list commands in PowerShell and the Azure CLI.

All of these operations can be performed with the Get-AzRoleDefinition, New-AzRoleDefinitions, Remove-AzRoleDefinition, Set-AzRoleDefinition, Get-AzRoleAssignment, New-AzRoleAssignment, Set-AzRoleAssignment, and Remove-AzRoleAssignment commands in PowerShell. My recommendation is to use the local-exec command to call these command line functions rather than coding them in Terraform. Scripts can be generated to create, update, and delete roles as needed to run outside of Terraform or as a local-exec call. Given that roles typically don’t get updated more than once or twice during a project automating the creation and destruction of a role can cause unnecessary API calls and potential issues if projects overlap with role definitions. One of the drawbacks to Terraform is that it does not have the cross project ability to recognize that a resource like a role definition is used across multiple workspaces or projects. Terraform treats the resource declaration as something absolute to this project and creates and destroys resources on subsequent runs. The destruction of a role can adversely effect other projects thus the creation and destruction should be done either at a higher level and reference it with a data declaration rather a resource declaration or provisioned through scripts run outside of Terraform.

In summary, roles are an important part of keeping Azure safe and secure. Limiting what a user or a service can do is critical in keeping unwanted actions or services from corrupting or disabling needed services. Role definitions typically span projects and Terraform configurations and are more of an environment rather than a resource that needs regularly refreshed. Doing role creation and assignments in Terraform can be done but should be done with care because it modifies the underlying environment that crosses resource group boundaries and could potentially negatively impact other projects from other groups.

Microsoft AZ-104 – Azure Admin Certification/Groups and Terraform

In a previous blog we talked about Azure AD and Tenant, Subscription, and User administration and how to map these functions to Terraform. In this blog we will continue this discussion but move onto Groups, IAM, and RBAC in Azure.

Groups are not only a good way to aggregate users but associate roles with users. Groups are the best way to associate roles and authorizations to users rather than associate them directly to a user. Dynamic groups are an extension of this but only available for Premium Azure AD and not the free layer.

Group types are Security and Microsoft 365. Security groups are typically associated with resource and role mappings to give users indirect association and responsibilities. The Microsoft 365 group provides mailbox, calendar, file sharing, and other Office 365 features to a user. This typically requires additional spend to get access to these resources while joining a security group typically does not cost anything.

Membership types are another group association that allows users to be an assigned member, a dynamic member, or a device to be a dynamic device. An example of a dynamic user would look at an attribute associated with a user and add them to a group. If, for example, someone lives in Europe they might be added to a GDPR group to host their data in a specific way that makes then GDPR compliant.

Role based access control or RBAC assign roles to a user or group to give them rights to perform specific functions. Some main roles in Azure are Global Administrator, User Administrator, or Billing Administrator. Traditional Azure roles include Owner, Contributor, Reader, or Administrator. Custom roles like backup admin or virtual machine admin can be added or created as desired to allow users to perform specific functions or job duties. Processes or virtual machines can be assigned RBAC responsibilities as well.

Groups are a relatively simple concept. You can create a Security or Microsoft 365 Group. The membership type can be Assigned, Dynamic, or Dynamic Device if those options are enabled. For corporate accounts they are typically enabled but for evaluation or personal accounts they are typically disabled.

Note that you have two group types but the Membership type is grey and defaults to Assigned. If you do a search in the azuread provider you can reference an azuread_group with data sources or create and manage an azuread_group with resources. For a data source azuread_group either name or object_id must be specified. For a resource azuread_group a name attribute is required but description and members are not mandatory. It is important to note that the group definition default to security group and there is no way to define a Microsoft 365 group through Terraform unless you load a custom personal provider select this option.

If you a search for group in the azurerm provider you get a variety of group definitions but most of these refer to the resource group and not groups associated with identity and authentication/authorization. Alternatively, groups can refer to storage groupings or sql groups for sql clusters. There are no group definitions like there were user definitions in the azurerm provider.

provider "azuread" {
}

resource "azuread_group" "simple_example" {
  name   = "Simple Example Group"
}

resource "azuread_user" "example" {
  display_name          = "J Doe"
  password              = "notSecure123"
  user_principal_name   = "jdoe@hashicorp.com"
}

resource "azuread_group" "example" {
  name    = "MyGroup"
  members = [
    azuread_user.example.object_id,
    /* more users */
  ]
}

data "azuread_group" "existing_example" {
  name = "Existing-Group"
}


resource "azuread_group_member" "example" {
  group_object_id   = azuread_group.example.id
  member_object_id  = data.azuread_user.example.id
}

In summary, group management from Terraform handles the standard use case for user and group management. Users can be created as a standard Azure AD user and associated with a Security group using the azuread_group_member resource. Existing groups can be declared with the data declaration or created with the resource declaration. Group members can be associated and deleted using Terraform. Not all the group functionality that exists in Azure is replicated in Terraform but for the typical use case all functionality exists. Best practice would suggest to do group associations and user definitions outside of Terraform using scripting. Terraform can call these scripts using local-exec commands rather than trying to make everything work inside of Terraform declarations.

Microsoft AZ-104 – Azure Admin Certification/Identity and Terraform

I am currently going through the A Cloud Guru AZ-104 Microsoft Azure Administrator Certification Prep class and thought I would take the discussion points and convert them into Terraform code rather than going through the labs with Azure Portal or Azure CLI.

Chapter 3 of the prep class covers Identity. The whole concept behind identity in Azure centers around Azure AD and Identity Access Management. The breakdown of the lectures in the acloud.guru class are as follows

  • Managing Azure AD
  • Creating Azure AD Users
  • Managing Users and Groups
  • Creating a Group and Adding Members
  • Configuring Azure AD Joing
  • Configuring Multi-factor authentication and SSPR

Before we dive into code we need to define what Azure AD and IAM are. Azure AD is the cloud based identity and access management solution (IAM) for the Azure cloud. AzureAD handles authentication as well as authorization allowing users to log into the Azure Portal and perform actions based on group affiliation and authorization roles (RBAC) associated with the user or the group.

There are four levels of Azure AD provided by Microsoft and each has a license and cost associated with consumption of Azure AD. The base level comes with an Azure license and allows you to have 500,000 directory objects and provides Single Sign-On (SSO) with other Microsoft products. This base license also has integration with IAM and business to business collaboration for federation of identities. The Office 365 License provides an additional layer of IAM with Microsoft 365 components and removes the limit on the number of directory objects. The Premium P1 and Premium P2 license provide additional layers like Dynamic Groups and Conditional Access as well as Identity Protection and Identity Governance for the Premium P2. These additional functions are good for larger corporations but not needed for small to medium businesses.

Two terms that also need definition are a tenant and a subscription. A tenant represents an organization via a domain name and gets mapped to the base Azure Portal account when it is created. This account needs to have a global administrator associated with the account but more users and subscriptions associated with it. A subscription is a billing entity within Azure. You can have multiple subscriptions under a tenant. Think of a subscription as a department or division of your company and the tenant as your parent company. The marketing department can be associated with a subscription so that billing can be tied to this profit and loss center while the engineering department is associated with another subscription that allows it to play with more features and functions of Azure but might have a smaller spending budget. These mapping are doing by the global administrator by creating new subscriptions under a tenant and giving the users and groups associated with the subscription rights and limits on what can and can’t be done. The subscription becomes the container for all Azure resources like storage, network configurations, and virtual machines.

If we look at the Azure AD Terraform documentation provided by HashiCorp we notice that this is official code provided by HashiCorp and provides a variety of mechanisms to authenticate into Azure AD. The simplest way is to use the Azure CLI to authenticate and leverage the authentication tokens returned to the CLI for Terraform to communicate with Azure. When I first tried to connect using a PowerShell 7.0 shell and the Az module the connection failed. I had to reconfigure the Azure account to allow for client authentication from the PowerShell CLI. To do this I had to go to the Azure AD implementation in the Azure Portal

then create a new App registration (I titled it AzureCLI because the name does not matter)

then changed the Allow public client flows from No to Yes to enable the Az CLI to connect.

Once the change was made in the Azure Portal the Connect-AzAccount conneciton works with the desired account connection.

Note that there is one subscription associated with this account and only one is shown. The Terraform azuread provider does not provide a new way of creating a tenant because typically this is not used very often. You can create a new tenant from the Azure Portal and this basically creates a new Primary domain that allows for a new vanity connection for users. In this example the primary domain is patpatshuff.onmicrosoft.com because patshuff.onmicrosoft.com was taken by another user. We could create a new domain patrickshuff.onmicrosoft.com or shuff.onmicrosoft.com since neither have been taken. Given that the vanity domain name has little consequence other than email addresses, creating a new tenant is not something that we will typically want to do and not having a way of creating or referencing a tenant from Terraform is not that significant.

SiliconValve posted a good description of Tenants, Subscriptions, Regions, and Geographies in Azure that is worth reading to understand more about tenants and subscriptions.

The next level down from tenants is subscriptions. A subscription is a billing entity in Azure and resources that are created like compute and storage are associated with a subscription and not a tenant. A new subscription can be created from the Azure portal but not through Terraform. Both the subscription ID and tenant ID can be pulled easily from Azure using the azuread_client_config data element and the azuread provider. Neither of these are required to use the azurerm provider that is typically used to create storage, networks, and virtual machines.

One of the key reasons why you would use both the azuread and azurerm provider is that you can pass in subscription_id and tenant_id to the azurerm provider. These values can be obtained from the azuread provider. Multiple azuread connections can be made to azuread using the alias field as well as passing credentials into the connection rather then using the default credentials from the command line connection in the PowerShell or command console that is executing the terraform binary. Multiple subscriptions can also be managed for one tenant by passing in the subscription ID into the azurerm provider and using an alias for the azurerm definition. Multiple subscriptions can be returned using the azurerm_subscriptions data declaration this reducing the need to use or manage the azuread provider.

Now that we have tenants and subscriptions under our belt (and don’t really need to address them with Terraform when it comes to creating the elements) we can leverage the azurerm provider to reference tenant_id and subscription_id to manage users and groups.

Users and Groups

Azure AD users are identities of an Azure AD tenant. A user is ties to a tenant and can be an administrator, member user, or guest user. An administrator user can take on different roles like global administrator, user administrator, or service administrator. Member users are users associated with the tenant and can be assigned to groups. Guest users are typically used to share documents or resources without storing credentials in Azure AD.

To create a user in AzureAD the azuread provider needs to be referenced and the resource azuread_user or data source azuread_user needs to be referenced. For the datasource the user_principal_name is the only required field (username). Multiple users can be referenced with the azuread_users data source with a list of multiple user_principal_names, object_ids, or mail_nicknames required to identify users in the directory. For the resource definition a user_principal_name, display_name, and password are required to identify a user. Only one user can be define at a time and a block module declaration can be created to take a map entry into a block definition to reduce the amount of terraform code needed to define multiple users.

provider "azuread" {
  version = "=0.7.0"
}

resource "azuread_user" "example" {
  user_principal_name = "jdoe@hashicorp.com"
  display_name        = "J. Doe"
  password            = "SecretP@sswd99!"
}

The user is mapped to the default tenant_id and subscription_id that is used during the azuread provider creation. If you are using the az command line it is the default tenant and subscription associated with the login credentials used.

Bulk operations as is available from the Azure portal to use a csv file defining users is not available from terraform. This might be a good opportunity to create a local-exec provision definition to call the Azure CLI that can leverage bulk import operations as discussed in the https://activedirectorypro.com/create-bulk-users-active-directory/ blog entry. Given that bulk import is typically a one time operation automating this in Terraform is typically not needed but can be performed with a local-exec if desired.

A sample Terraform file that will create a list of users is shown below:

provider "azuread" {
}

variable "pwd" {
  type = string
  default = "Password123"
}

variable "user_list" {
  type = map
  description = "list of users to create"
  default = {
    "0" = ["Bob@patpatshuff.onmicrosoft.com","Bob"],
    "1" = ["Ted@patpatshuff.onmicrosoft.com","Ted"],
    "2" = ["Alice@patpatshuff.onmicrosoft.com","Alice"]
  }
}

resource "azuread_user" "new_user" {
      user_principal_name = "bill@patpatshuff.onmicrosoft.com"
      display_name = "Bill"
      password = "Password_123"
}

resource "azuread_user" "new_users" {
  for_each = var.user_list
  user_principal_name = var.user_list[each.key][0]
  display_name = var.user_list[each.key][1]
  password = var.pwd
}

The definition is relatively simple. The user_list contains a list of usernames and display names and there are two examples of creating a user. The first is the new_user resource to create one user and the second is the new_users resource to create multiple users. Users just need to be added to the user_list and are created with the var.pwd (from the default or variable passed in via the command line or environment variable. The for_each walks through the user_list and creates all of these users. A terraform apply will create everything the first time and a terraform destroy will cleanup after you are finished.

In summary, tenants, subscriptions, and users can be managed from Terraform. Tenants and subscriptions are typically read only elements that can be read from a connection and not created or updated from Terraform. Users can be added, updated, or deleted easily using the azuread provider. Once we have the user created we can dive deeper into (in a later blog) role management, RBAC, and IAM definitions using azuread or azurerm providers.

Deploying an AWS instance from Marketplace images using Terraform

In a previous post we looked at network requirements required to deploy an instance in AWS. In this post we are going to look at what it takes to pull a Marketplace Amazon Machine Instance (AMI) from the marketplace and deploy it into a virtual private cloud with the appropriate network security group and subnet definitions.

If you go into the AWS Marketplace from the AWS Console you get a list of virtual machine images. We are going to deploy a Commvault CommServe server instance because it is relatively complex with networking requirements, SQL Server, IIS Server, and customization after the image is deployed. We could just as easily have done a Windows 2016 Server or Ubuntu 18 Server instance but wanted to do something a little more complex.

The Cloud Control is a Windows CommServe server installation. The first step needed is to open a PowerShell and connect to Amazon using the aws command line interface. This might require an Install-Module aws to get the aws command line installed and configured but once it is ready to connect to aws by typing in

aws configure

We can search for Marketplace images by doing an ec2 describe-images with a filter option

aws ec2 describe-images –executable-users all –filters “Name=name,Values=*Cloud Control*”

The describe-images command searches for an Amazon AMI that matches the description that we are looking for and returns an AMI ID. From this we can create a new instance pre-configured with a CommServe server. From here we can create out terraform files. It is important to note that the previous examples of main.tf and network.tf files do not need to be changed for this definition. We only need to create a virtual_machine.tf file to define our instance and have it created with the network configurations that we have previously defined.

We will need to create a new variable in our main.tf file that defines the private and public key that we are going to use to authenticate against our Windows server.

resource “aws_key_pair” “cmvlt2020” {
provider = aws.east
key_name = “cmvlt2020”
public_key = “AAAAB3NzaC1yc2EAAAADAQABAAABAQCtVZ7lZfbH8ZKC72A+ipNB6L/upQrj8pRxLwzQi7LVPrameil8/q4ROvWbC1KC9A3Ego”
}

A second element that needs to be defined is an aws_ami data declaration to reference an existing AMI. This can be done in the virtual_machines.tf file to isolate the variable and data declaration for virtual machine specific definitions. If we wanted to define an Ubuntu instance we would need to define the owner as well as the filter to use for an aws_ami search. In this example we are going to look for Ubuntu on an AMD 64-bit processor. The unusualness is the owners that needs to be used for Ubuntu since it is controlled by a third part Marketplace owner.

variable “ubuntu-version” {
type = string
default = “bionic”
# default = “xenial”
# default = “groovy”
# default = “focal”
# default = “trusty”
}

data “aws_ami” “ubuntu” {
provider = aws.east
most_recent = true
# owners = [“Canonical”]
owners = [“099720109477”]
filter {
name = “name”
values = [“ubuntu/images/hvm-ssd/ubuntu-${var.ubuntu-version}–amd64-server-“]
}
}

output “Ubuntu_image_name” {
value = “${data.aws_ami.ubuntu.name}”
}

output “Ubuntu_image_id” {
value = “${data.aws_ami.ubuntu.id}”
}

In this example we will be pulling the ubuntu-bionic-amd64-server image that has hardware virtualization running on a solid state disk. The variable ubuntu-version is mapped to the version of the Ubuntu kernel that is desired. The filter.values does the search in the Marketplace store to find the AMI ID. We restrict the search by searching in the region that we are deploying and use owner “099720109477” as the Marketplace provider.

If we compare this to a CentOS deployment the centos-version variable has a different string definition and a different owner.

variable “centos-version” {
type = string
default = “Linux 7 x86_64”
# default = “Linux 6 x86_64”
}

data “aws_ami” “centos” {
provider = aws.east
most_recent = true
owners = [“aws-marketplace”]

filter {
name = “name”
values = [“CentOS ${var.centos-version}*”]
}
}

output “CentOS_image_name” {
value = “${data.aws_ami.centos.name}”
}

output “CentOS_image_id” {
value = “${data.aws_ami.centos.id}”
}

For CentOS we can deploy 6 or version 7 by changing the centos-version.default definition. It is important to note that the owner of this AMI is not Amazon and uses the aws-marketplace definition to perform the filter. The same is true for the Commvault image that we are looking at.

data “aws_ami” “commvault” {
provider = aws.east
most_recent = true
# owners = [“Canonical”]
owners = [“aws-marketplace”]

filter {
name = “name”
values = [“*Cloud Control*”]
}
}

output “Commvault_CommServe_image_name” {
value = “${data.aws_ami.commvault.name}”
}

output “Commvault_CommServe_image_id” {
value = “${data.aws_ami.amazon.id}”
}

Note the filter uses a leading wildcard with the name “Cloud Control” followed by a wildcard to look for the instance that we are looking for. Once we have the AMI we can use the AMI.id from our search to define the aws_instance definition.

resource “aws_instance” “commserve” {
provider = aws.east
ami = data.aws_ami.commvault.id
associate_public_ip_address = true
instance_type = “m5.xlarge”
key_name = “cmvlt2020”
vpc_security_group_ids = [aws_security_group.cmvltRules.id]
subnet_id = aws_subnet.mySubnet.id
tags = {
Name = “TechEnablement test”
environment = var.environment
createdby = var.createdby
}
}

output “test_instance” {
value = aws_instance.commserve.public_ip
}

If we take the aws_instance declaration piece by piece the provider defines which AWS region that we will provision into Amazon. The vpc_security_group_ids and subnet_id defines what network that this instance will join. The new declarations are

  • ami – AWS AMI id to use as the source to clone
  • associate_public_ip_address – do we want a public or private only IP address with this instance
  • instance_type – this is the size. We need to reference the documentation or our users to figure out how large or how small this server needs to be. From the Commvault documentation the smallest recommended size is an m5.xlarge.
  • key_name – this is the public and private key names that will be used to connect to the Windows instance.

The remainder of the variables like disk, is this a Windows instance, and all the regular required parameters we saw with a vsphere_virtual_machine are provided by the AMI definition.

With these files we can execute from the following files

  • aws configure
  • terraform init
  • terraform plan
  • terraform apply

In summary, pulling an AMI ID from the marketplace works well and allows us to dynamically create virtual machines from current or previous builds. The terraform apply finishes quickly but the actual spin up of the Windows instance takes a little longer. Using Marketplace instances like the Commvault AMI provides a good foundation for a proof of concept or demo platform. The files used in this example are available in github.com.

AWS networking with Terraform

In our previous blog we talked about provisioning an AWS Provider into Terraform. It was important to note that it differed from the vSphere provider in that you can create multiple AWS providers for different regions and give an alias to each region or login credentials as desired. With vSphere you can only have one provider and no aliases.

Once we have a provider defined we need to create elements inside the provider. If our eventual goal is to create a database using software as a service or a virtual machine using infrastructure as a service then we need to create a network to communicate with these services. With AWS there are basically two layers of network that you can define and two components associated with these networks.

The first layer is the virtual private network which defines an address range and access rights into the network. The network can be completely closed and private. The network can be an extension of your existing datacenter through a virtual private network connection. The network can be an isolated network that has public access points allowing clients and consumers access to websites and services hosted in AWS.

Underneath the virtual private network is either a public or private subnet that segments the IP addresses into smaller chunks and allows for instances to be addressed on the subnet network. Multiple subnet definitions can be created inside a virtual private network to segment communications with the outside world and private communications between servers (for example a database server and applications server). The application server might need a public IP address and an private IP address while the database server typically will only have a private IP address.

Associated with the network and subnets are a network security group and internet gateway to restrict access to servers in the AWS cloud. A diagram of this configurations with a generic compute instance is shown below.

The first element that needs to be defined is the AWS Provider.

provider “aws” {
version = “> 2”
profile = “default”
region = “us-east-1”
alias = “east”
}

The second component would be the virtual private cloud or aws_vpc.

resource “aws_vpc” “myNet” {
cidr_block = “10.0.0.0/16”
provider = aws.east
tags = {
Name = “myNet”
environment = var.environment
createdby = var.createdby
}
}

Note that the only required attribute for the aws_vpc is the cidr_block. Everything else is optional. It is important to note that the aws_vpc can be defined as a resource or as a data element that does not create or destroy the network definition in AWS with terraform apply and destroy. With the data declaration the cidr_block is optional given that it has already been defined and the only only attribute needed to match the existing VPC is the name or the ID of the existing VPC.

Once the VPC has been created an aws_subnet can be defined and the two required elements for a resource definition are the cidr_block and the vpc_id. If you want to define the aws_subnet as a data element the only required resource is the vpc_id.

resource “aws_subnet” “MySubnet” {
provider = aws.east
vpc_id = aws_vpc.myNet.id
cidr_block = “10.0.1.0/24”
tags = {
Name = “MySubnet”
environment = var.environment
createdby = var.createdby
}
}

The provider declaration is not required but does help with debugging and troubleshooting at a later date. It is important to note that the VPC was defined with a /16 cidr_block and the subnet was a more restrictive /24 cidr_block. If we were going to place a database in a private network we would create another subnet definition and use a different cidr_block to isolate the network.

Another element that needs to be defined is an aws_internet_gateway to define access from one network (public or private) to another network. The only required element that is needed for the resource declaration is the internet gateway id. If you define the aws_internet_gateway as a data declaration then the name or the vpc_id is required to map to an existing gateway declaration.

resource “aws_internet_gateway” “igw” {
provider = aws.aws
vpc_id = aws_vpc.myNet.id
tags = {
Name = “igw”
environment = var.environment
createdby = var.createdby
}
}

The final element that we want to define is the network security group which defines ports that are open inbound and outbound. In the following example we define inbound rules for ports 80, 443, and 8400-8403, ssh (port 22), and rdp (port 3389) as well as outbound traffic for all ports.

resource “aws_security_group” “cmvltRules” {
provider = aws.aws
name = “cmvltRules”
description = “allow ports 80, 443, 8400-8403 inbound traffic”
vpc_id = aws_vpc.myNet.id

ingress {
description = “Allow 443 from anywhere”
from_port = 443
to_port = 443
protocol = “tcp”
cidr_blocks = [“0.0.0.0/0”]
}

ingress {
description = “Allow 80 from anywhere”
from_port = 80
to_port = 80
protocol = “tcp”
cidr_blocks = [“0.0.0.0/0”]
}

ingress {
description = “Allow 8400-8403 from anywhere”
from_port = 8400
to_port = 8403
protocol = “tcp”
cidr_blocks = [“0.0.0.0/0”]
}

ingress {
description = “Allow ssh from anywhere”
from_port = 22
to_port = 22
protocol = “tcp”
cidr_blocks = [“0.0.0.0/0”]
}

ingress {
description = “Allow rdp from anywhere”
from_port = 3389
to_port = 3389
protocol = “tcp”
cidr_blocks = [“0.0.0.0/0”]
}

egress {
description = “Allow all to anywhere”
from_port = 0
to_port = 0
protocol = “-1”
cidr_blocks = [“0.0.0.0/0”]
}

tags = {
Name = “cmvltRules”
environment = var.environment
createdby = var.createdby
}

}

For the security group the protocol and from_port are the only required definitions when defining an aws_security_group resource. If you declare an aws_security_group data declaration then the name is the only required element. For the declaration shown above the provider and vpc_id to help identify the network that the roles are associated with for debugging and troubleshooting.

This simple video looks at the AWS console to see the changes defined by terraform using the main.tf and network.tf files saved in github.com.

In summary, network definitions on AWS are radically different and more secure than a typical vSphere provider definition with undefined network configurations. Understanding network configurations in Terraform help build a more predictable and secure deployment in the cloud. If you are part of a larger organization you might need to use data declarations rather than resource declarations unless you are creating your own sandbox. You might need to join a corporate VPC or dedicated subnet assigned to your team. Once networking is defined, new and creating things like moving dev/test to the cloud or testing database as a service to reduce license costs. The only step missing from these configuration files are setting up the aws configure and authentication using the AWS CLI interface. Terraform does a good job leveraging the command line authentication so that the public and private keys don’t need to be stored in files or configuration templates.